Hello user!
We, at Angel One, are glad to serve you in your trading/investing journey.
In the following article(s), we will share with you each and every detail about how to operate our new Super App. Simple, transparent, and reliable - it is the most user-oriented online platform available to Indian traders today. In the subsequent chapters, we will go over the various sections of the Angel One app categorised as per their functions, thereby covering 6 chapters in total -
- Getting Started
- Home
- Watchlist
- Portfolio
- Orders
- Account
Let us now start this learning journey by describing how to set up and operate your Angel One account.
How to Open an Angel One Account
Opening a demat and trading account with the Angel One app is a simple process that barely takes five minutes. The following are the steps that you need to follow in order to activate your Angel One demat and trading account:
Step 1: Download the app
You can download the Angel One app from iOS or Google Play. Simply go to the respective app store, search for ‘Angel One’, and start the download. Note: You can also perform your Angel One KYC on the web version of the app. You can also begin the application process through a referral link.
Step 2: Registration
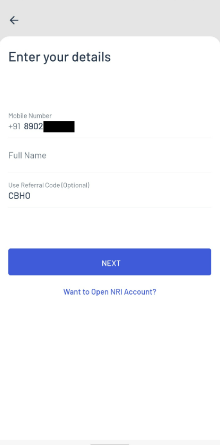
- Open the app and click on ‘SIGNUP’ to start the account opening process.
- Enter your mobile number (for all future communications). The mobile number must be unique, i.e. there should be no prior Angel One accounts with that number.
- In case you are signing up based on a referral, you can also enter an optional referral code at this point. If you have used a referral link for downloading, then the referral code will be shown here already - you can edit it at this stage.
- Once you are done, click on ‘NEXT’.
- An OTP will thereafter be sent to that number for confirmation.
- Once the OTP is confirmed, you can then enter the email ID that you want to register with. You can do so by either clicking directly from the list provided or clicking “Add another account” and then entering it yourself manually.
- In case you enter your email ID manually, an OTP will be sent to the email address which you have to enter within the next 30 minutes, in order to confirm your email ID.
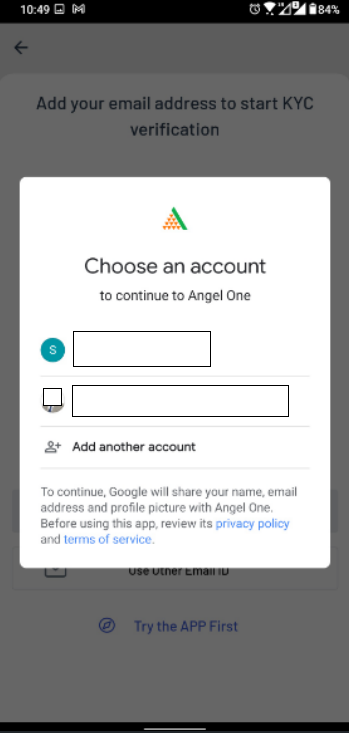
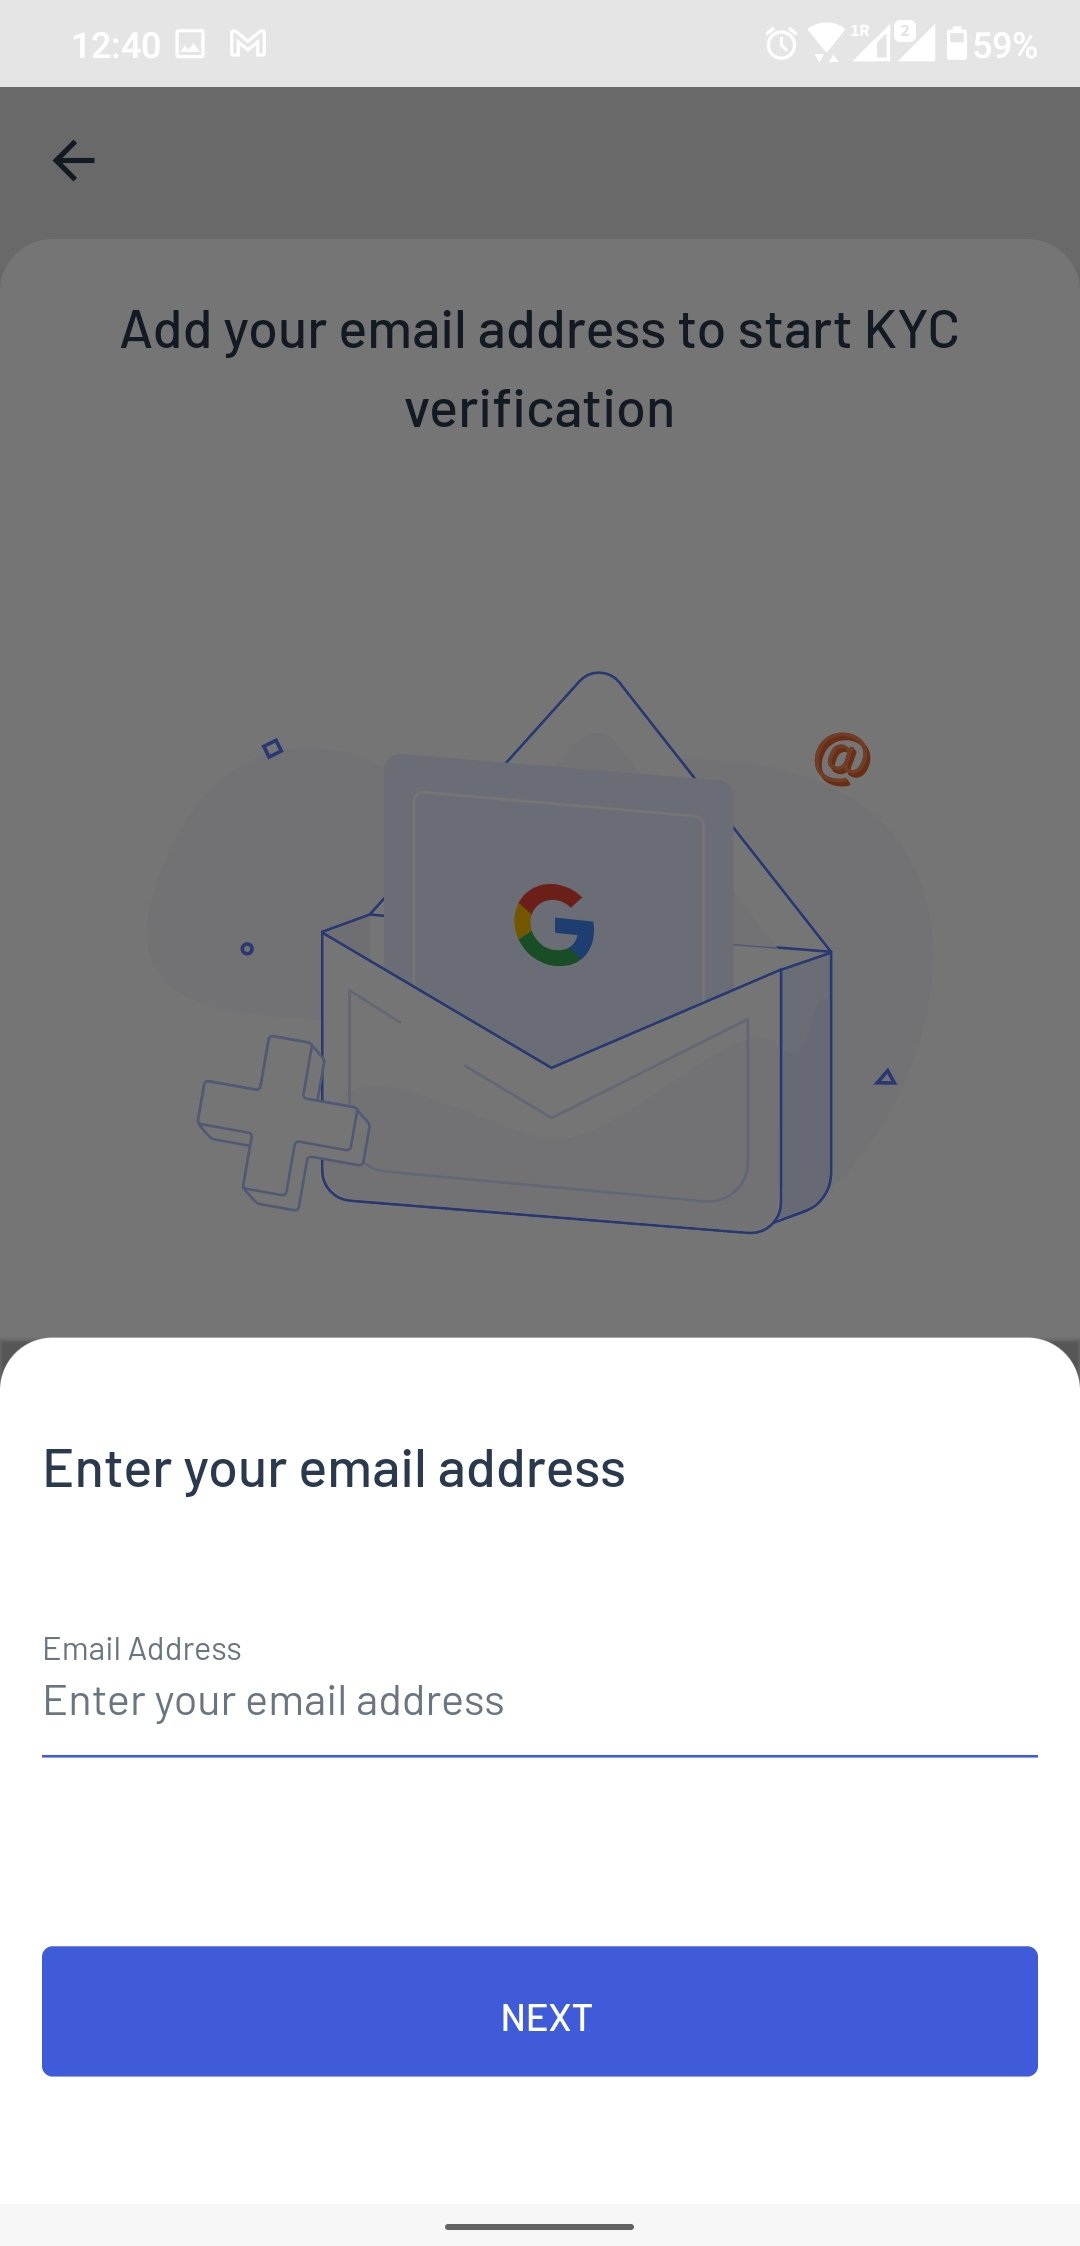
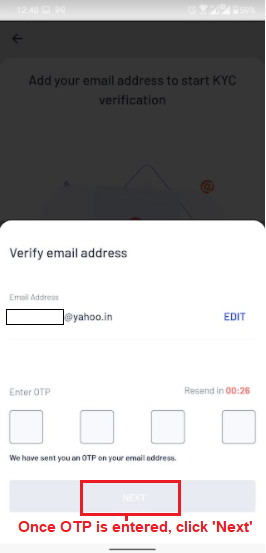 Figure: Choose an email account (left), enter email address manually (middle) and enter OTP for email confirmation (right).
Step 3: Complete Your KYC Journey
At this point, your KYC (Know Your Customer) process begins. It is mandatory to verify your KYC for trading in equities. Here are the ways in which you can complete your KYC -
- If your Aadhaar is linked to your PAN and mobile number, then you can skip uploading your PAN and Aadhaar documents or manually entering the details of the latter.
- If the above documents are not linked then you have to manually upload your Aadhaar and PAN documents.
Here is a table that more clearly describes the process as per your Aadhaar-PAN-mobile no. linking status -
| Status of PAN, Aadhaar and Mobile number | Your KYC journey |
| Aadhaar linked to both mobile number and PAN | Follow the new simplified KYC Journey (i.e. zero uploads) |
| Aadhaar linked to only mobile number and not PAN |
|
| Aadhaar not linked to mobile number |
|
| Aadhaar not available | KYC is then not possible online. |
If your Aadhaar is linked to both your PAN and mobile number, then you can have your PAN and Aadhaar details fetched from your Digilocker. You just have to - 1. Enter your PAN number and Father’s name in the required boxes. Then click on ‘SUBMIT’. 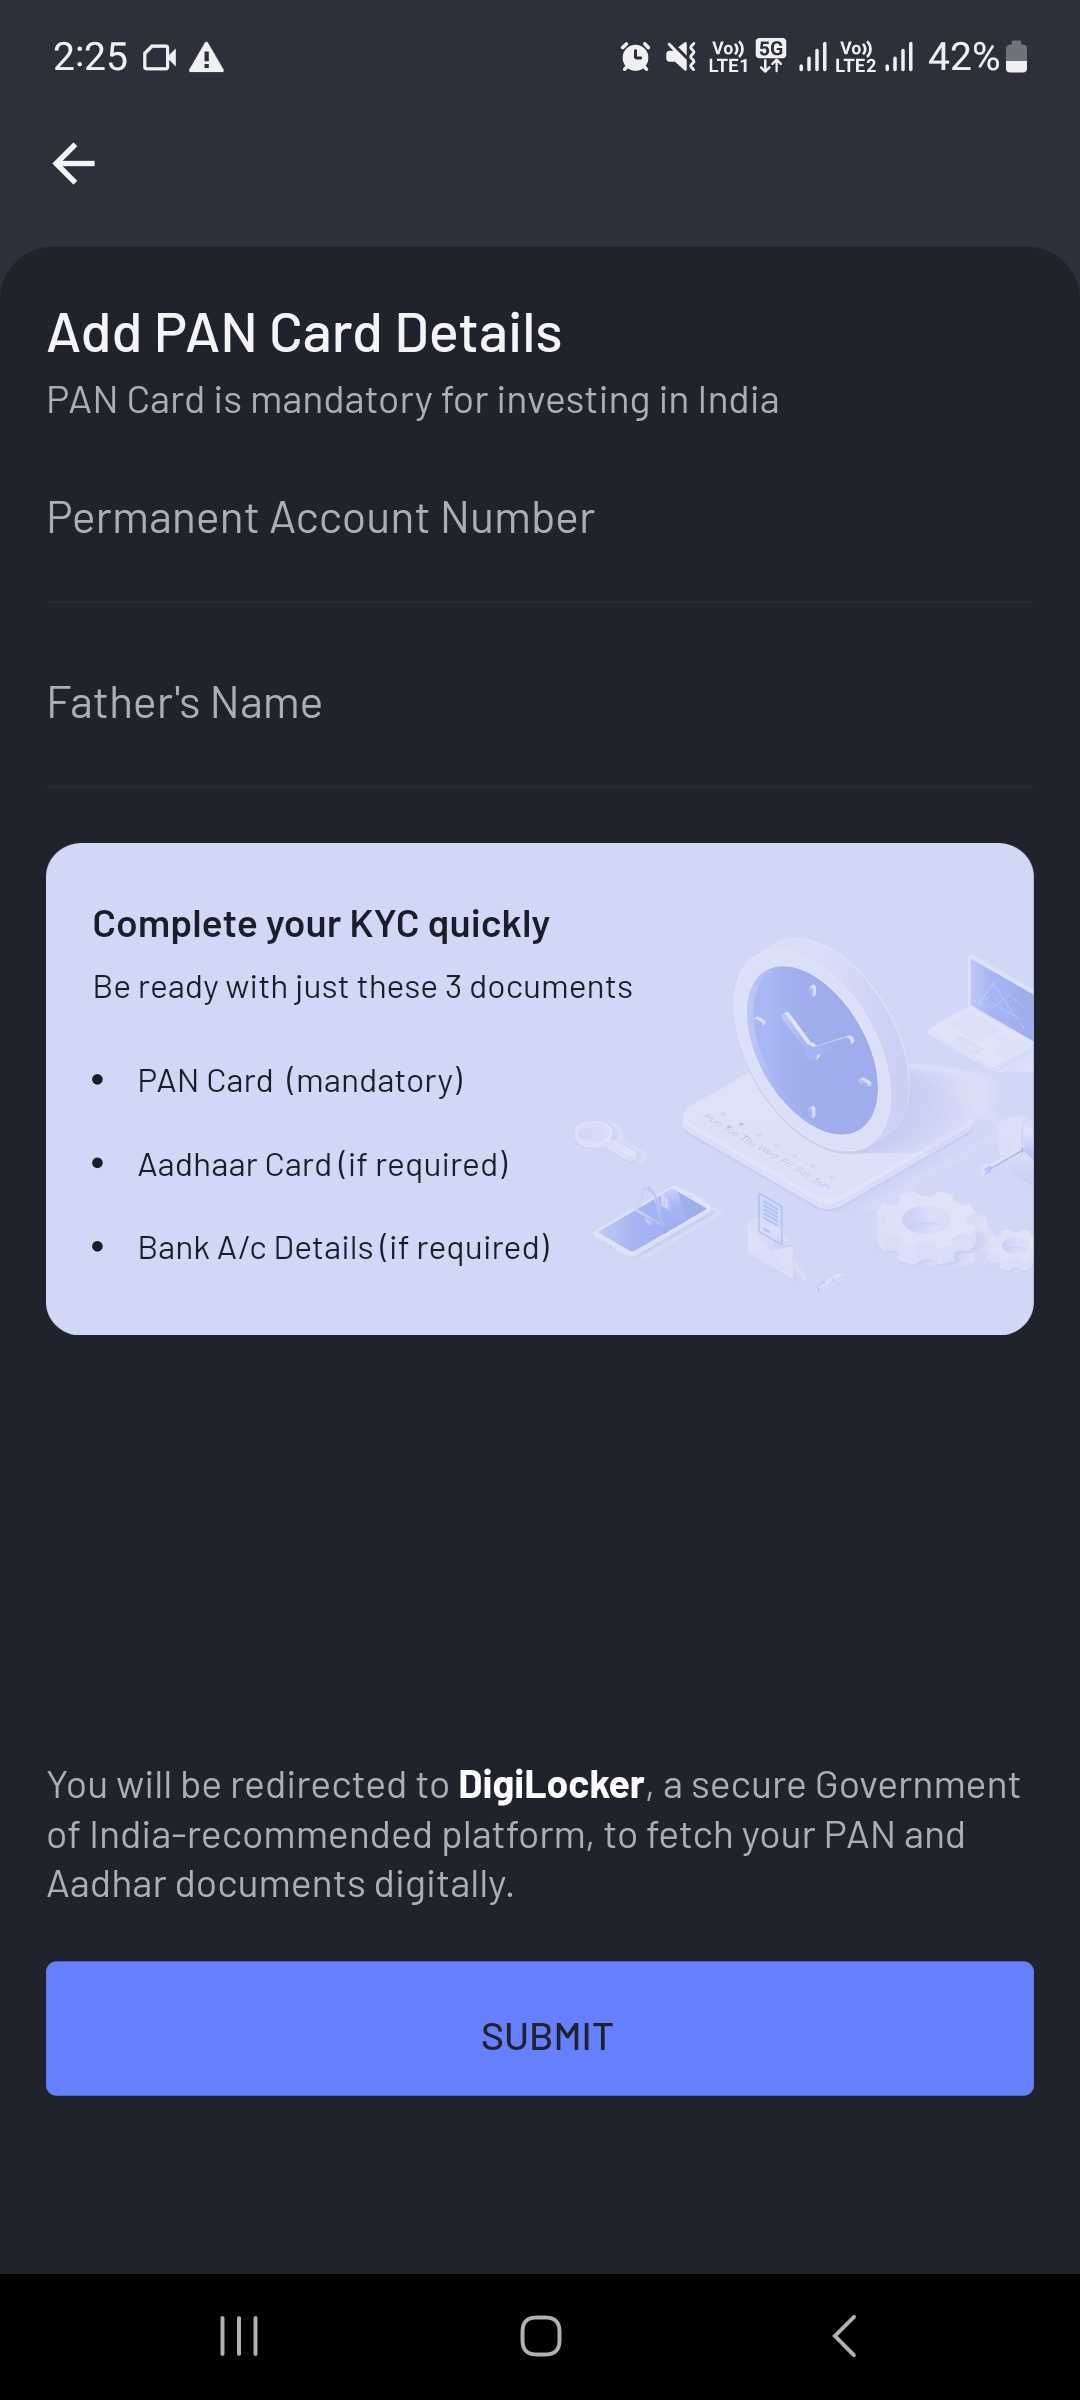 2. On the next page, confirm your consent to allow Digio to fetch your personal details (like name, Aadhaar number and date of birth) from Digilocker and transfer it to Angel One. Just check the box below and click on ‘Authenticate Aadhaar’. 3. For Aadhaar authentication, enter your Aadhaar number and perform the CAPTCHA authentication (i.e. entering the text in the image). 4. Enter the OTP sent to your registered mobile number from UIDAI - this OTP will be valid for 10 minutes only. 5. Once the OTP is confirmed, enter your 6-digit Digilocker security PIN. In case you forgot your security PIN, just click on ‘Forgot Security PIN?’. Enter your date of birth and you will be allowed to reset your PIN. 6. Confirm your consent to let Digiotech fetch your documents from Digilocker by clicking on ‘Allow’.
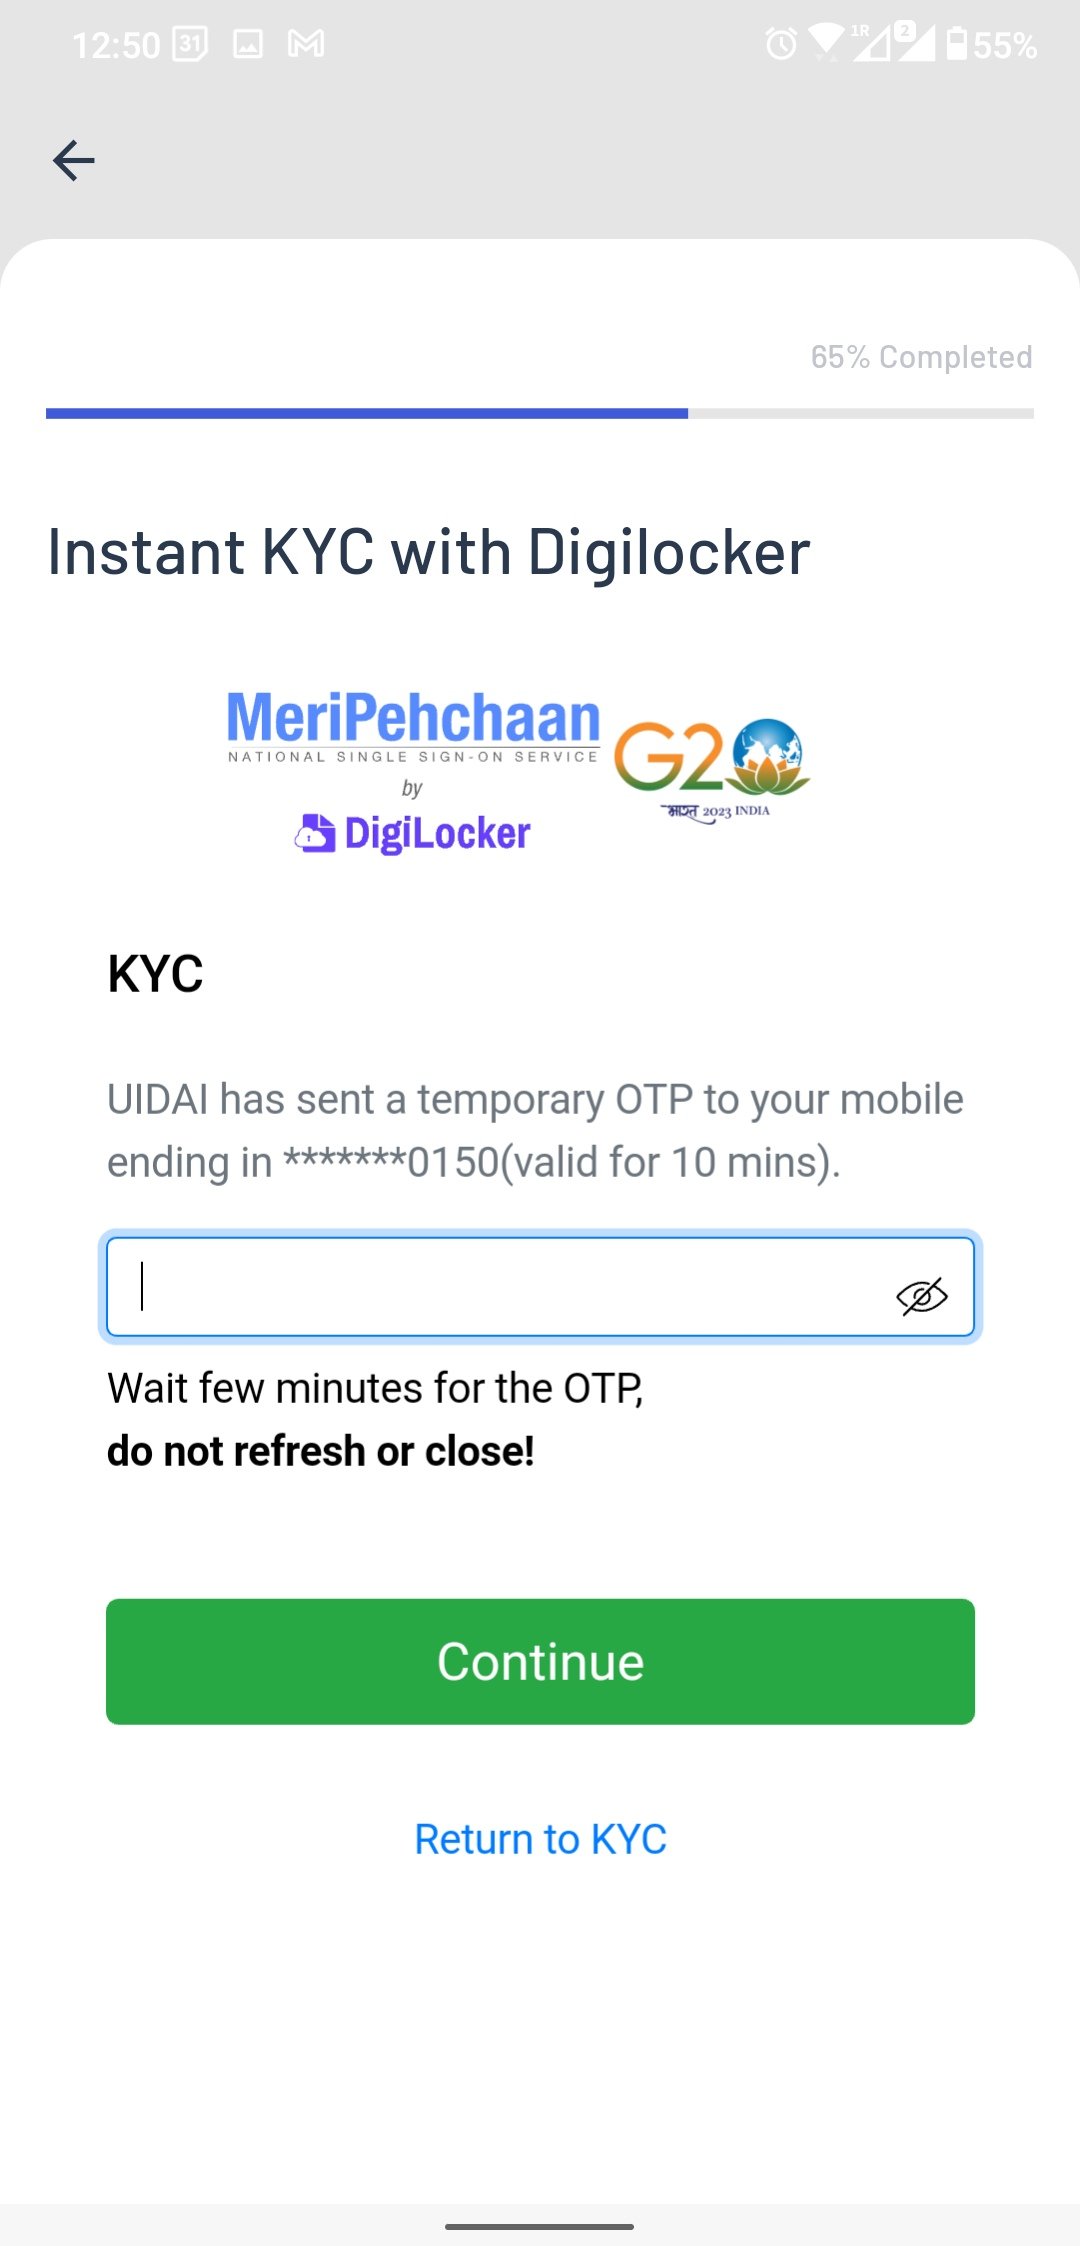
 Figure: Enter Aadhaar no. and captcha (left), then enter mobile OTP (middle), then enter your 6-digit Digilocker security PIN (right) after which you only have to click “Allow” to allow sharing of the documents for KYC 7. Your PAN and Aadhaar data will have now been submitted and you will be redirected to finish the rest of your account opening process. You can read about the process and importance of this feature, along with detailed screenshots in this blog. You will be prompted to upload PAN manually in the following cases -
- You entered the wrong Aadhaar number
- Your mobile number is not linked with AADHAAR
- You have denied permission to Digilocker to fetch your details.
In these above cases, you will have to upload both your PAN and Aadhaar details.
3.1. How to upload PAN?
1. Take a picture of the PAN card - For this, first you press “Click a picture”. Then you just have to keep the PAN card within the frame, click the blue button beneath and the picture will be taken. You can use flash while taking the photo by clicking the lightning icon. 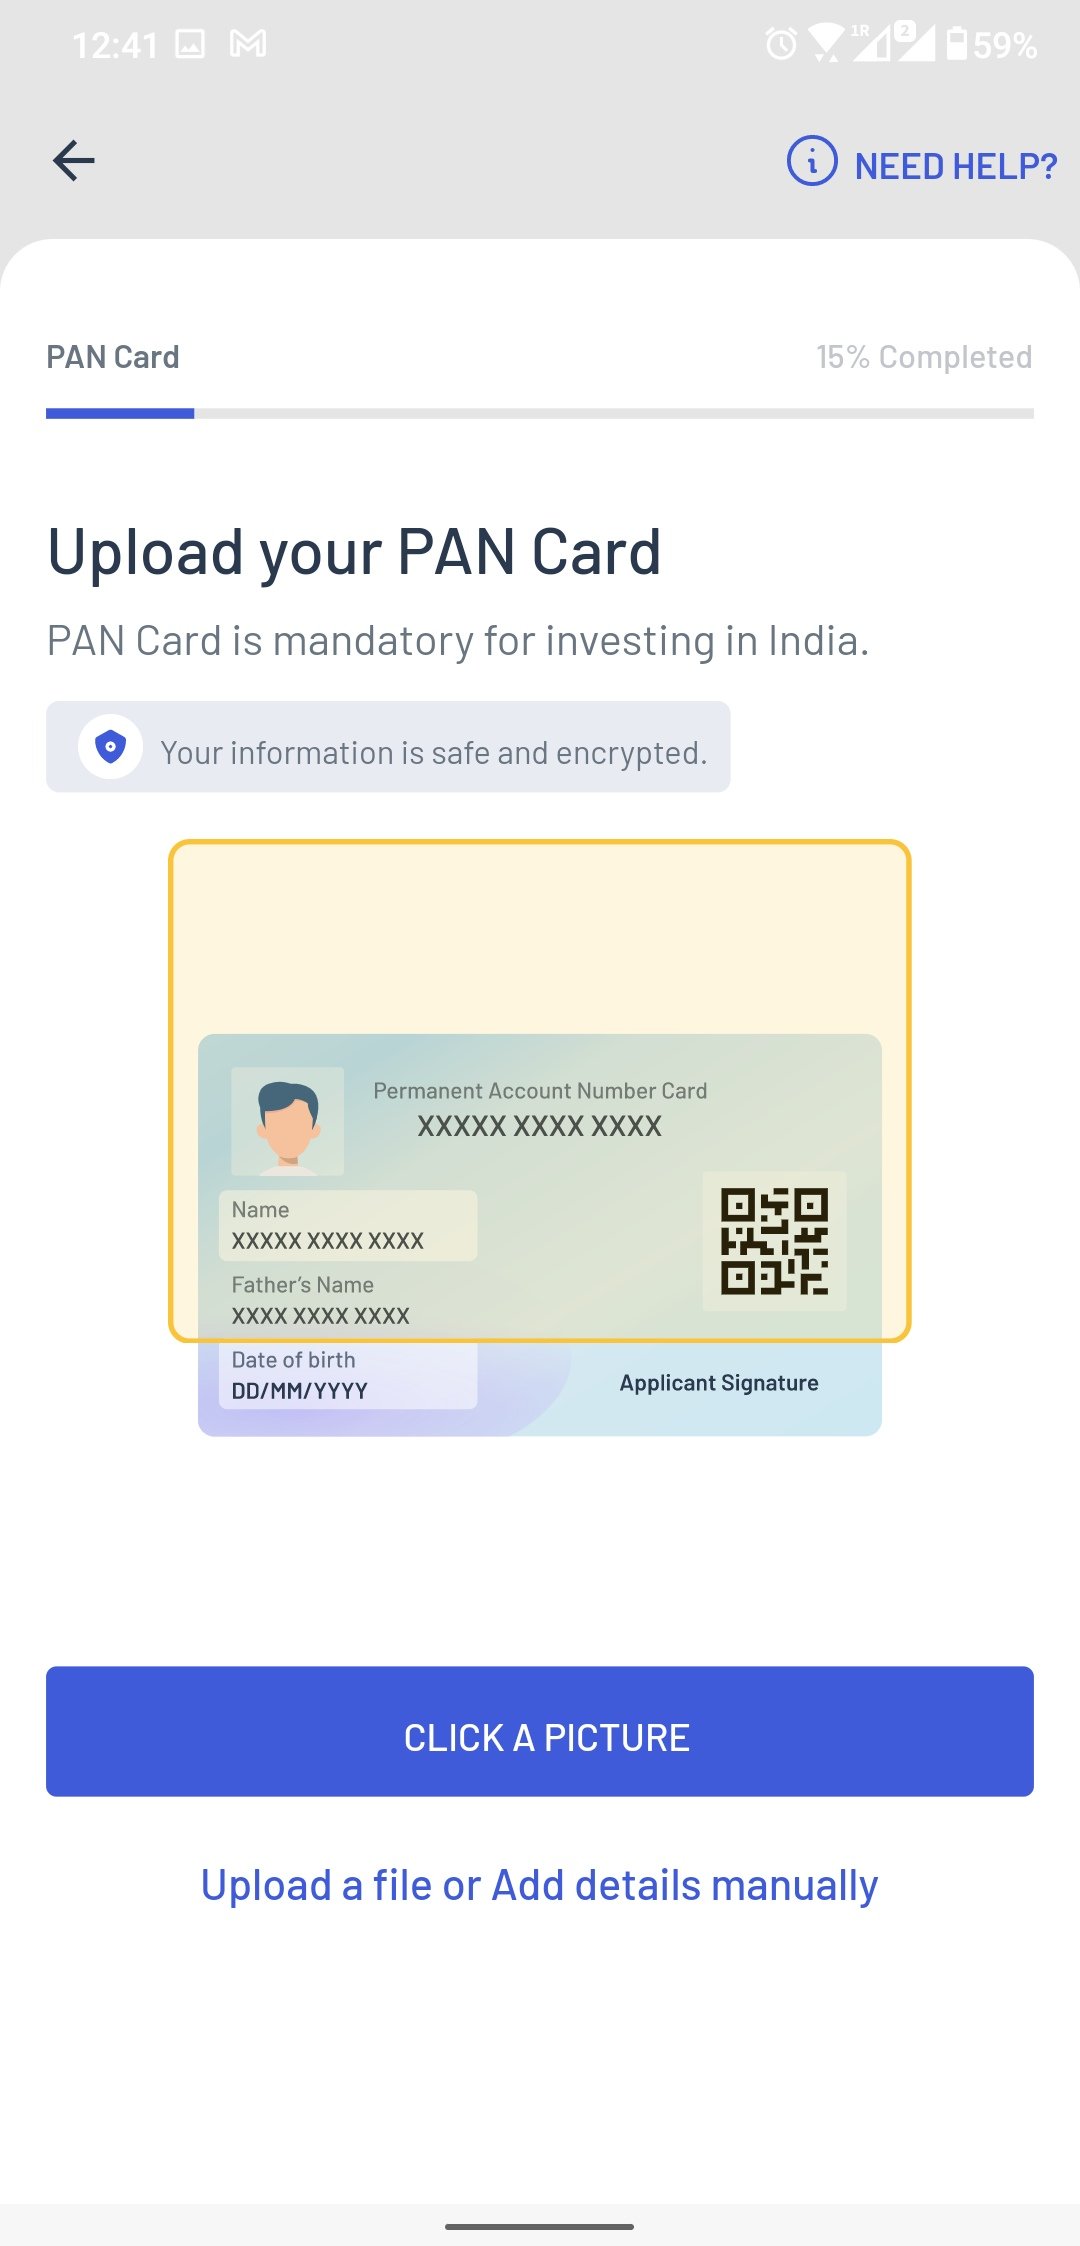
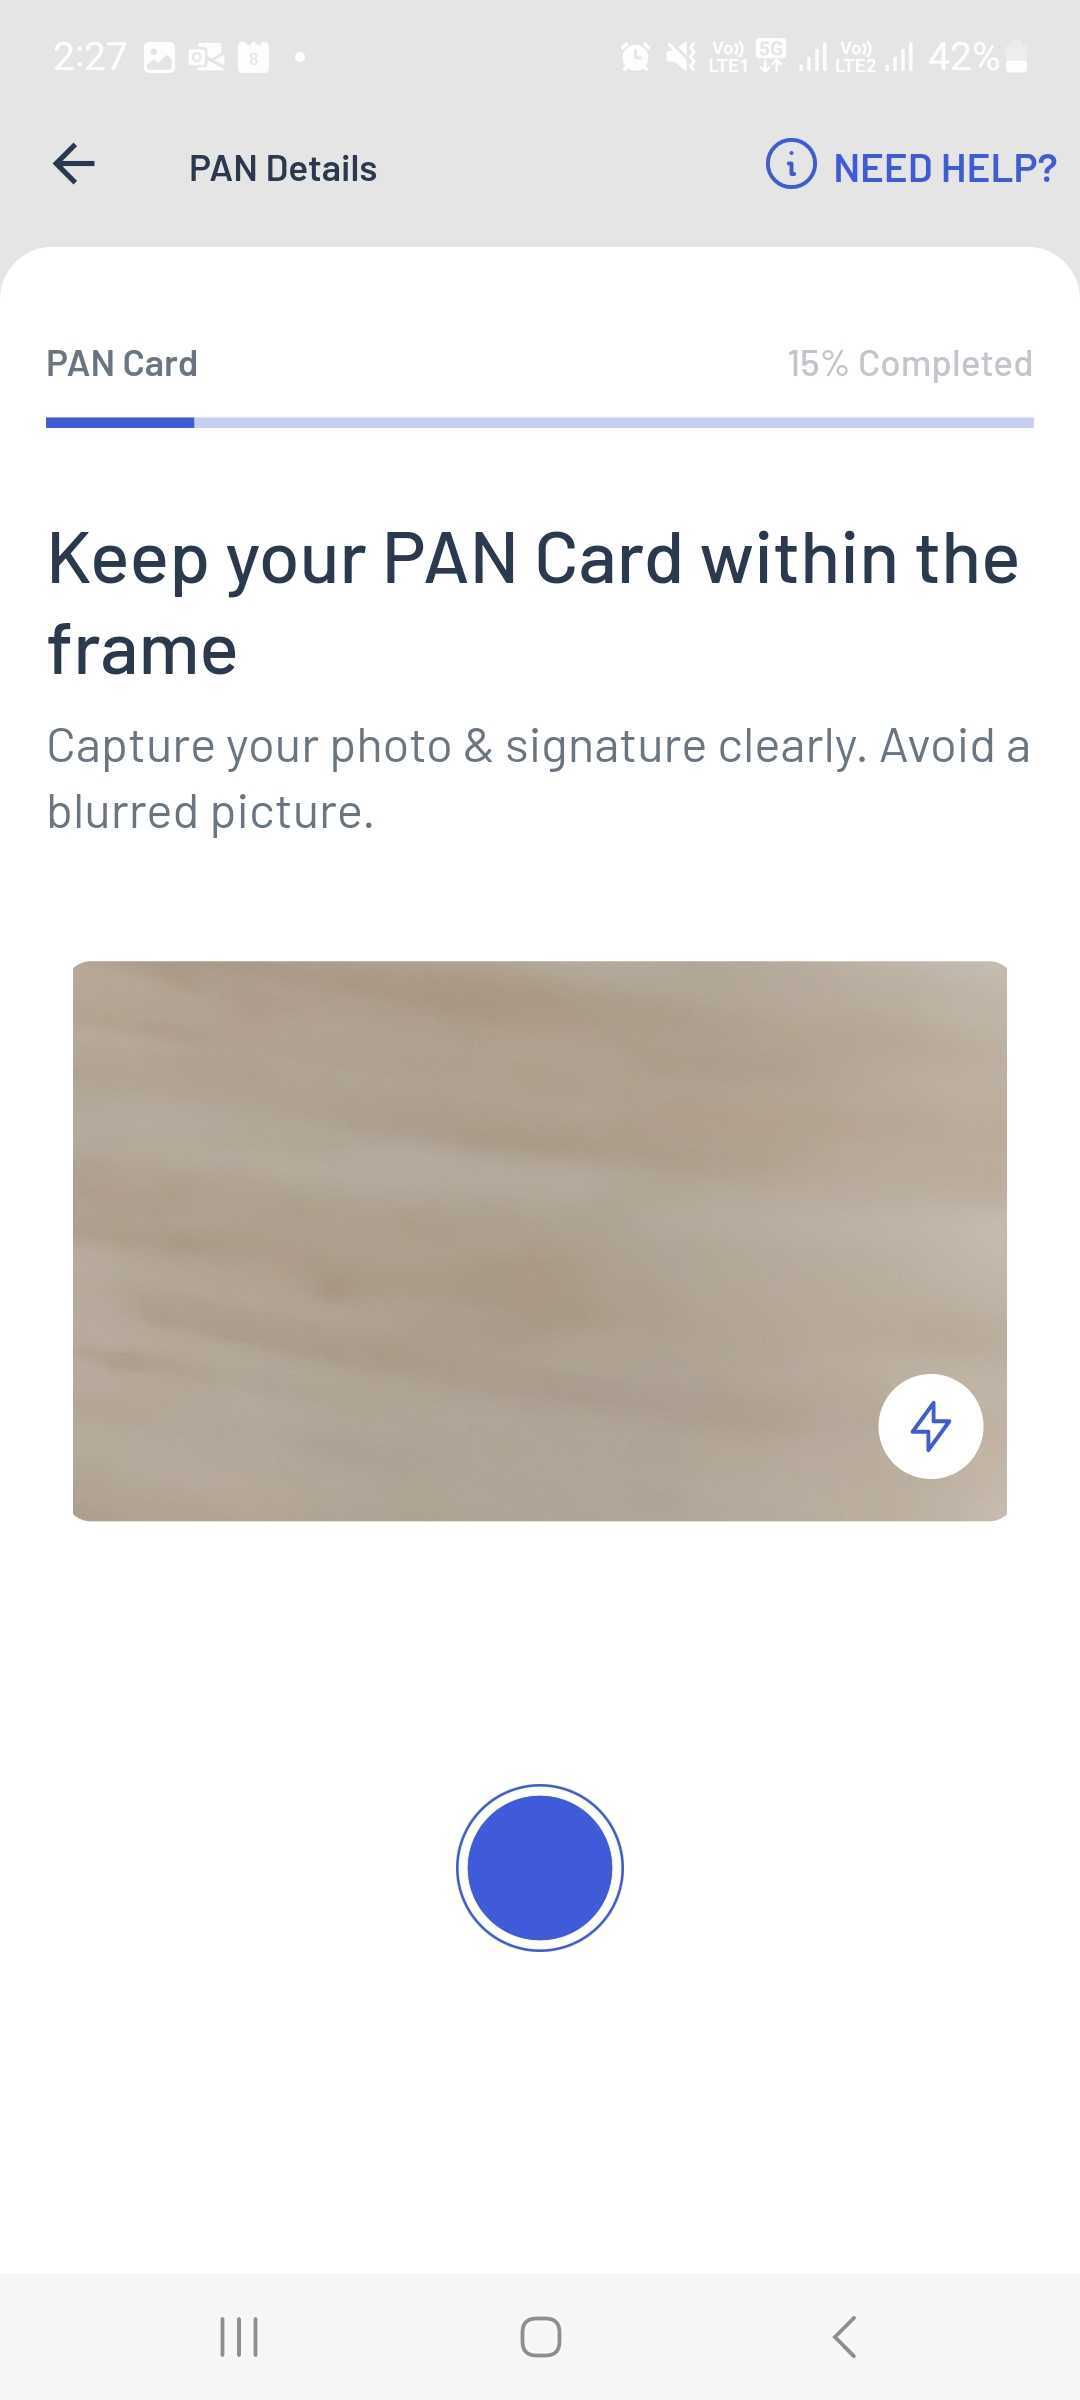 Figure: Upload PAN by clicking a picture.2. Upload a scanned copy of the PAN card - For this click “Upload a file or add details manually” and on the next page, click the upward arrow to upload the scanned copy. Note: The uploaded image must be a .jpg, .jpeg, .png file only and within the size of 5 MB.
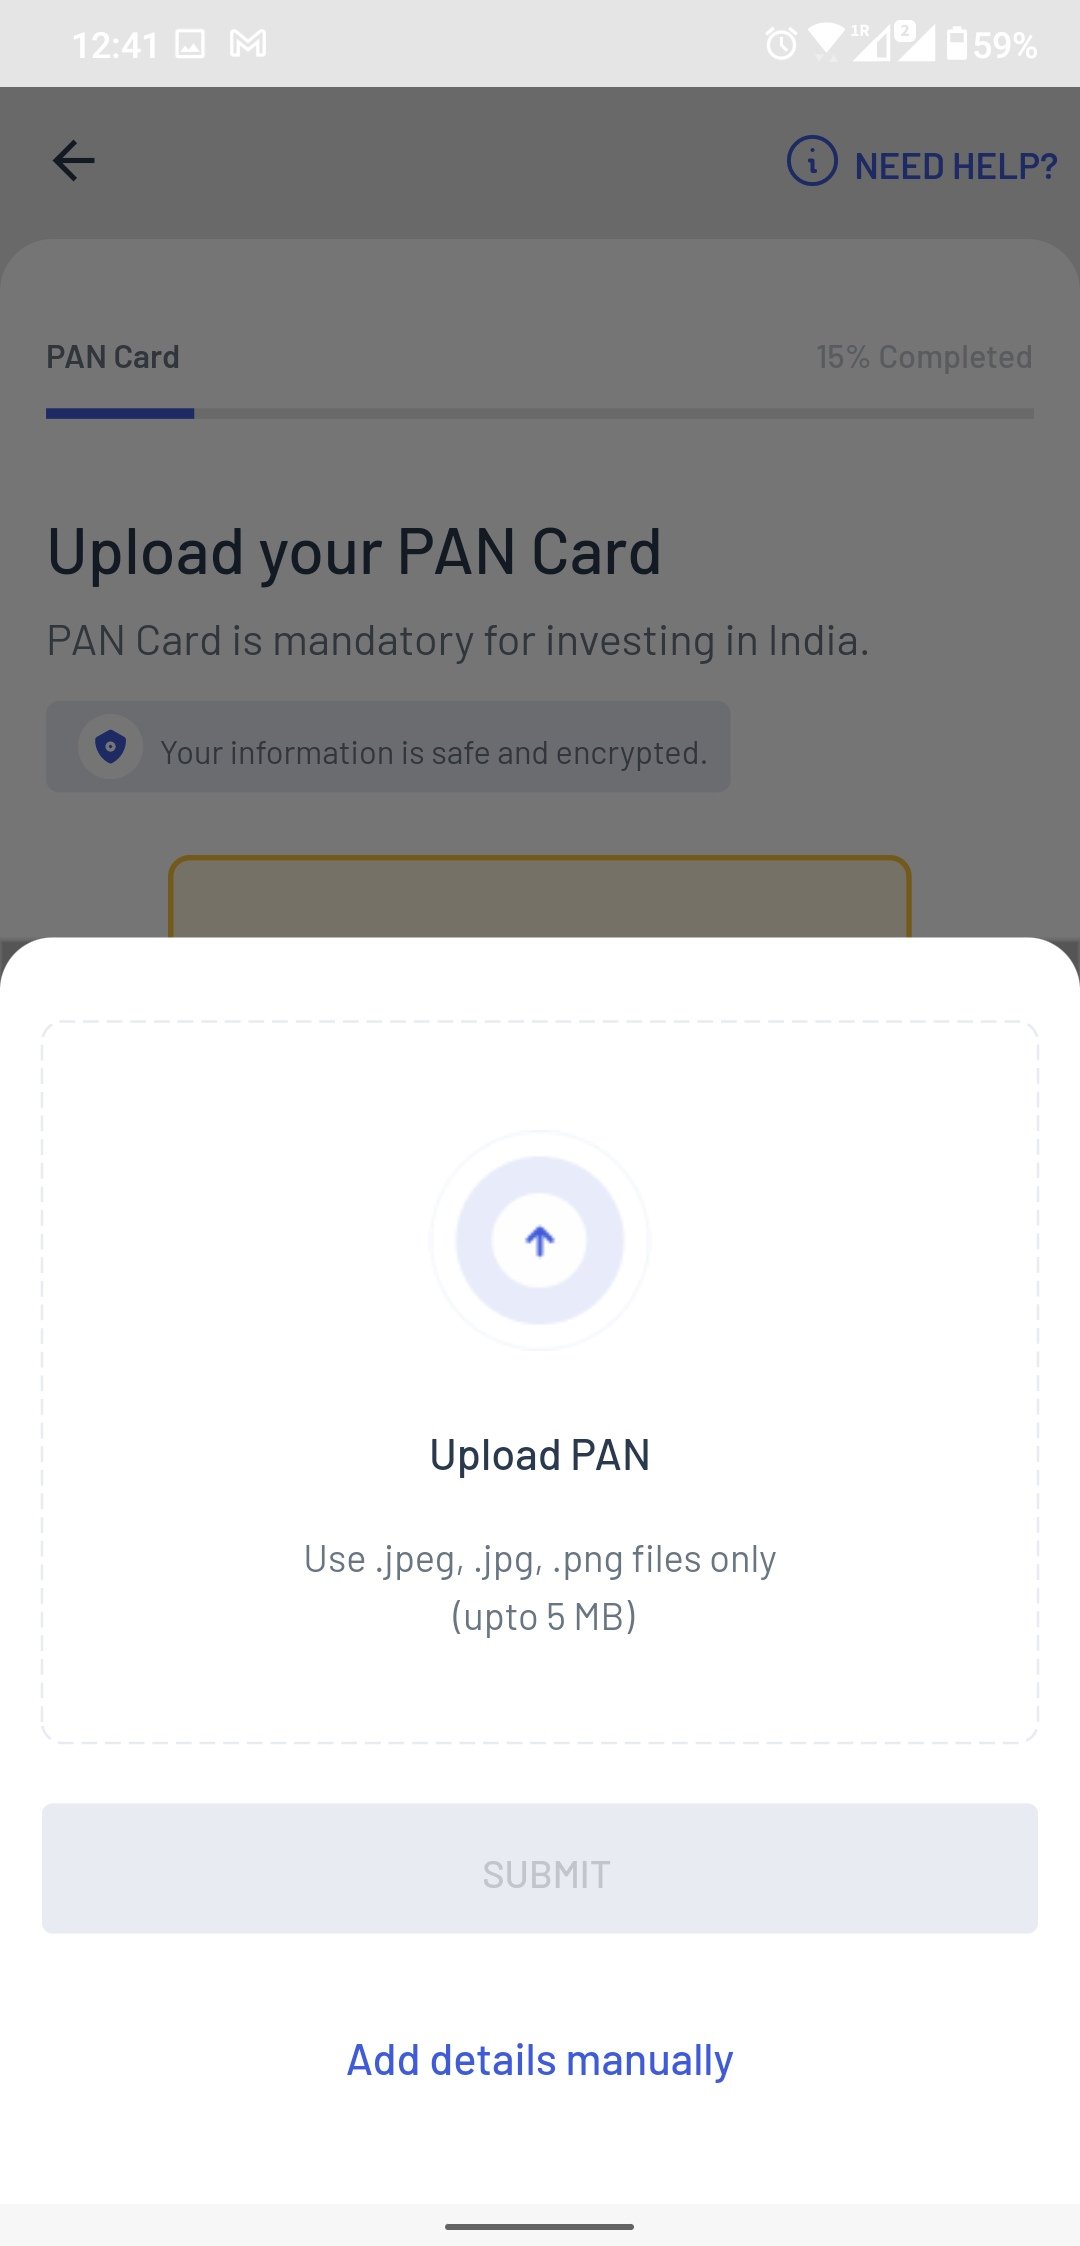
3.2 How to Upload Aadhaar?
If your mobile number is not linked to your Aadhaar card, you will be asked to upload pictures of the front and back of your Aadhaar card by clicking the pictures or by uploading existing pictures of the same in your gallery. If you are uploading pictures from your gallery, then only .jpg, .jpeg & .png files are accepted, with a maximum file size of 5 MB for each side. If the pictures uploaded are unsatisfactory, then you can manually enter your Aadhaar card details (i.e. Aadhaar number and address) by clicking on “Enter details manually”. 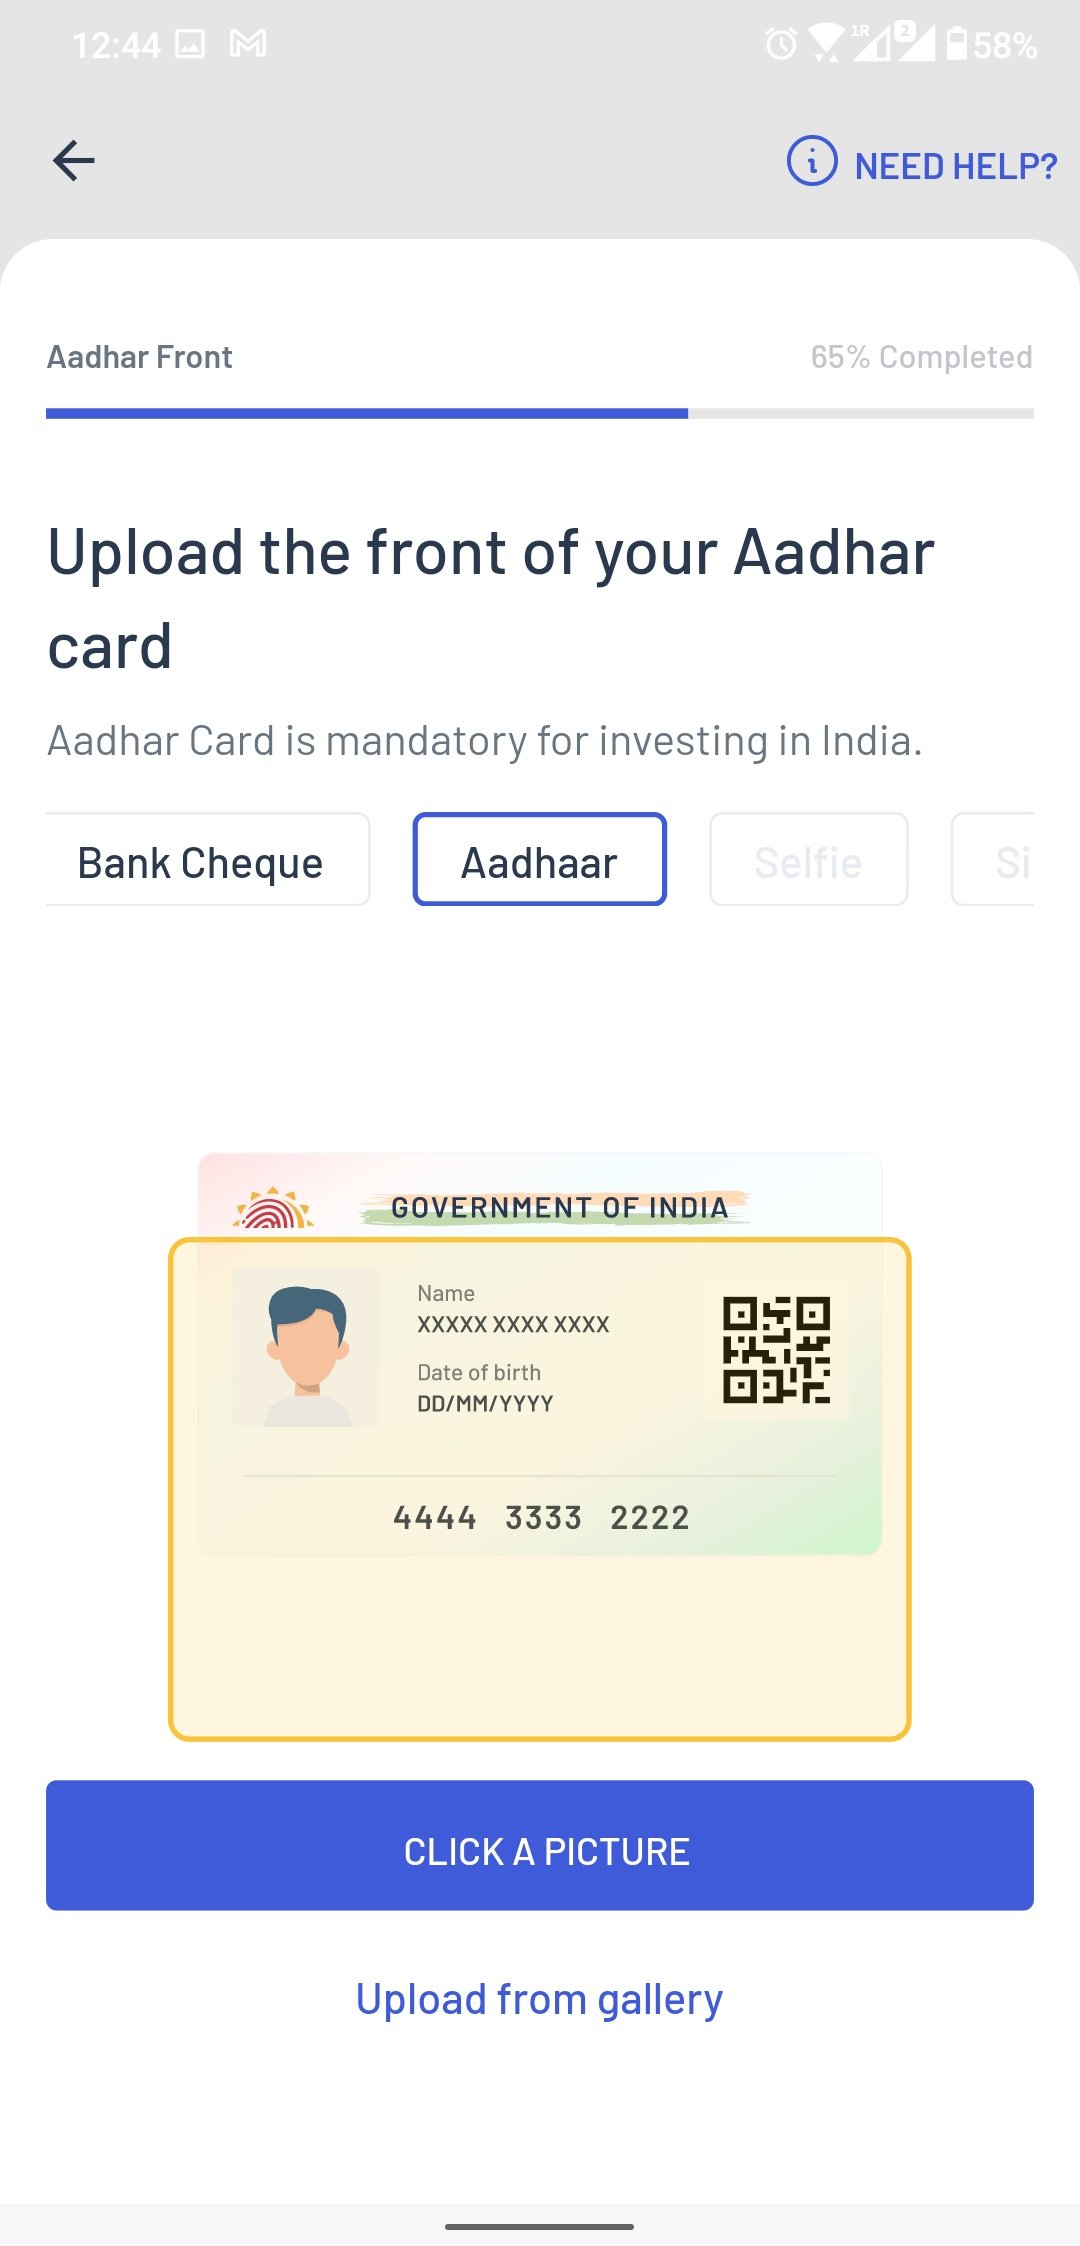
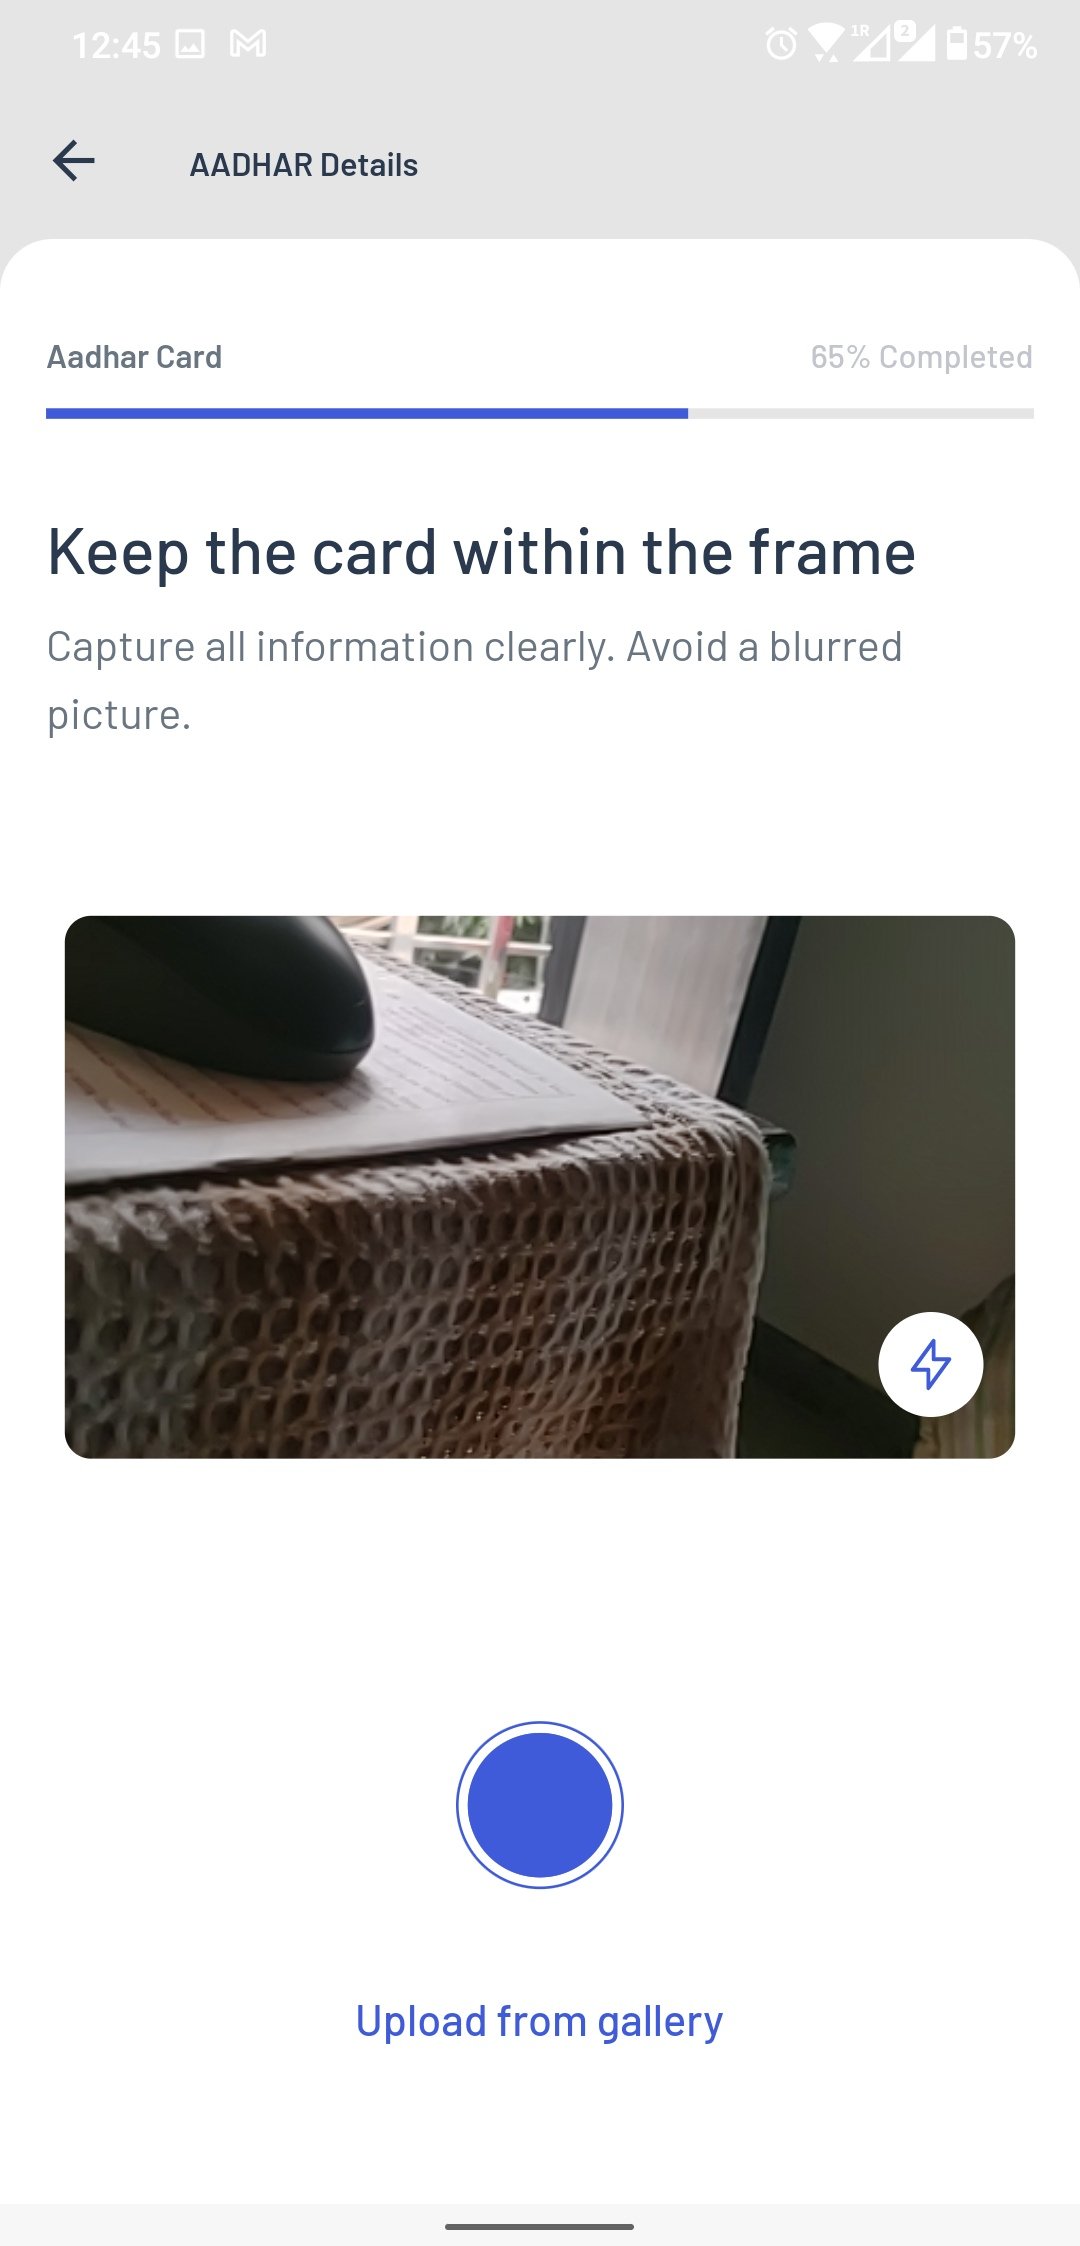
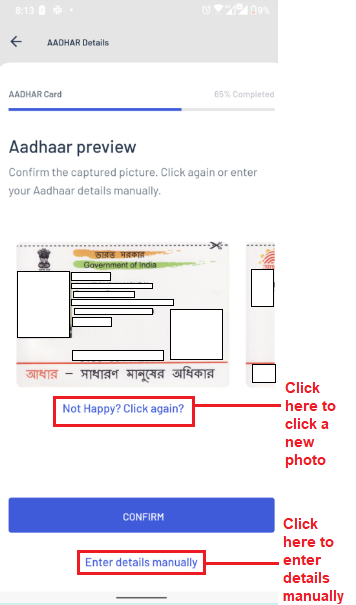 Figure: Clicking Aadhaar picture, upload Aadhaar picture from gallery or enter details manually.
Step 4: Fill in Your Bank Account Details
In order to enter your bank account details, follow the below steps: 4.1. Enter your bank account number and confirm it. Then enter the IFSC Code of your account. 4.2. If you cannot remember your IFSC Code, you choose the IFSC Code from a dropdown that opens when you start typing out your IFSC Code. 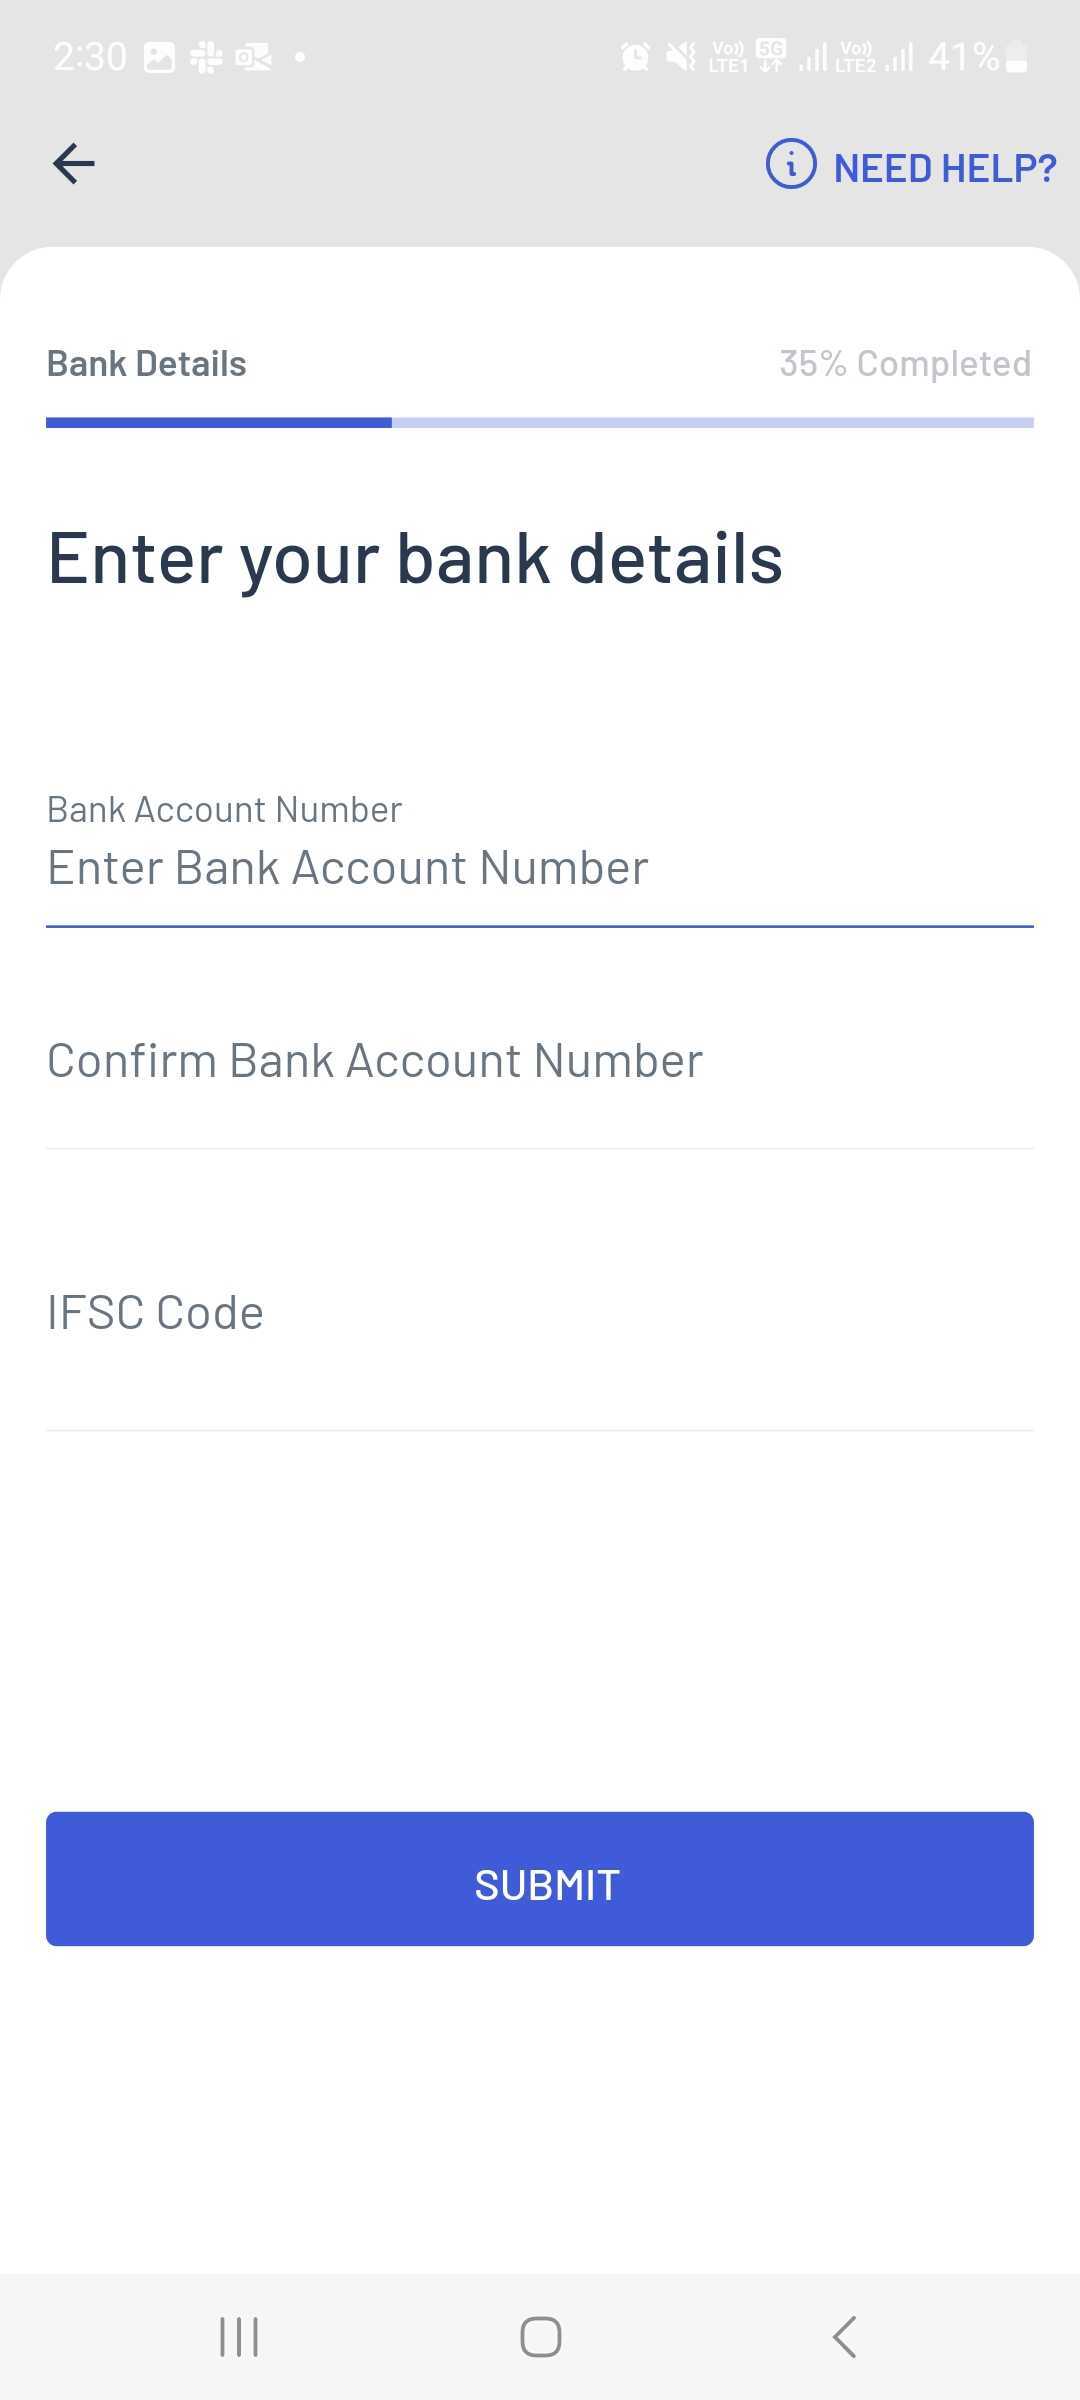
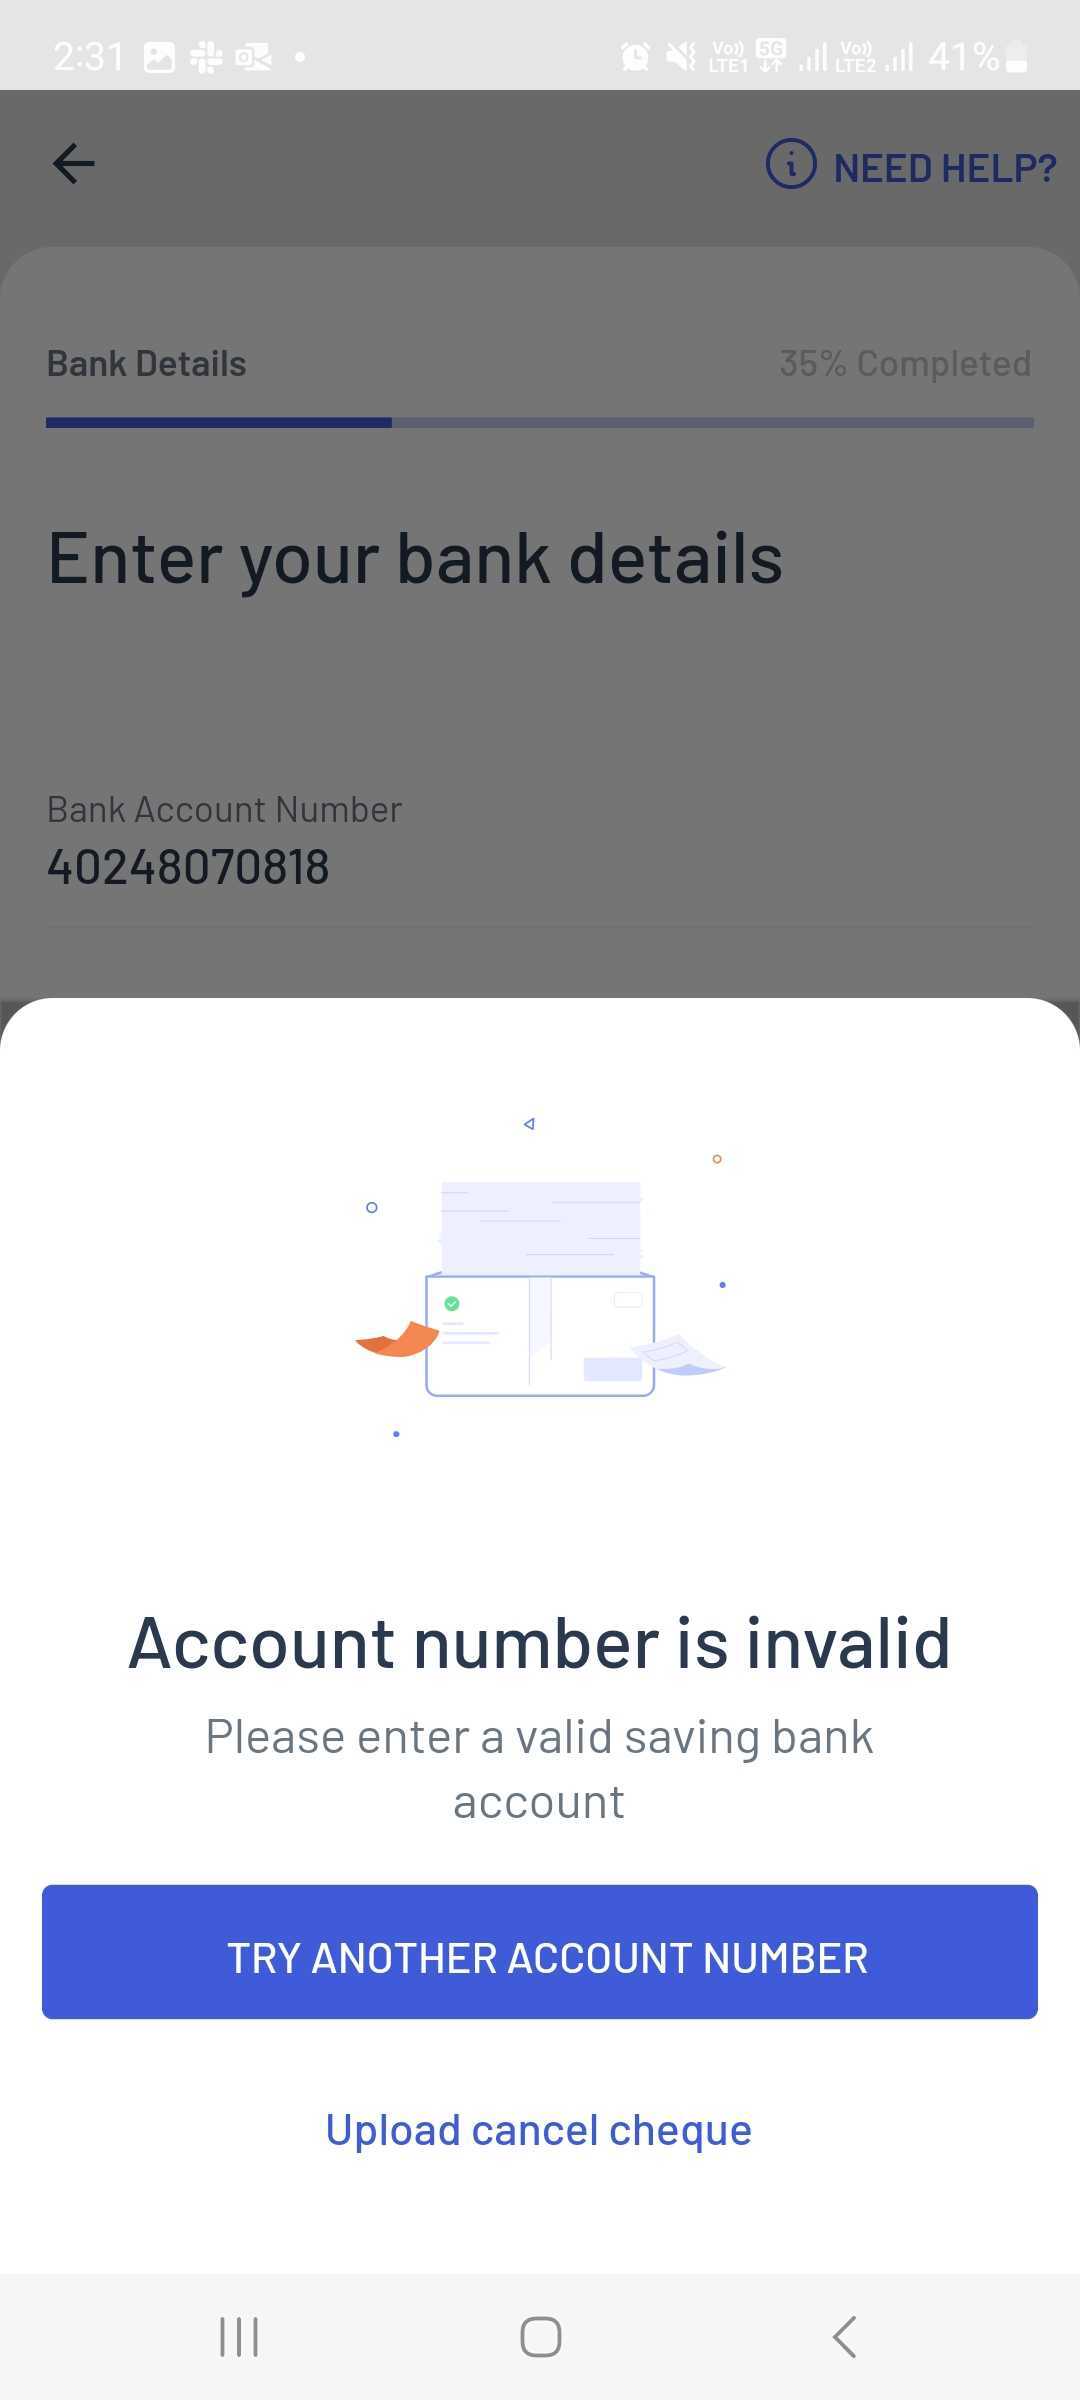 Figure: Enter your bank account details (left), and try another bank account (right). 4.3. Once you click ‘SUBMIT’, Angel One will deposit ₹1 into your account to verify it. In case the account number entered is invalid, you can either use another valid account number or upload a scanned copy of a cancelled cheque of that same bank account. If you choose to upload a scanned copy of a cancelled cheque, the file must be .jpg, .jpeg, .png with file size of up to 5MB. We will then verify the account details.
 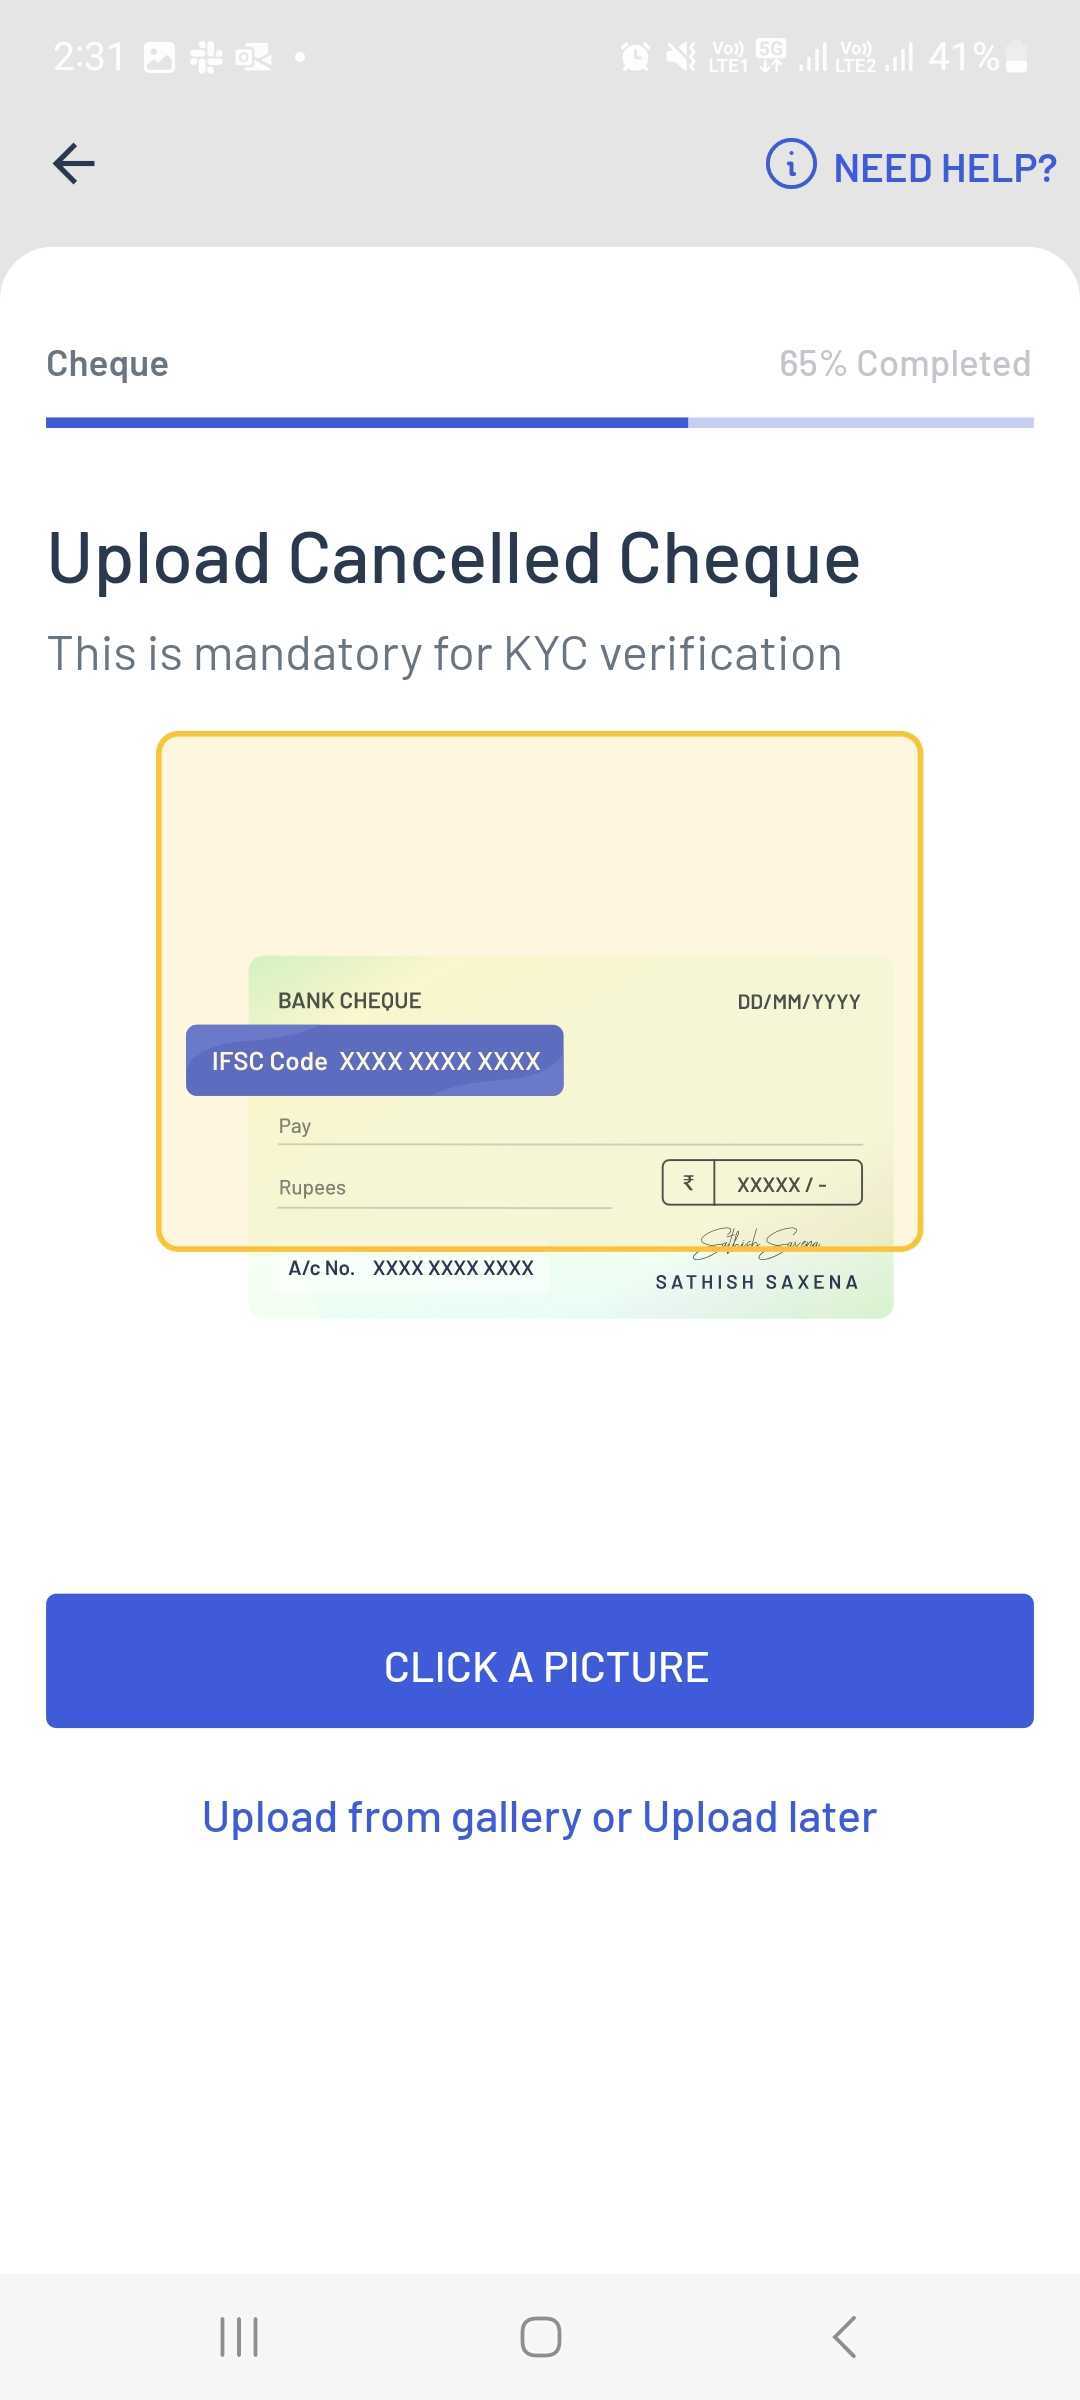 Figure: Upload Cancel Cheque by clicking or uploading from gallery.
Step 5: Take Your Selfie.
Place your face within the circle and click the camera icon to take the selfie.
Step 6: Enter your signature
Finally, you will have to upload a signature. There are 3 ways to do so -
- Enter your digital signature afresh by signing within a dotted rectangle on the phone screen. If you think the signature is not good enough, you can do it again by clicking on ‘Do it again’.
- Click a picture of your signature on a white paper and upload it.
- Upload an existing scanned copy or picture from the gallery on your device by clicking on “Upload from gallery”. File types accepted include .jpg, .jpeg & .png files of maximum 5 MB size.
Once you are done with the signature, you also have to put ticks on the checklist that confirms that you are not a politically exposed person and that you are a resident of India. 
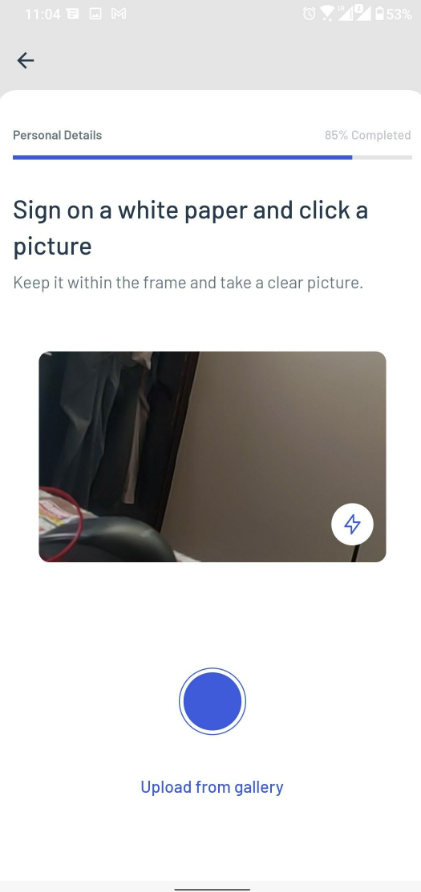 Figure: Sign your application within the dotted line (left) or take a picture of your physical signature (right). There are a few further steps that you can also undertake in order to add a few more features to your Angel One account.
Step 7: Activate Derivatives
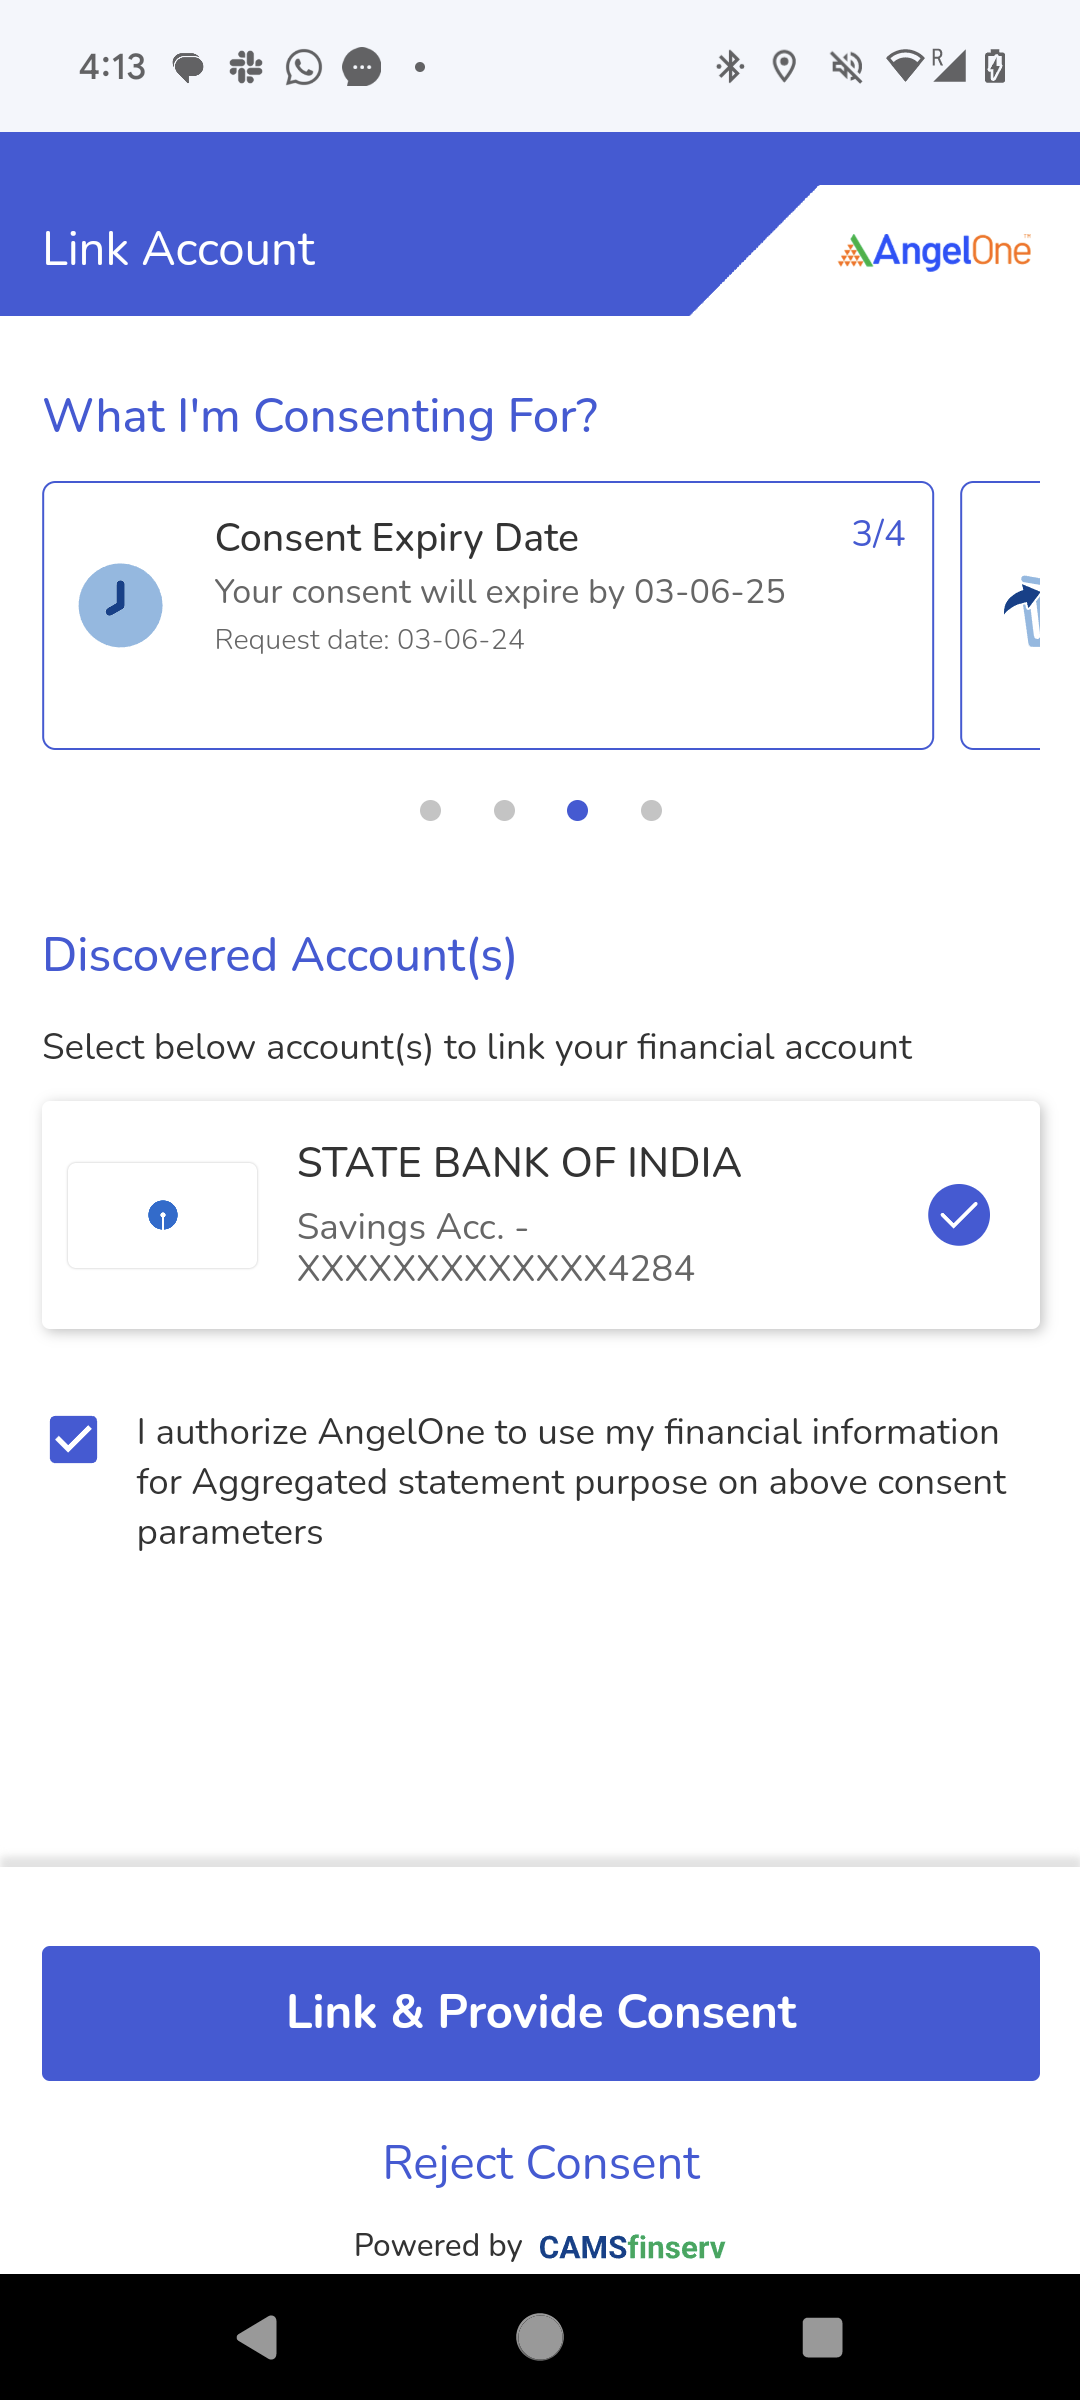
Once you complete your signature, you will be redirected to derivatives activation step, which is optional. You will be redirected to the screen for automatic fetching of bank account statement or the screen for manual document upload, depending on the bank account you entered. 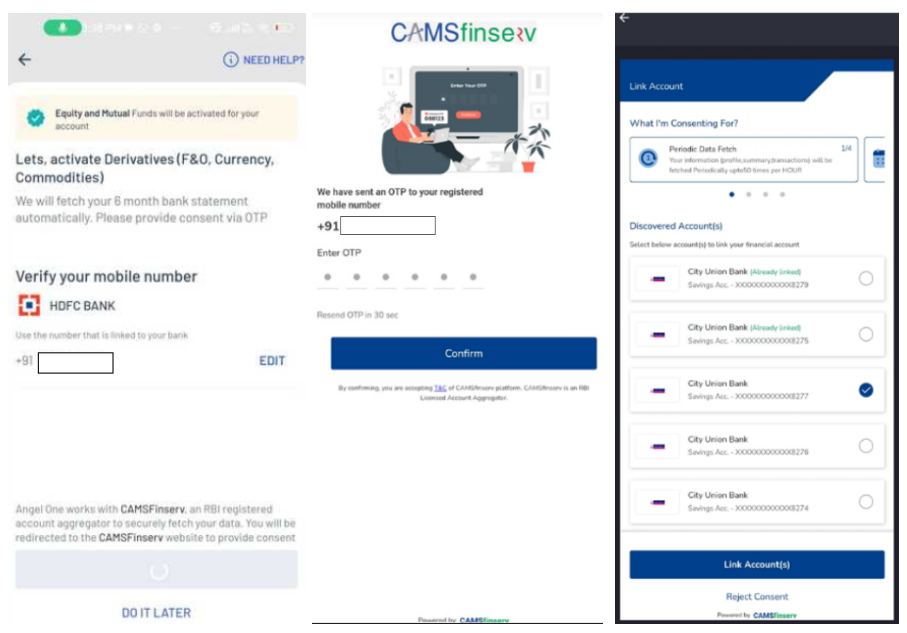 Once you click on ‘Proceed’ you will be redirected to the CAMSFinserv Journey:
- Simply enter an OTP sent to your mobile number linked to the bank account.
- Then choose the account to link and click on ‘Link Account(s)’. Make sure, that bank account is atleast 6 months old. This will allow us to fetch your bank account statement for the previous 6 months.
Note: The bank account you choose for fetching the 6 month statement can be different from the account that is connected to your Angel One account. In case the Bank is not available with the CAMSFinserv you will be redirected to choose any one income proof document out of -
- Bank Statement (previous 6 months)
- Passbook (previous 6 months)
- ITR (previous financial year)
- Form 16 (previous financial year)
- Salary Slip (previous month)
- Latest Demat Account Holdings Statement
Note: Document types accepted include .pdf, .jpeg, .jpg & .png files of upto 10 MB maximum. In case the file is password protected, provide the password when prompted. If you do not activate derivatives at this point you can still activate it later.
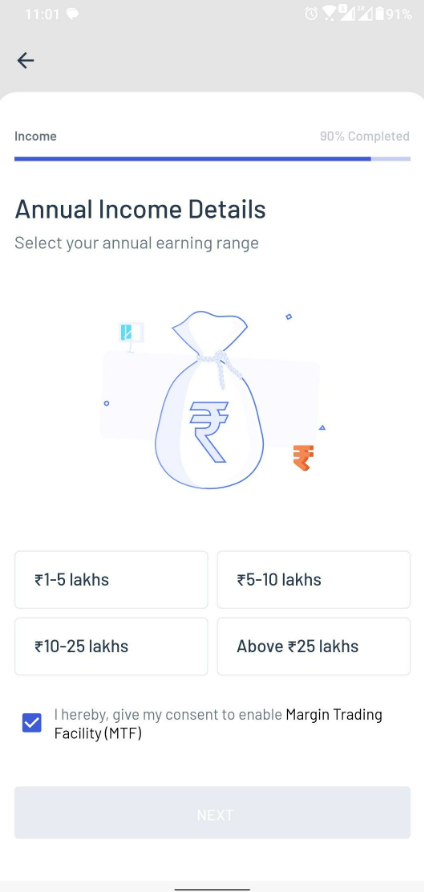
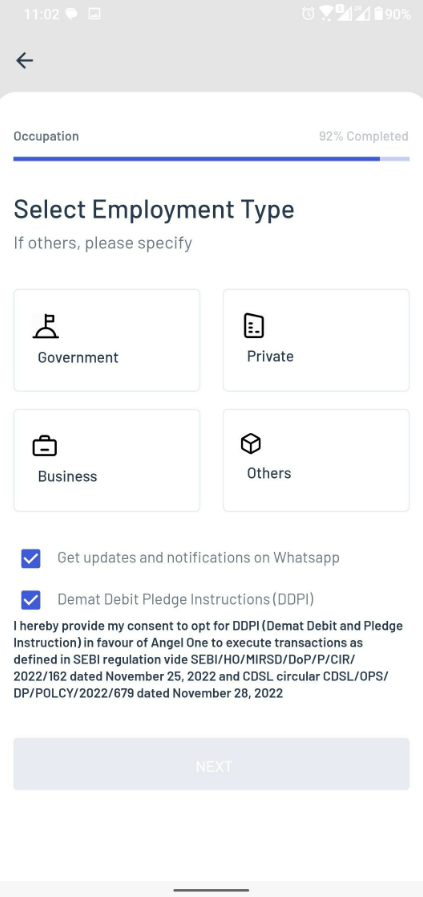
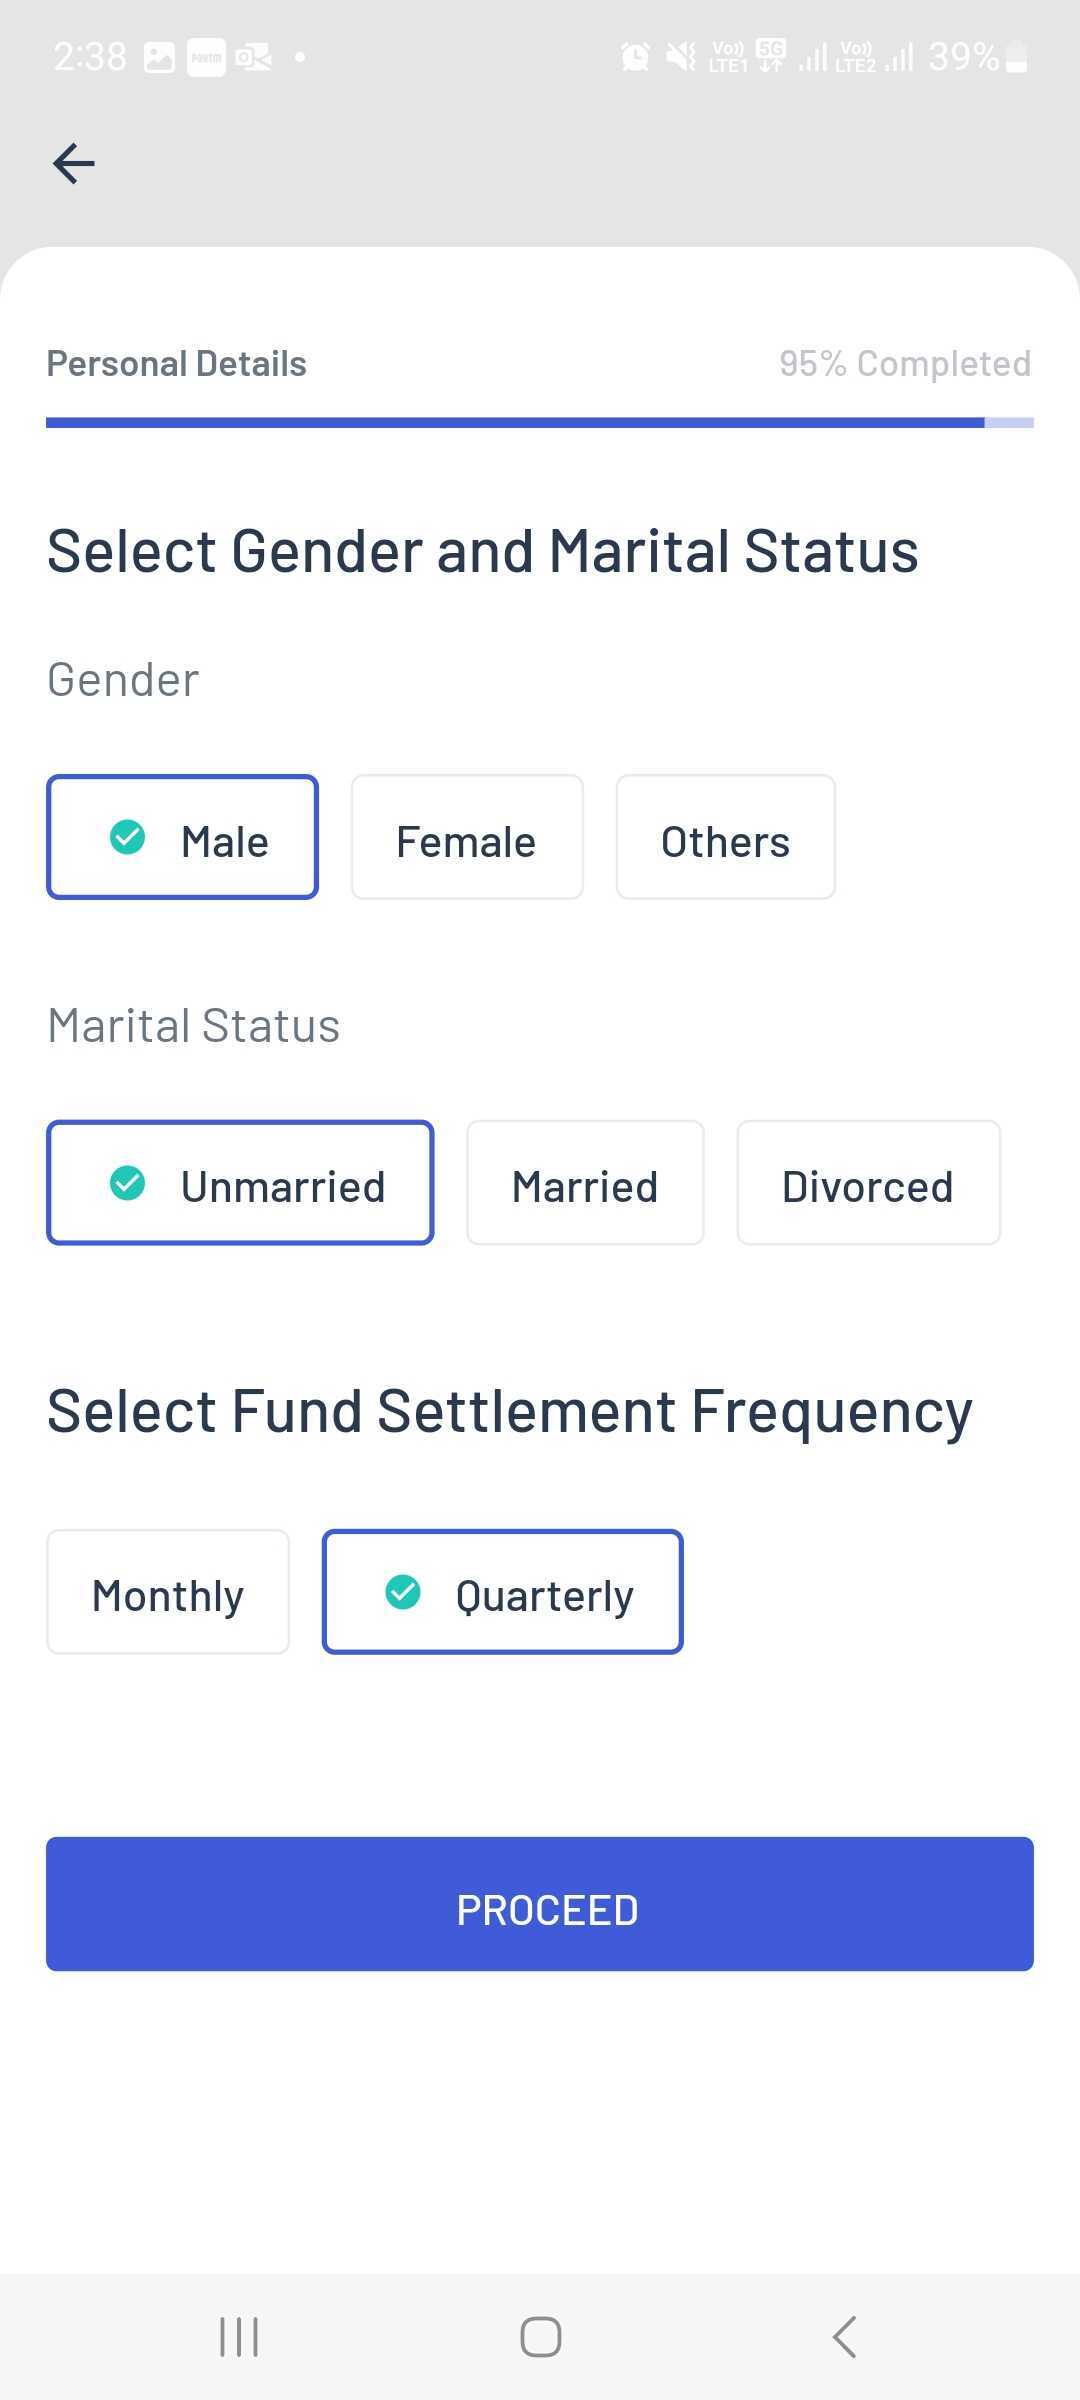
Step 8: Enter Your Personal Details and Choose MTF, DDPI and Settlement Preference
In order to take the above steps, do the following:
- Choose your income category.
- Here you can also choose to add Margin Trading Facility or MTF as a service.
- Select your employment type.
- Choose if you want to receive notifications on Whatsapp.
- Next, you will be given the option to activate DDPI or Demat Debit and Pledge Instructions. It is an extremely beneficial tool that will help reduce the effort required to trade shares. Read how to activate DDPI by clicking here.
- Finally, choose your gender, marital status and whether you want your securities settled monthly or quarterly.
Step 9: Adding nominees
At this point, you may choose to add a nominee to your demat account by clicking on “Add Nominee”. Clicking it will take you to the relevant page where you will be asked to fill in -
- Name of the nominee.
- Their PAN number.
- Their Date of Birth.
- Percentage - A single demat account holder can add up to 3 nominees. Therefore, in this section, the account holder has to specify what percentage of their holdings the particular nominee is going to be entitled to. The total percentage held by all the nominees in the list together has to be 100%.
- Their relationship with you, i.e. the demat account holder.
Once you add all the nominee details, you can proceed to e-sign. In case you want to add another nominee, you can do so before the e-sign by clicking on “Add another nominee”. You can also add a nominee later through the Angel One web app.
Step 10: Complete Your E-Signature
At this point, if you have a Digilocker, you can proceed to perform an e-Signature. This will take you to the NSDL website, where you have to authorise the NSDL e-Gov to use your Aadhaar/Virtual ID for the e-sign. Thereafter, enter the Aadhaar ID and click on “Send OTP”. You can also generate a virtual ID during this transaction and use it in place of Aadhaar. Once this process is over, Angel One will have received all requisite documents. 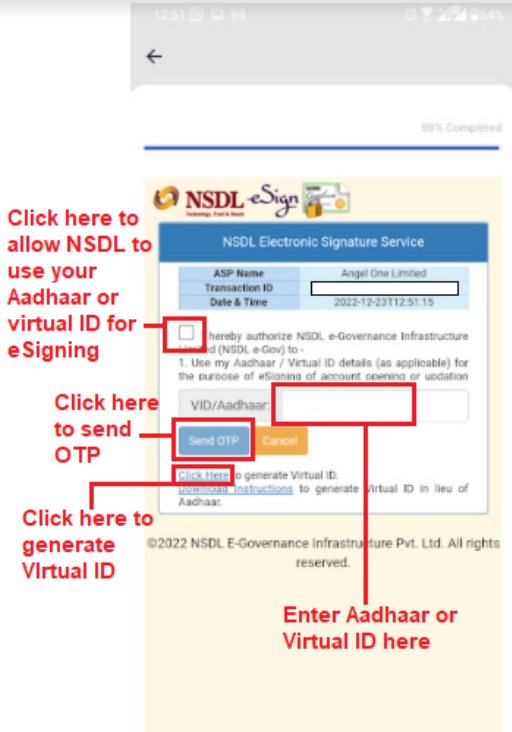 However, if you do not have a Digilocker, then one of our customer care executives will call you to perform your KYC and open your account. This process will also result inAngel One receiving all the requisite information for opening your account! Once you complete the E-Sign, the KYC journey is complete and you will be redirected to the Thank You screen. Your account will be activated within 3 days and here you can rate the onboarding process at scale of 1-10. You can explore the app while your account is being opened.
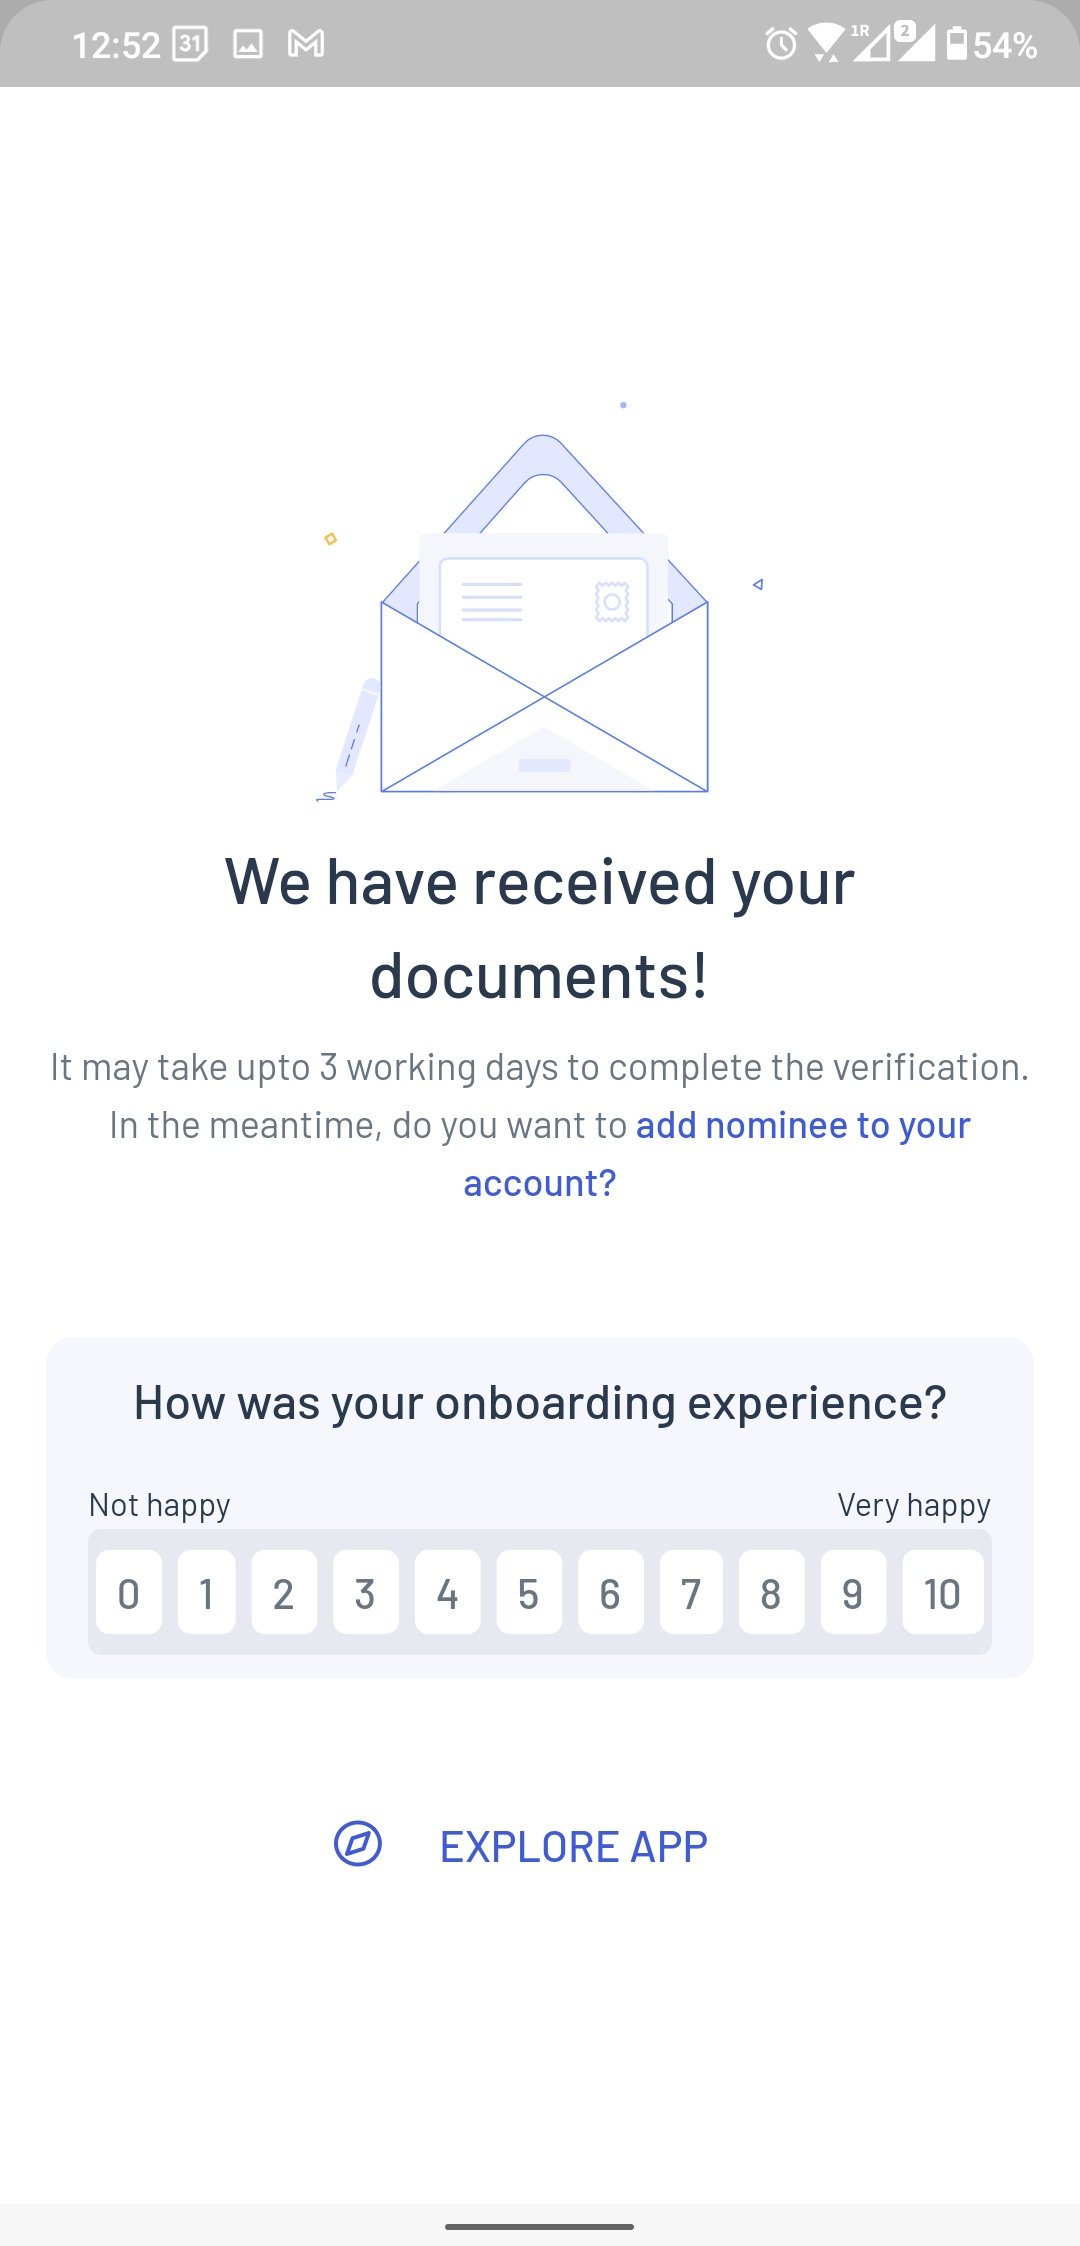
Process to Activate Segment Online
Step 1. Accessing the segment activation option:
- Use this link to access to access segment activation
- Alternatively, log in to the Angel One app, go to the Accounts page, and click on the Profile Widget
- Use your mobile number/client ID and OTP to login
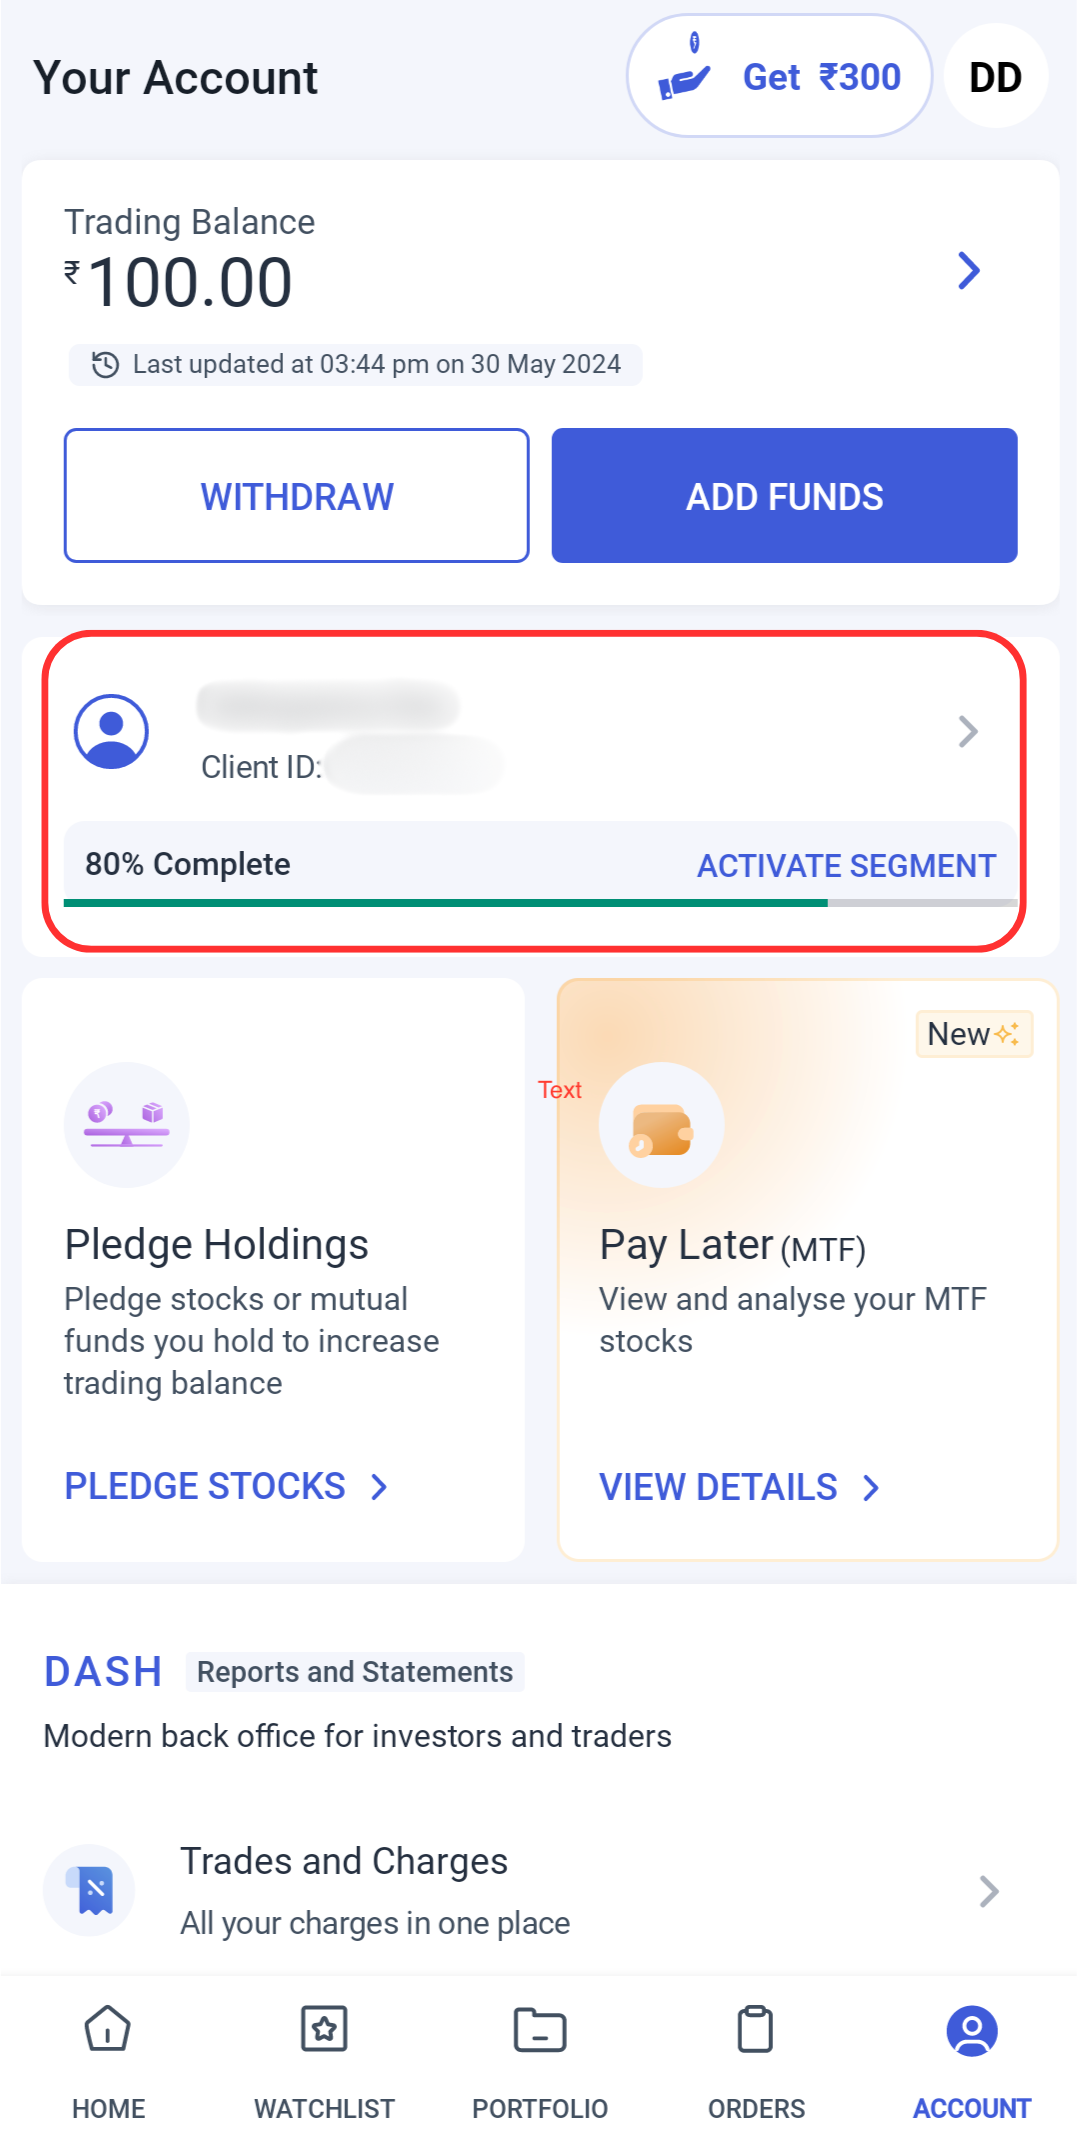
Step 2: Click on “Manage Segment”.
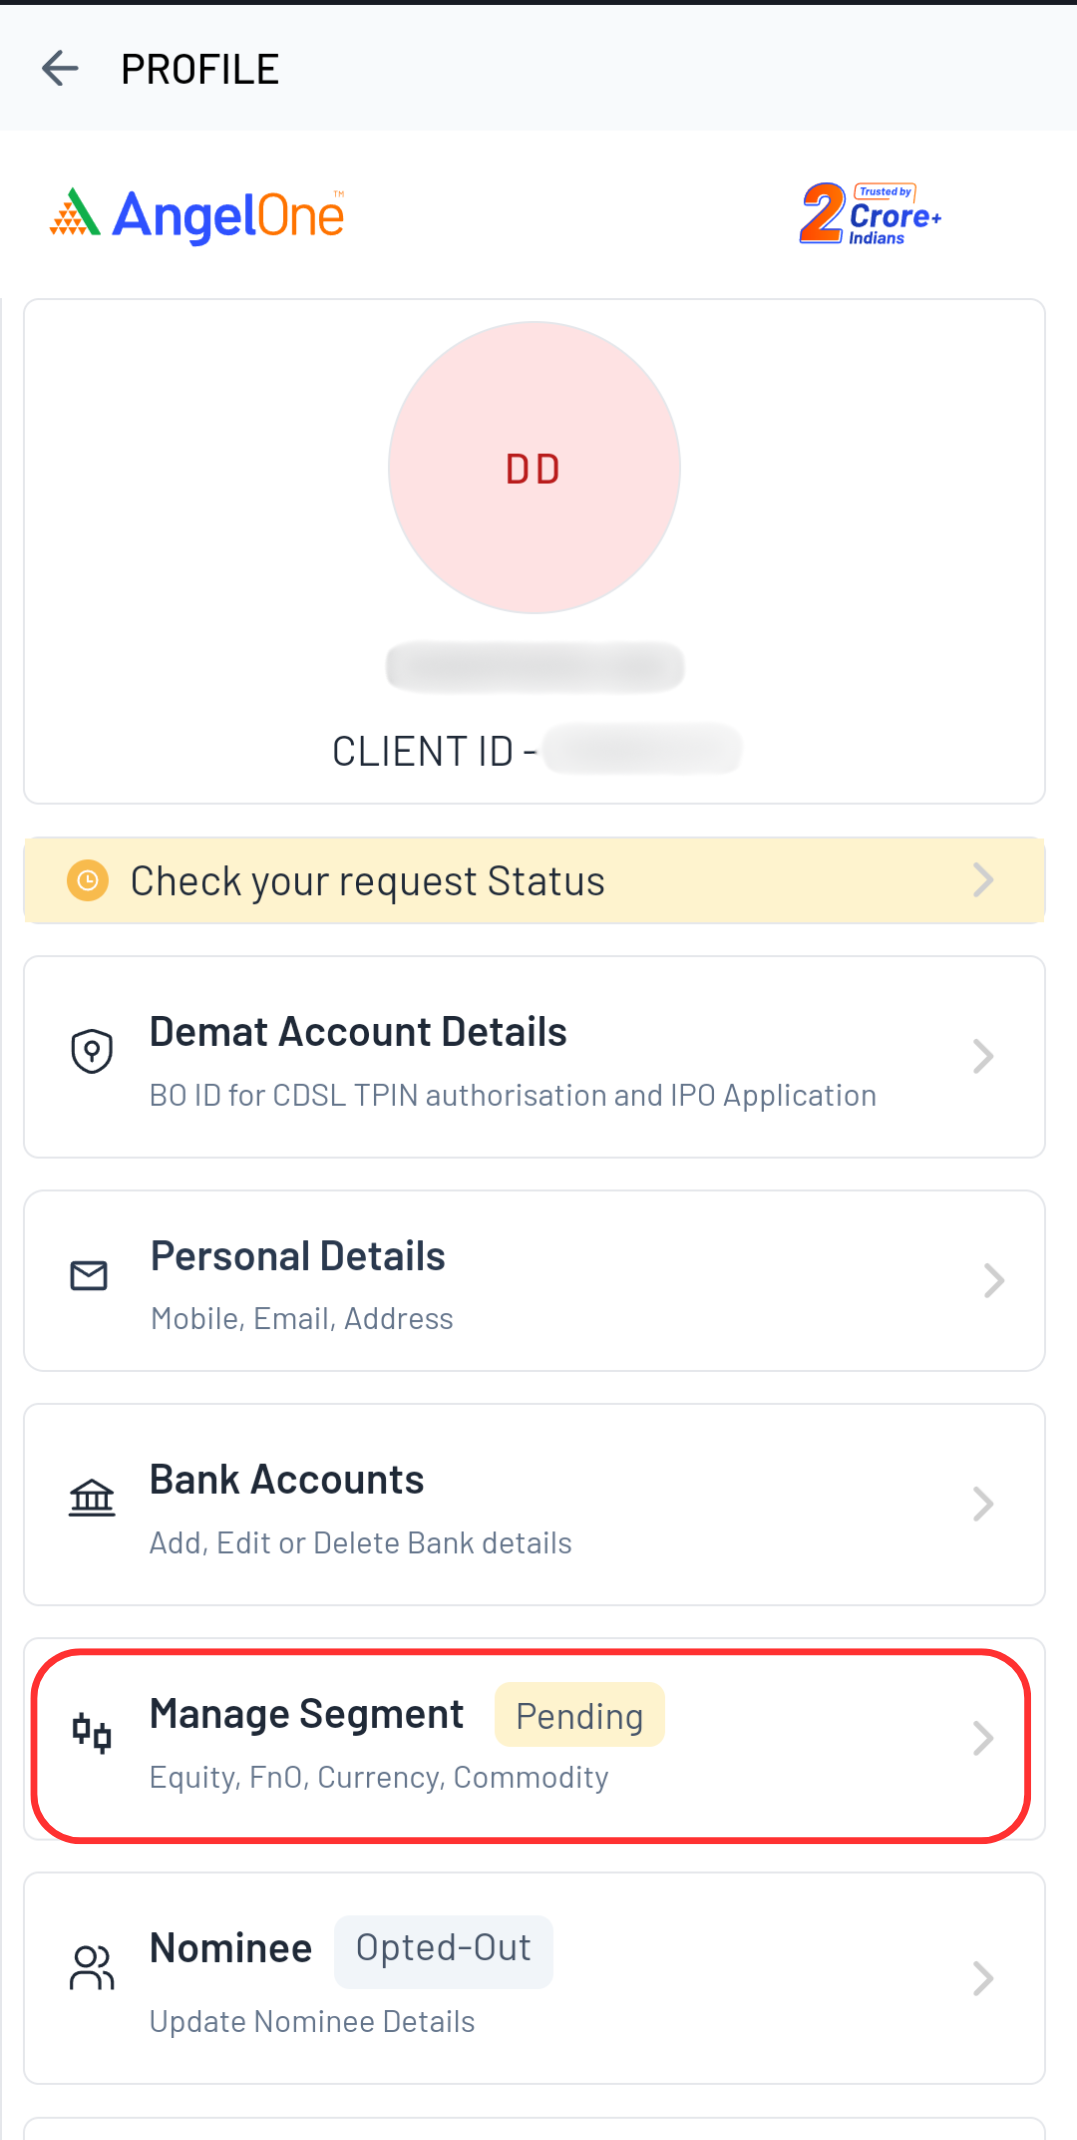
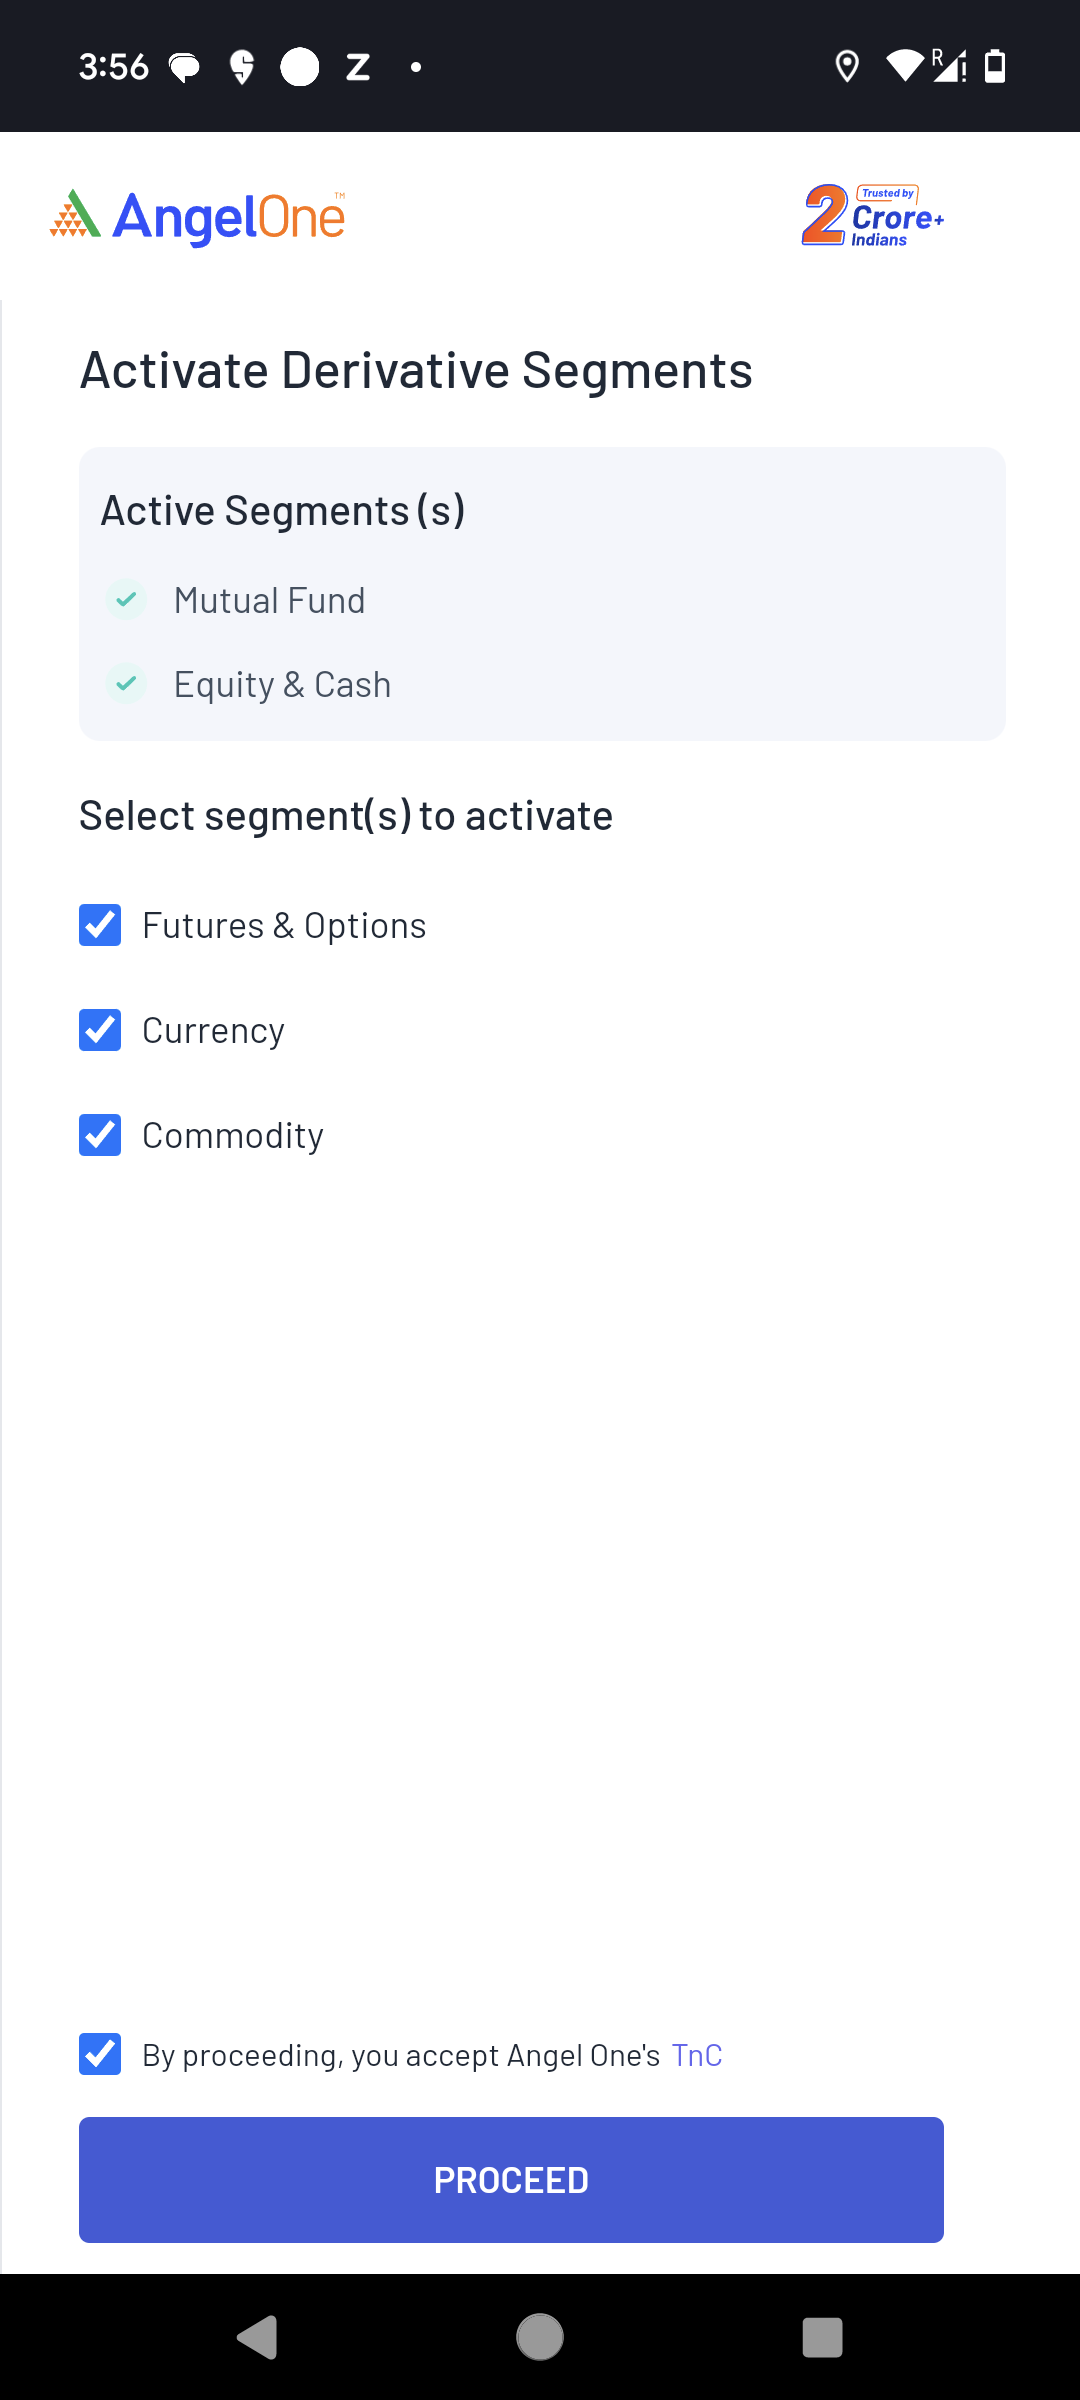
Step 3: Select the segment(s) to be activated.
Step 4: Provide financial proof
- Allow system to automatically fetch last 6 month bank statement by entering the bank name and mobile number linked to your bank account
- Alternatively, select “Upload documents manually” option to upload the income proof yourself
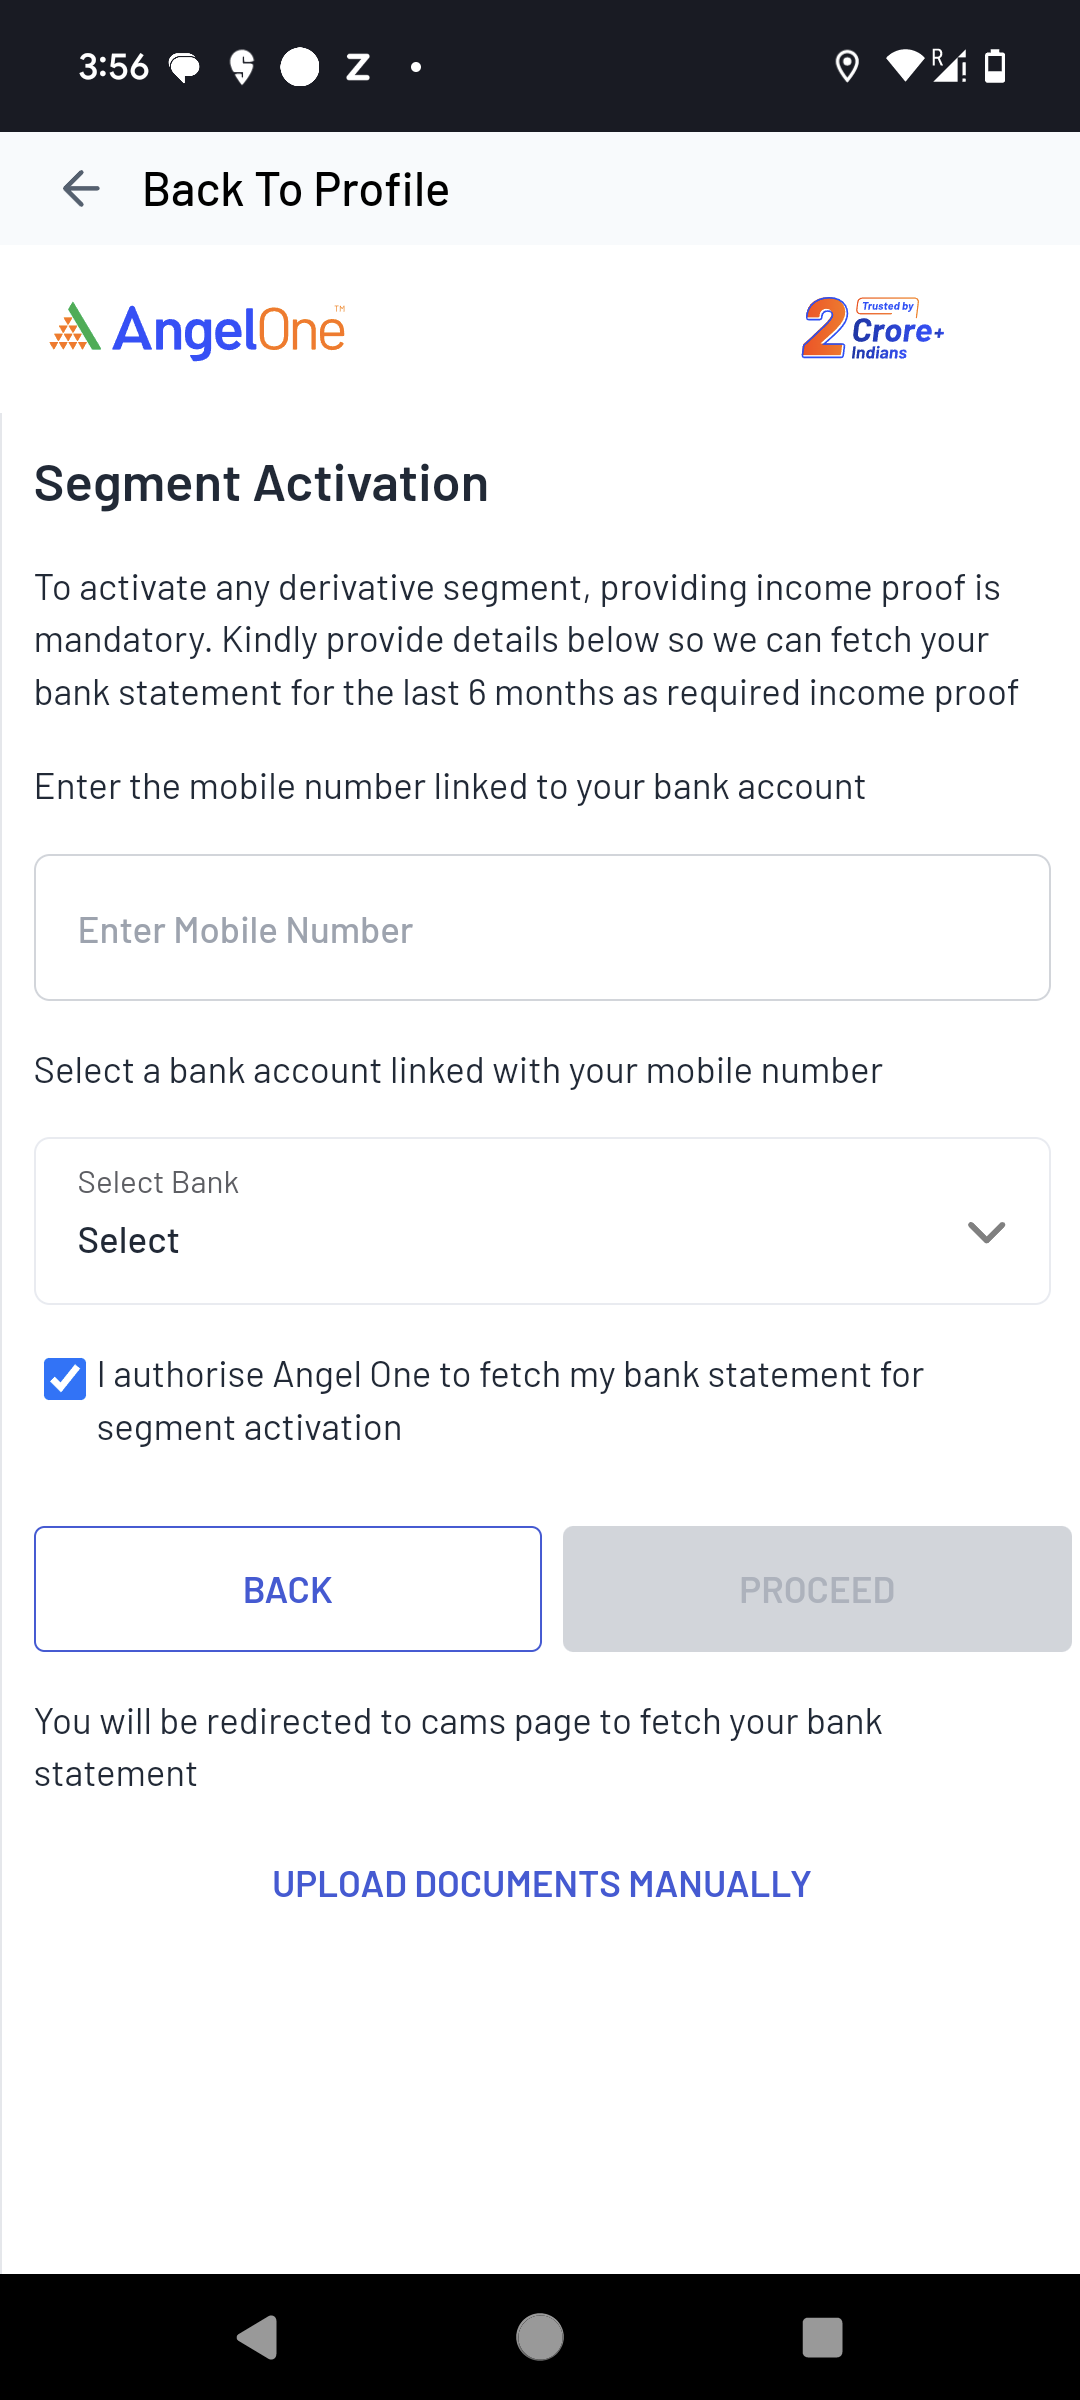
Step 4a: Automatically fetch bank statement
i) Enter the OTP sent by CAMSfinserv to your registered mobile number 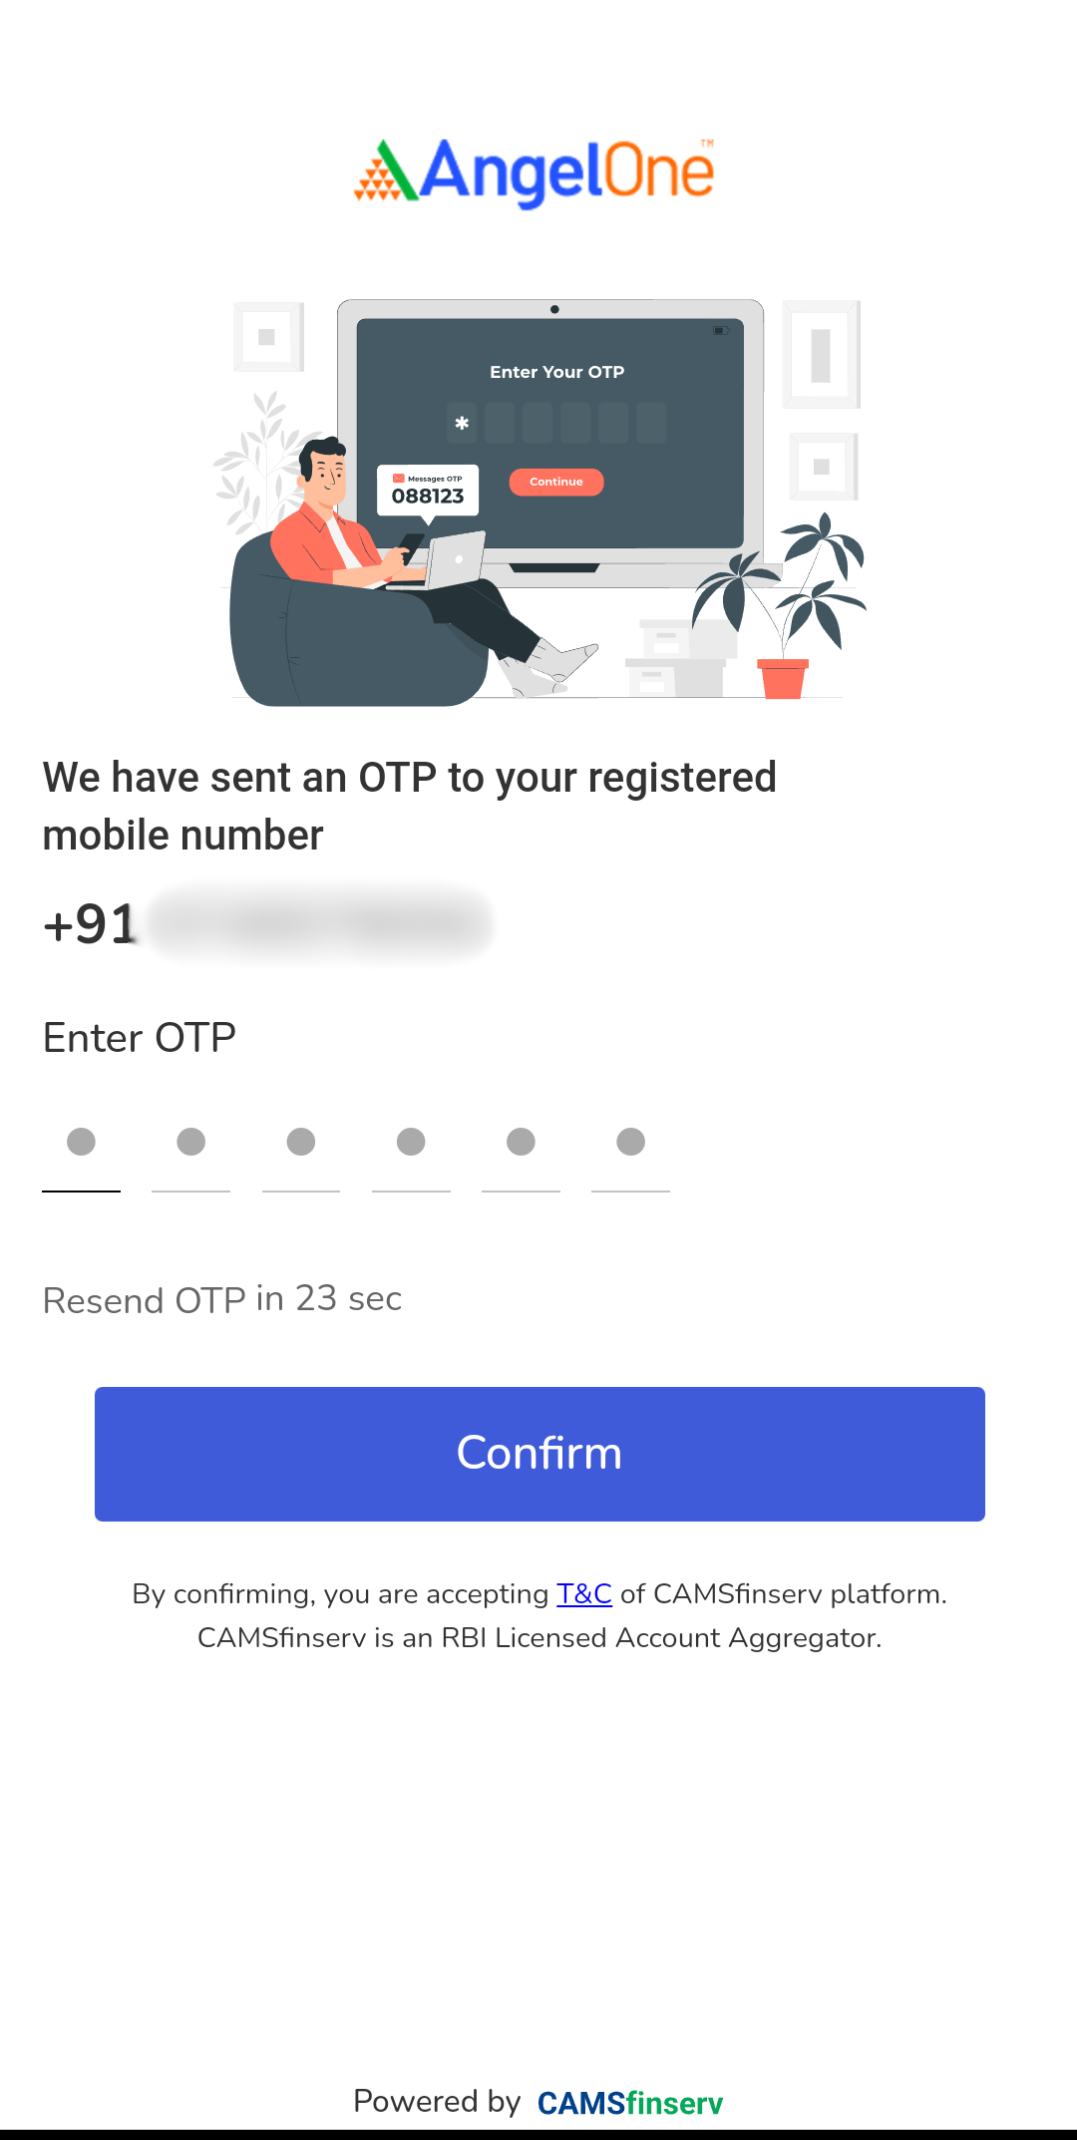 ii) Bank accounts linked with the mobile number will be fetched
- Select the bank account you want to use to provide last 6 months bank statement
 iii) User will be automatically redirected forthe e-signing
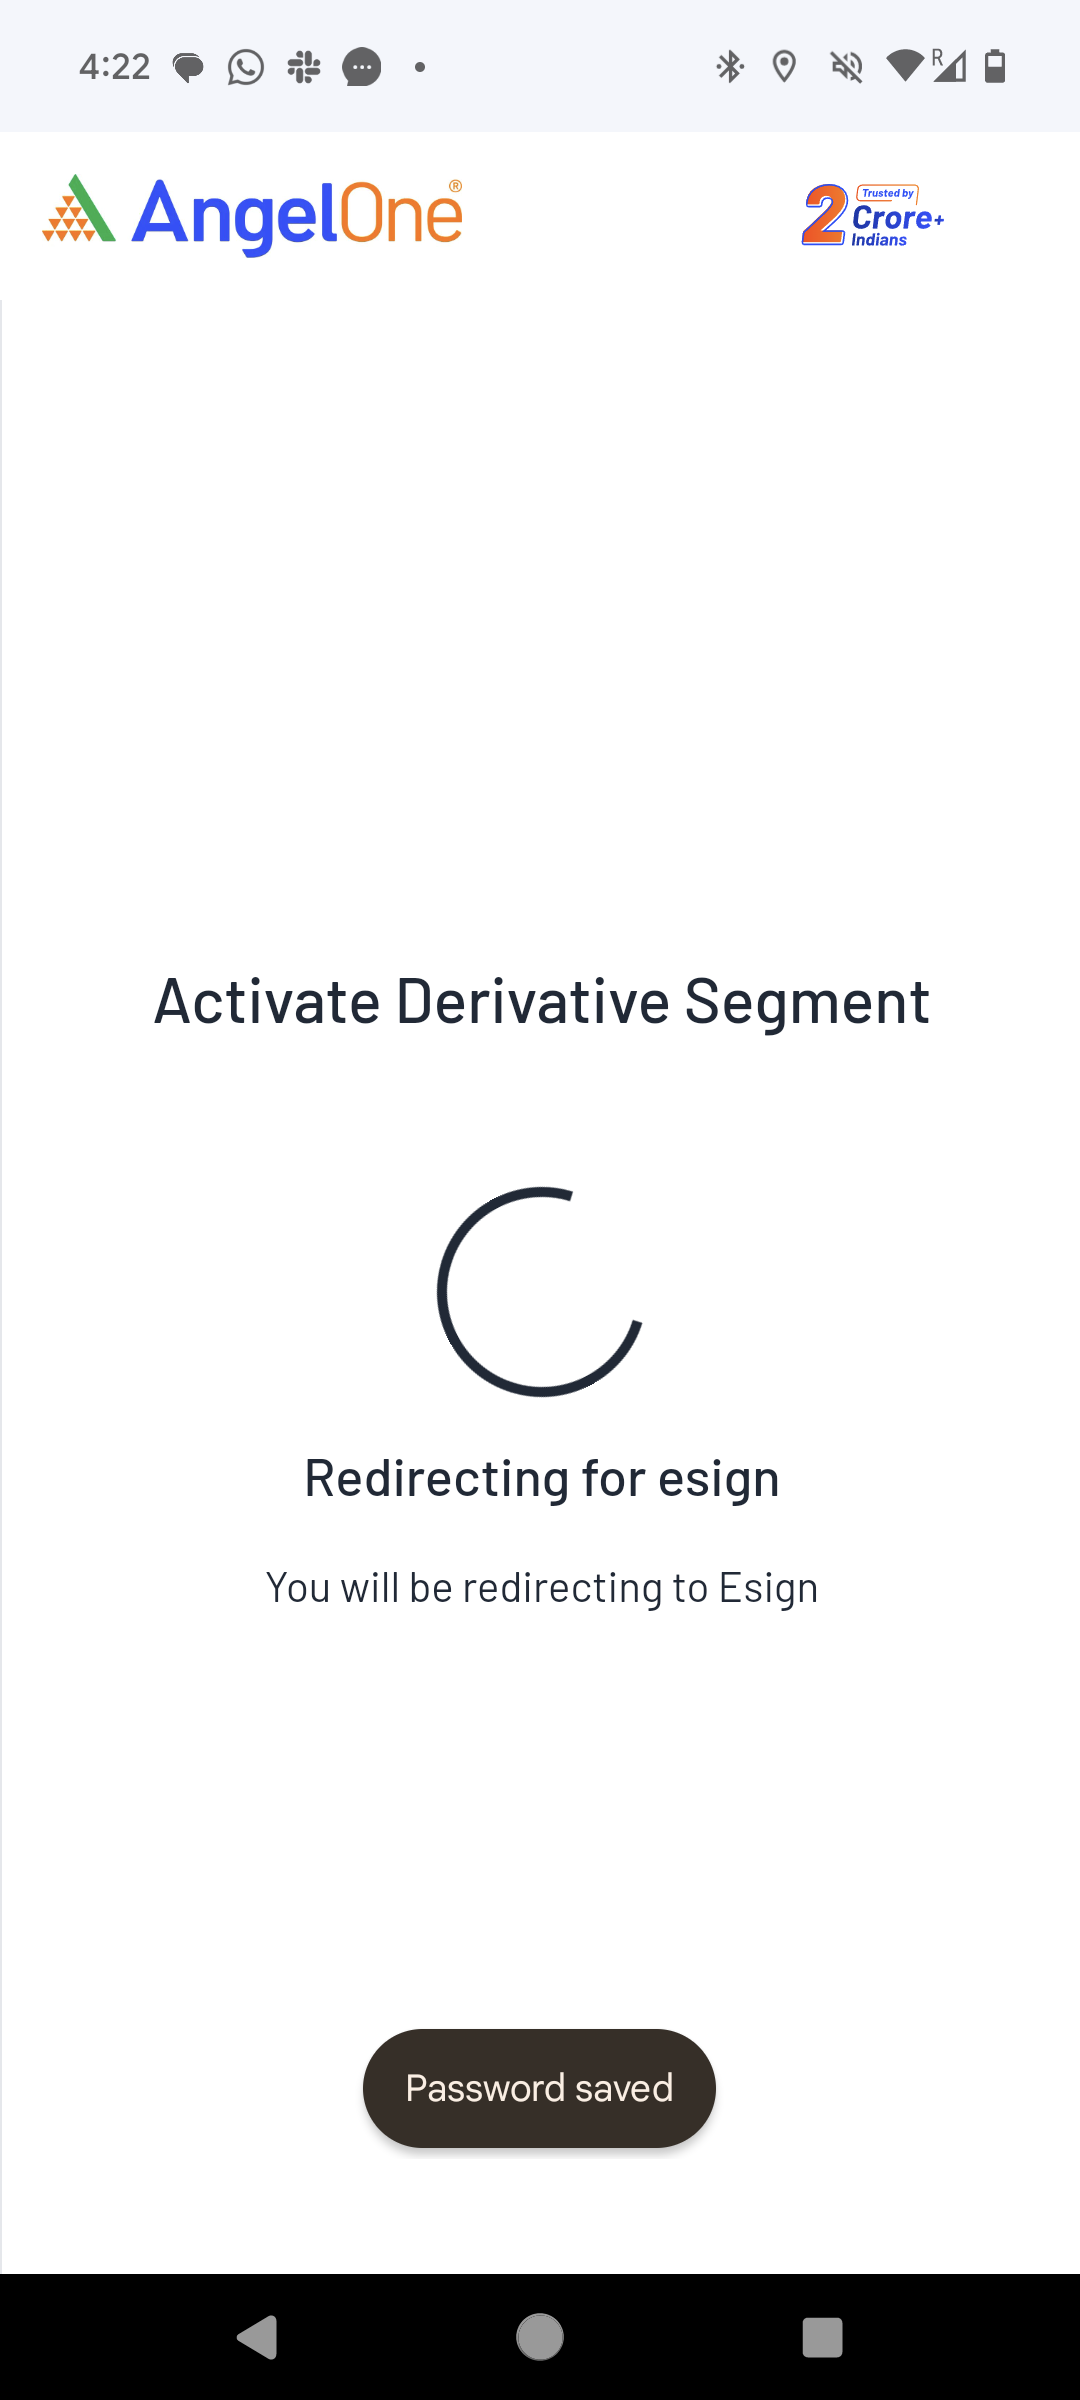
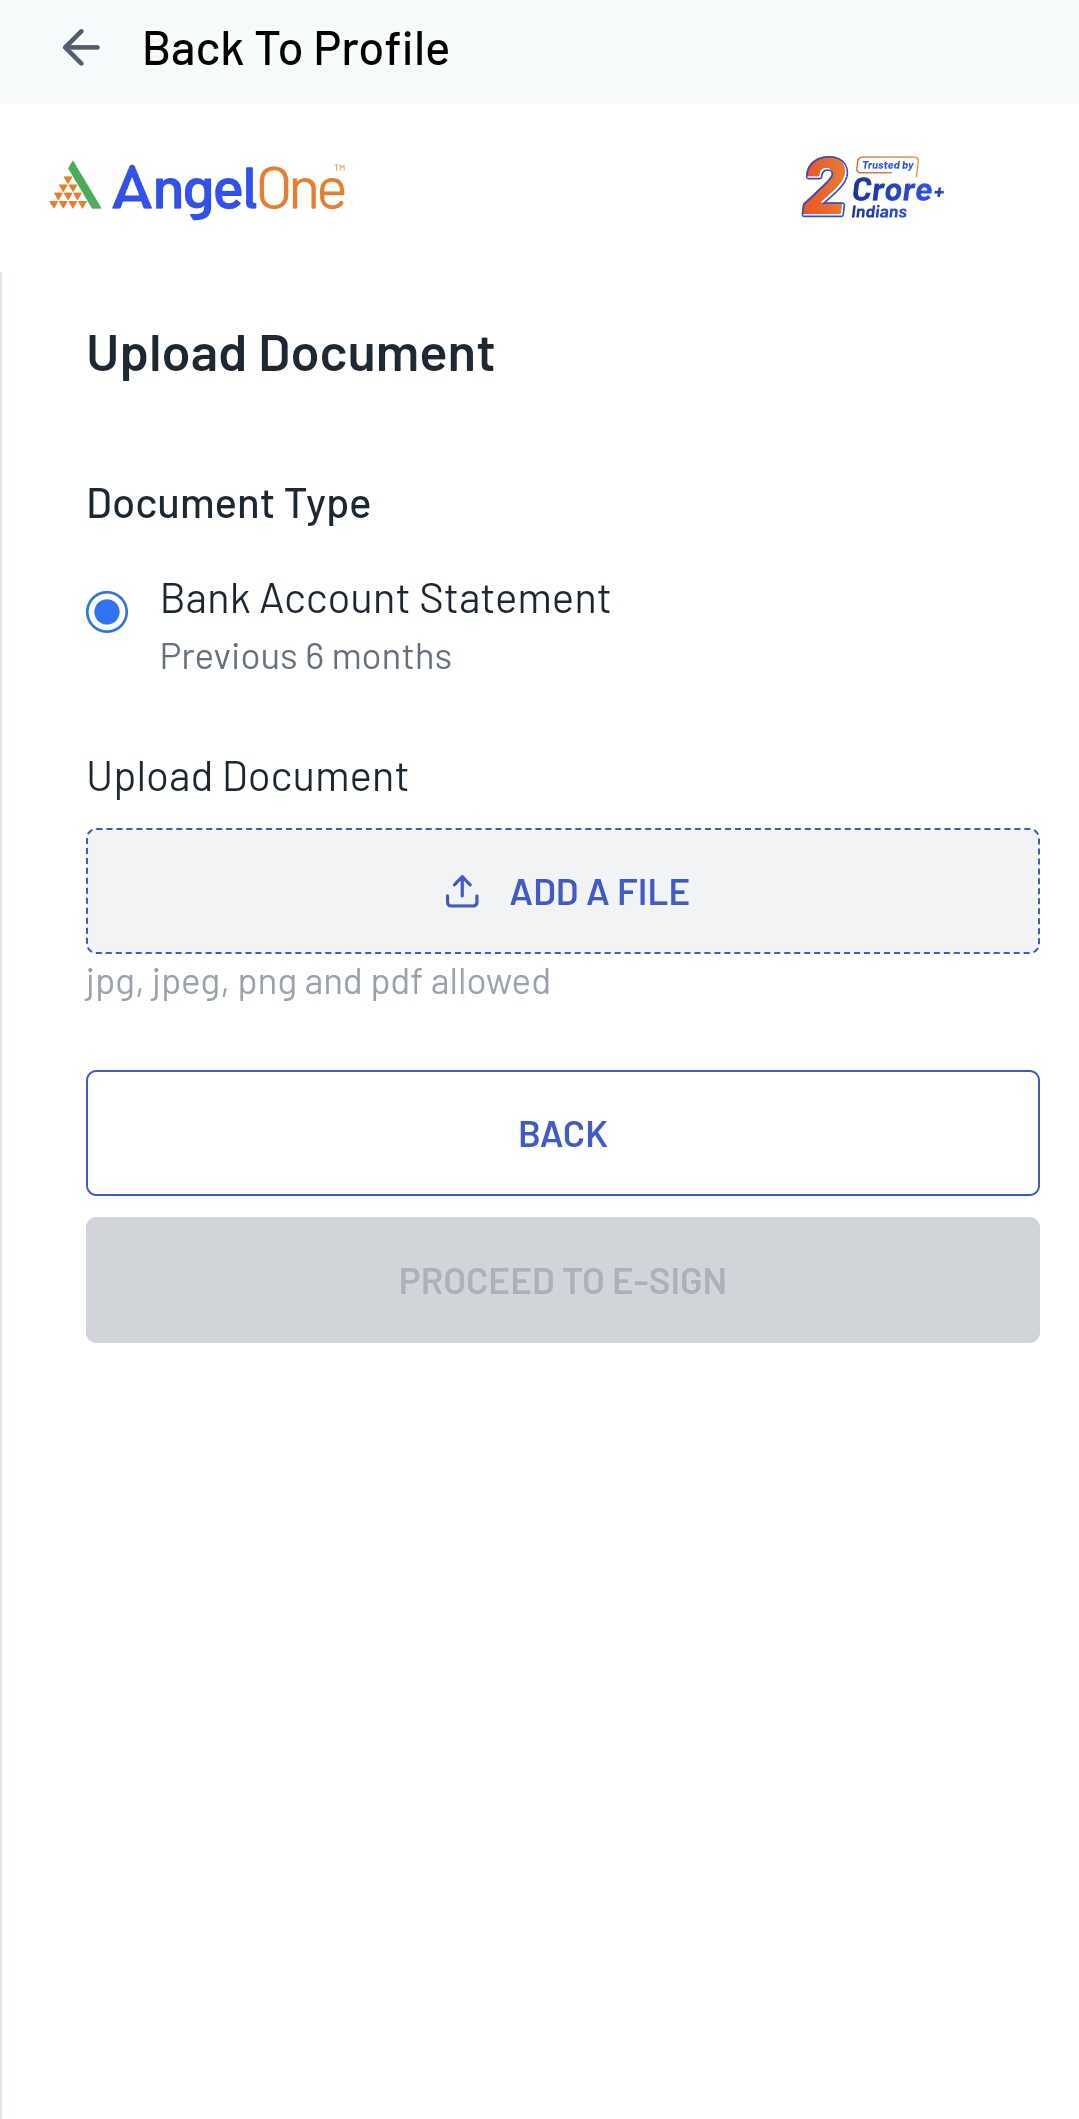
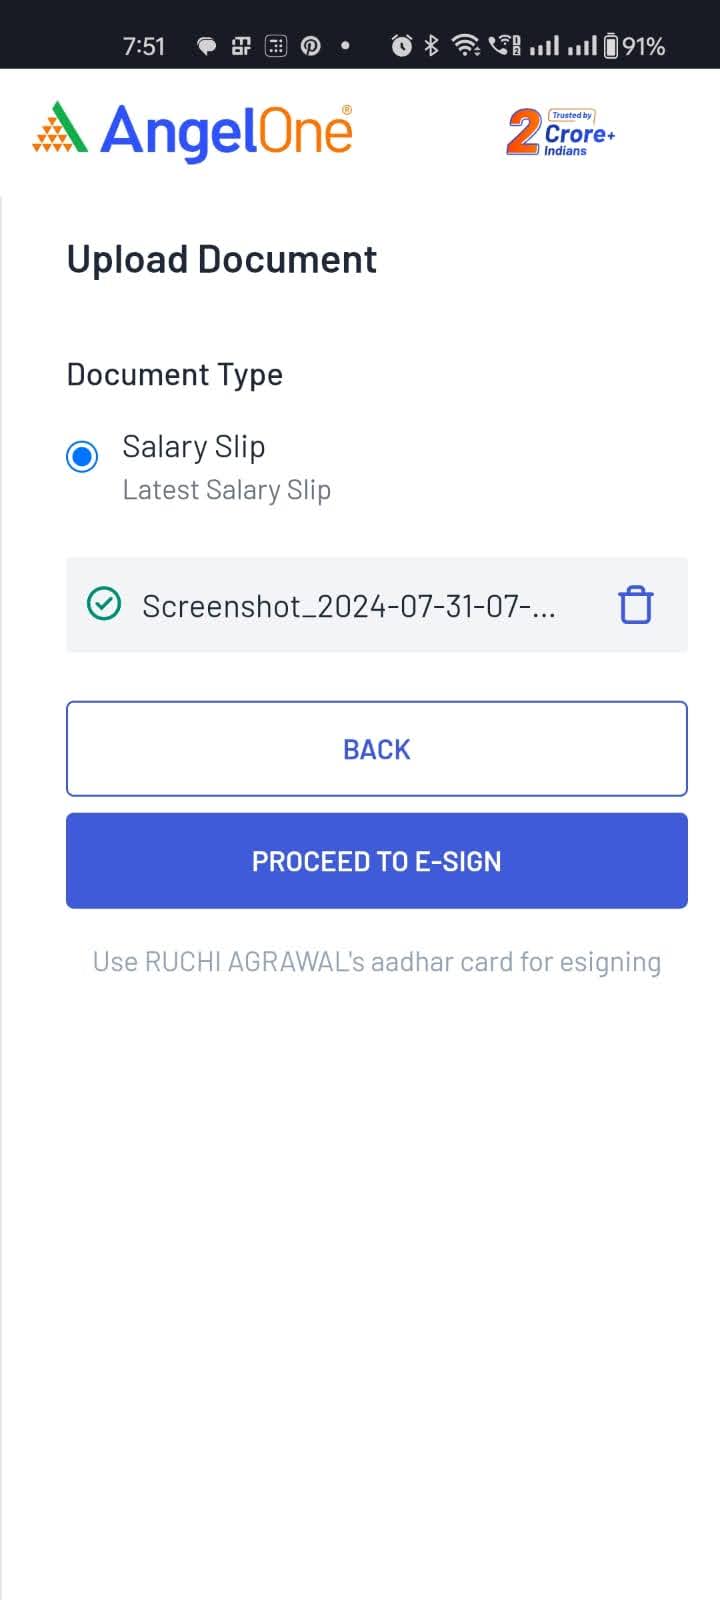
Step 4b: Manually upload documents
i) Select the document from the list you want to provide as the financial proof 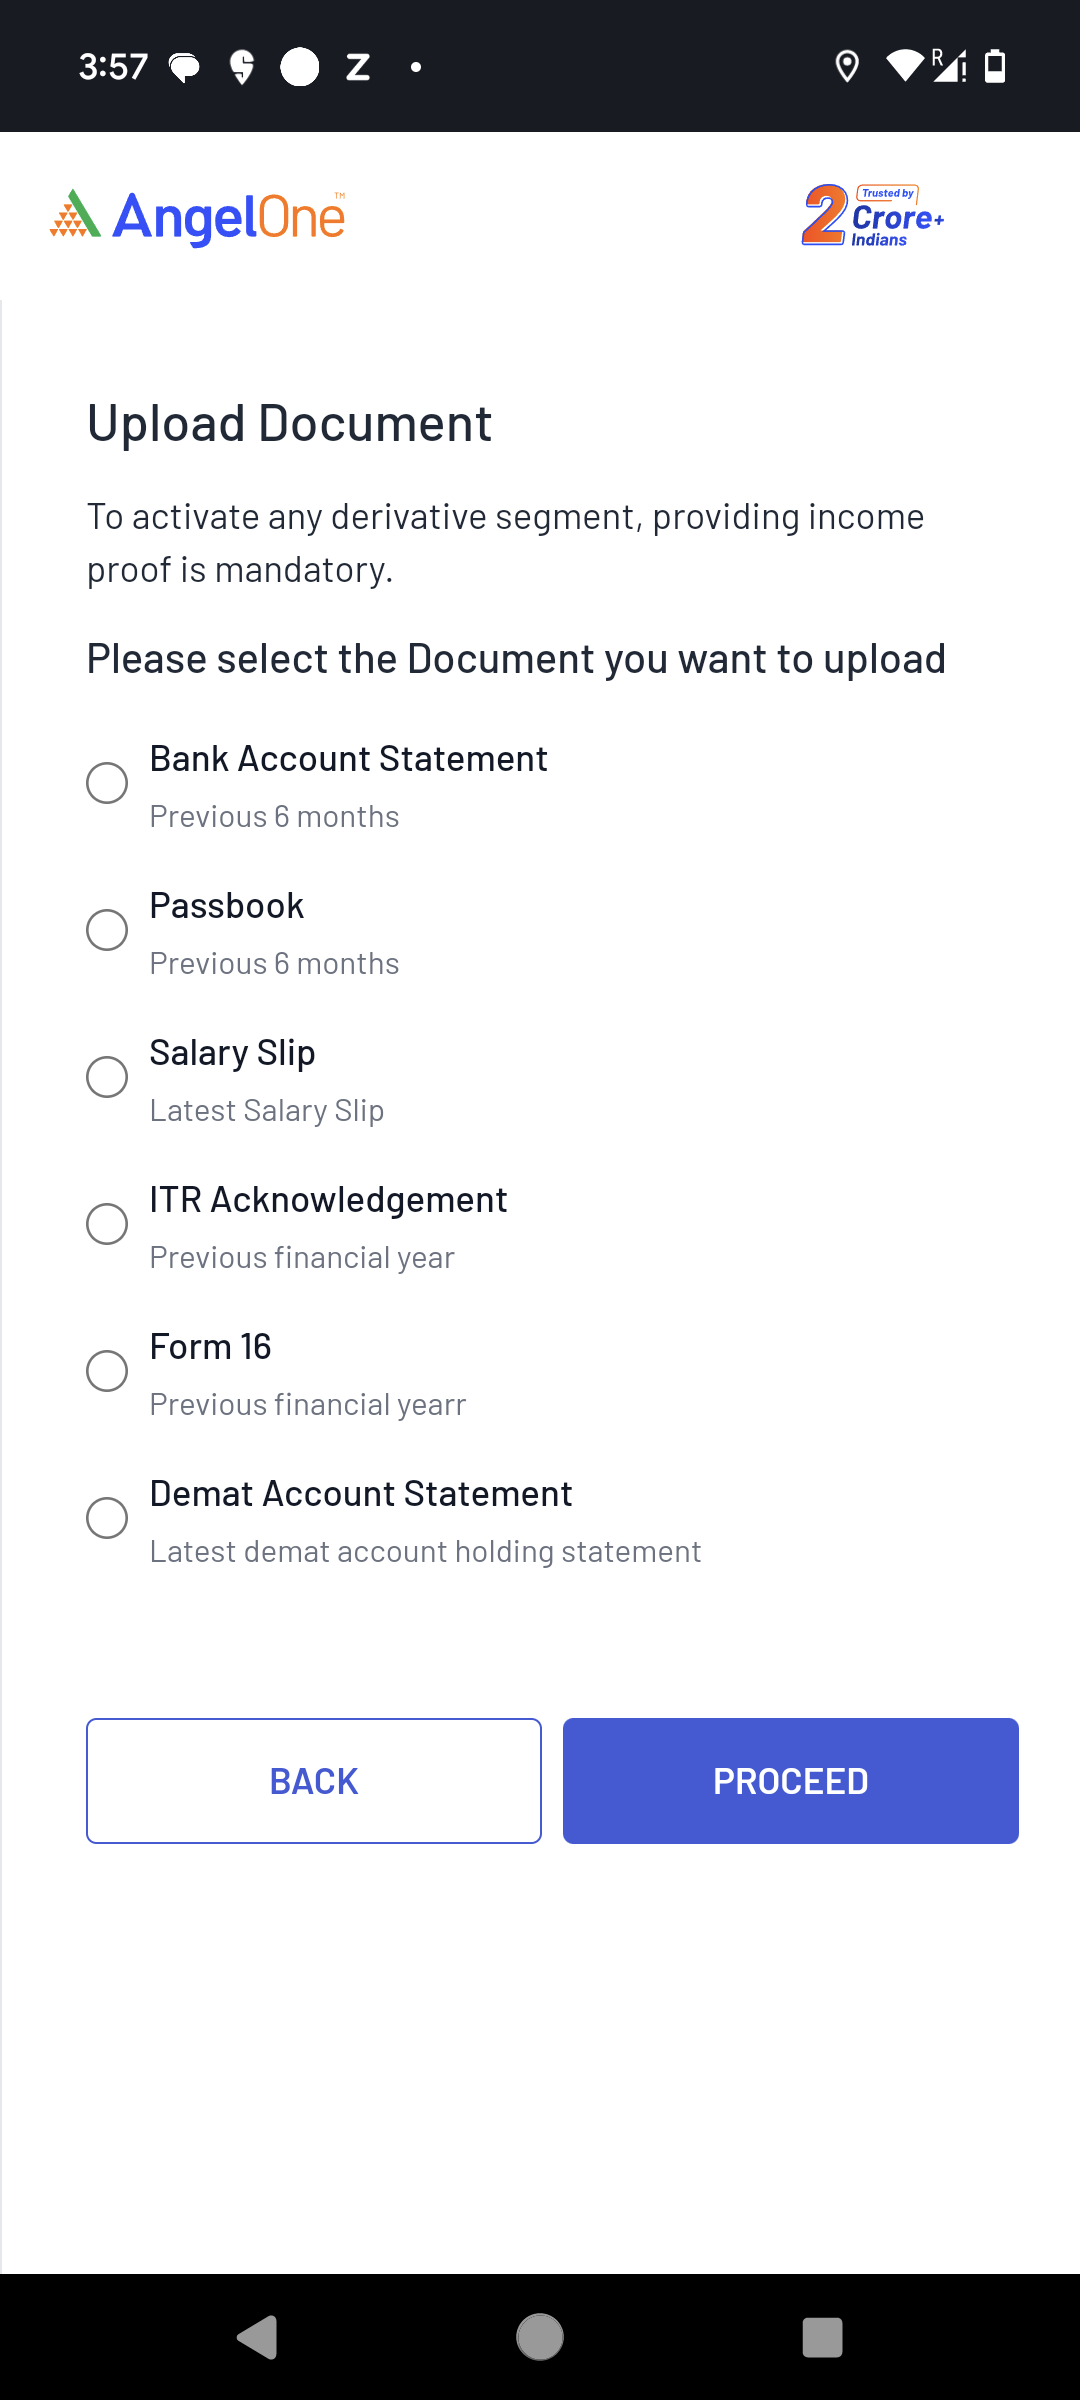 ii) Click on “Add a file” box. Select the file you want to add from your device.
- If your document is password protected, you will be asked to provide document password in order to verify the document
- Once the file is uploaded, click on “Proceed to E-Sign” button
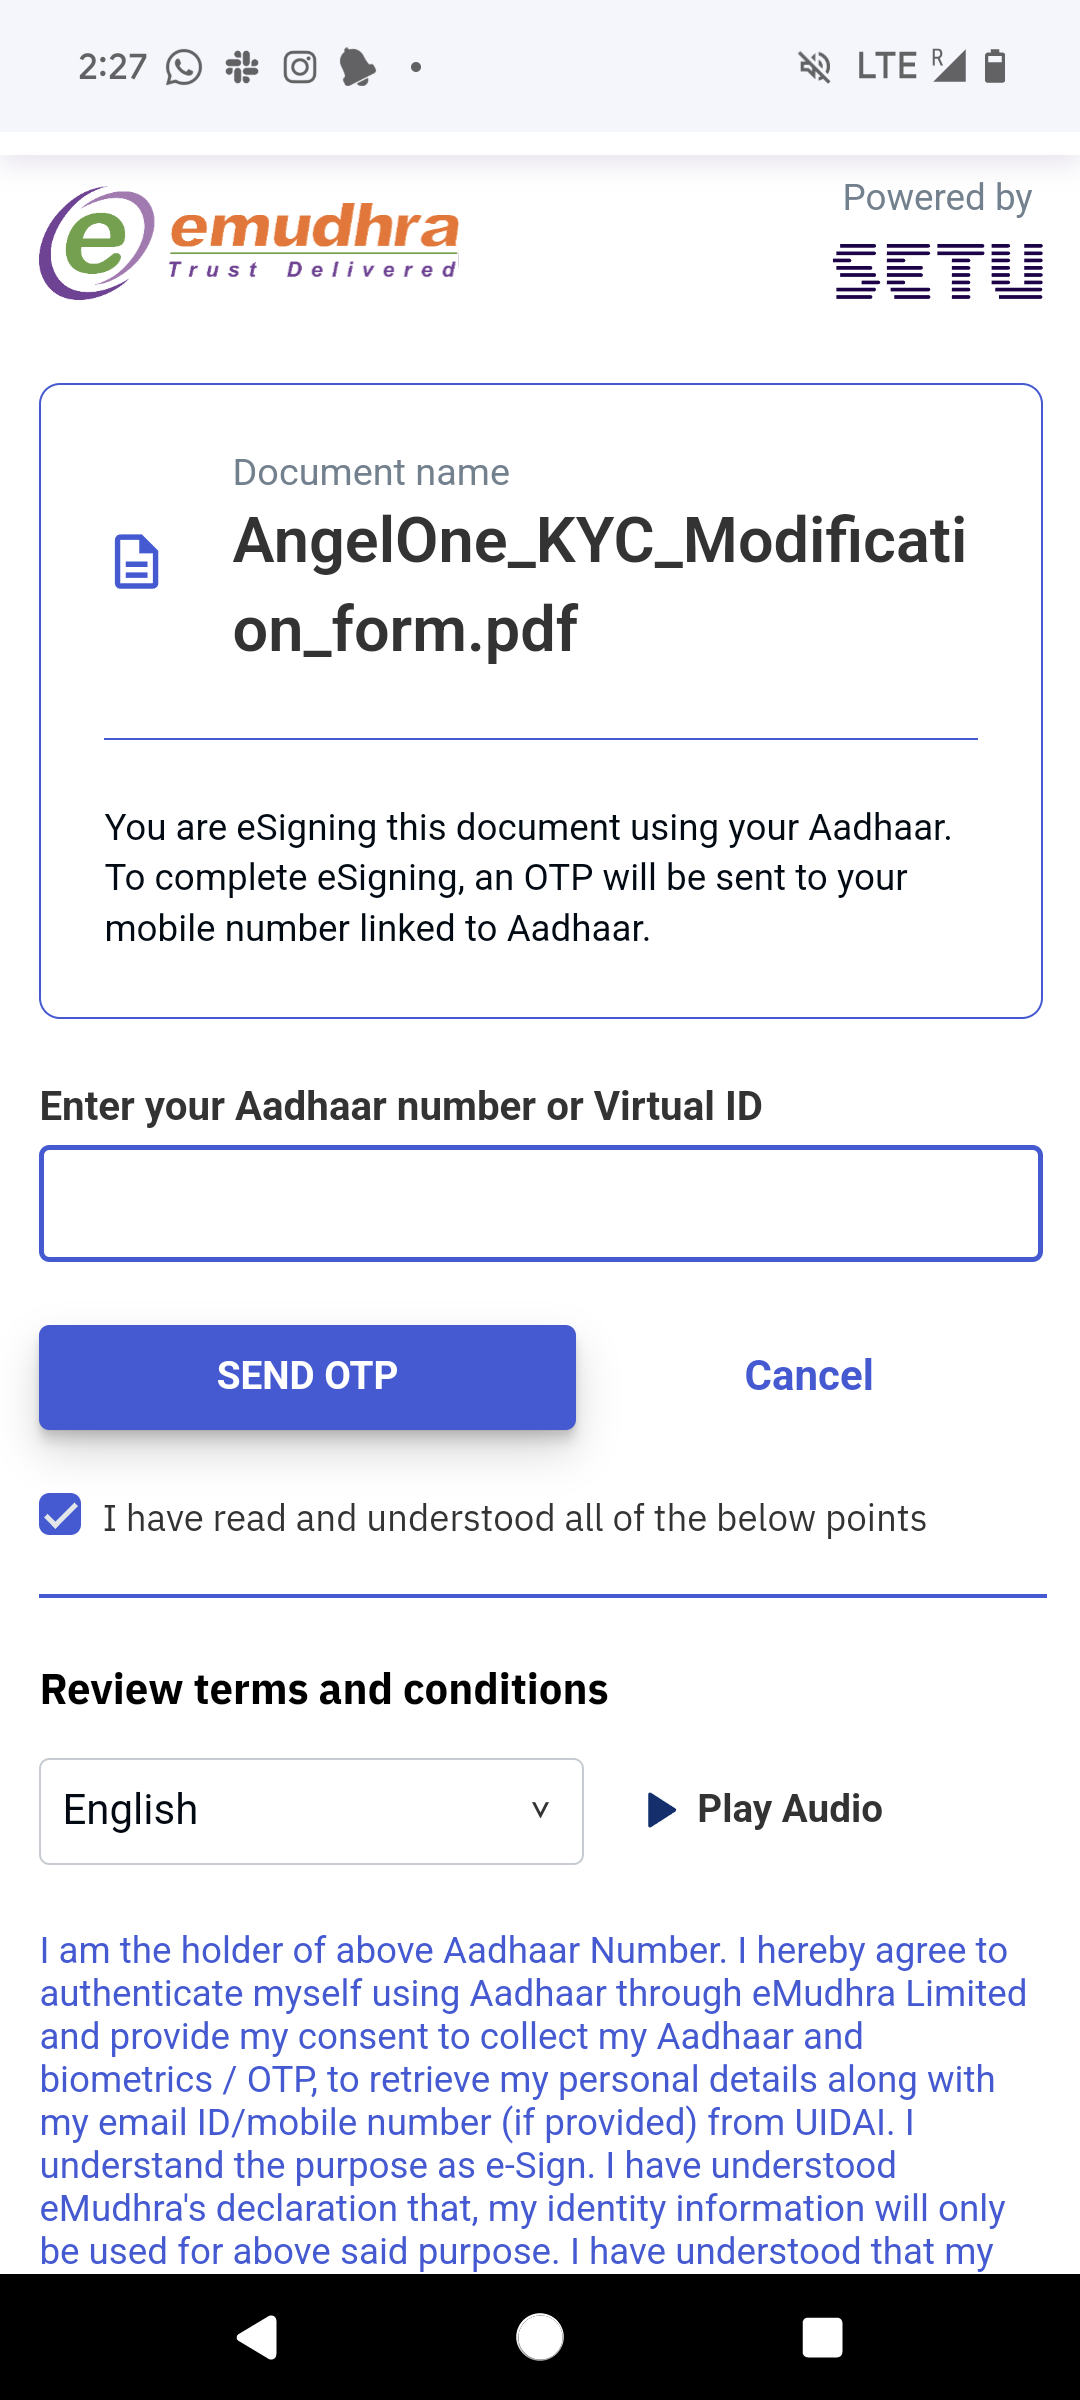
Step 5: You will be redirected for e-signing the request. Enter the Aadhar details & OTP sent from Adhaar on your mobile number
- Make sure to use your own Aadhar card for e-signing

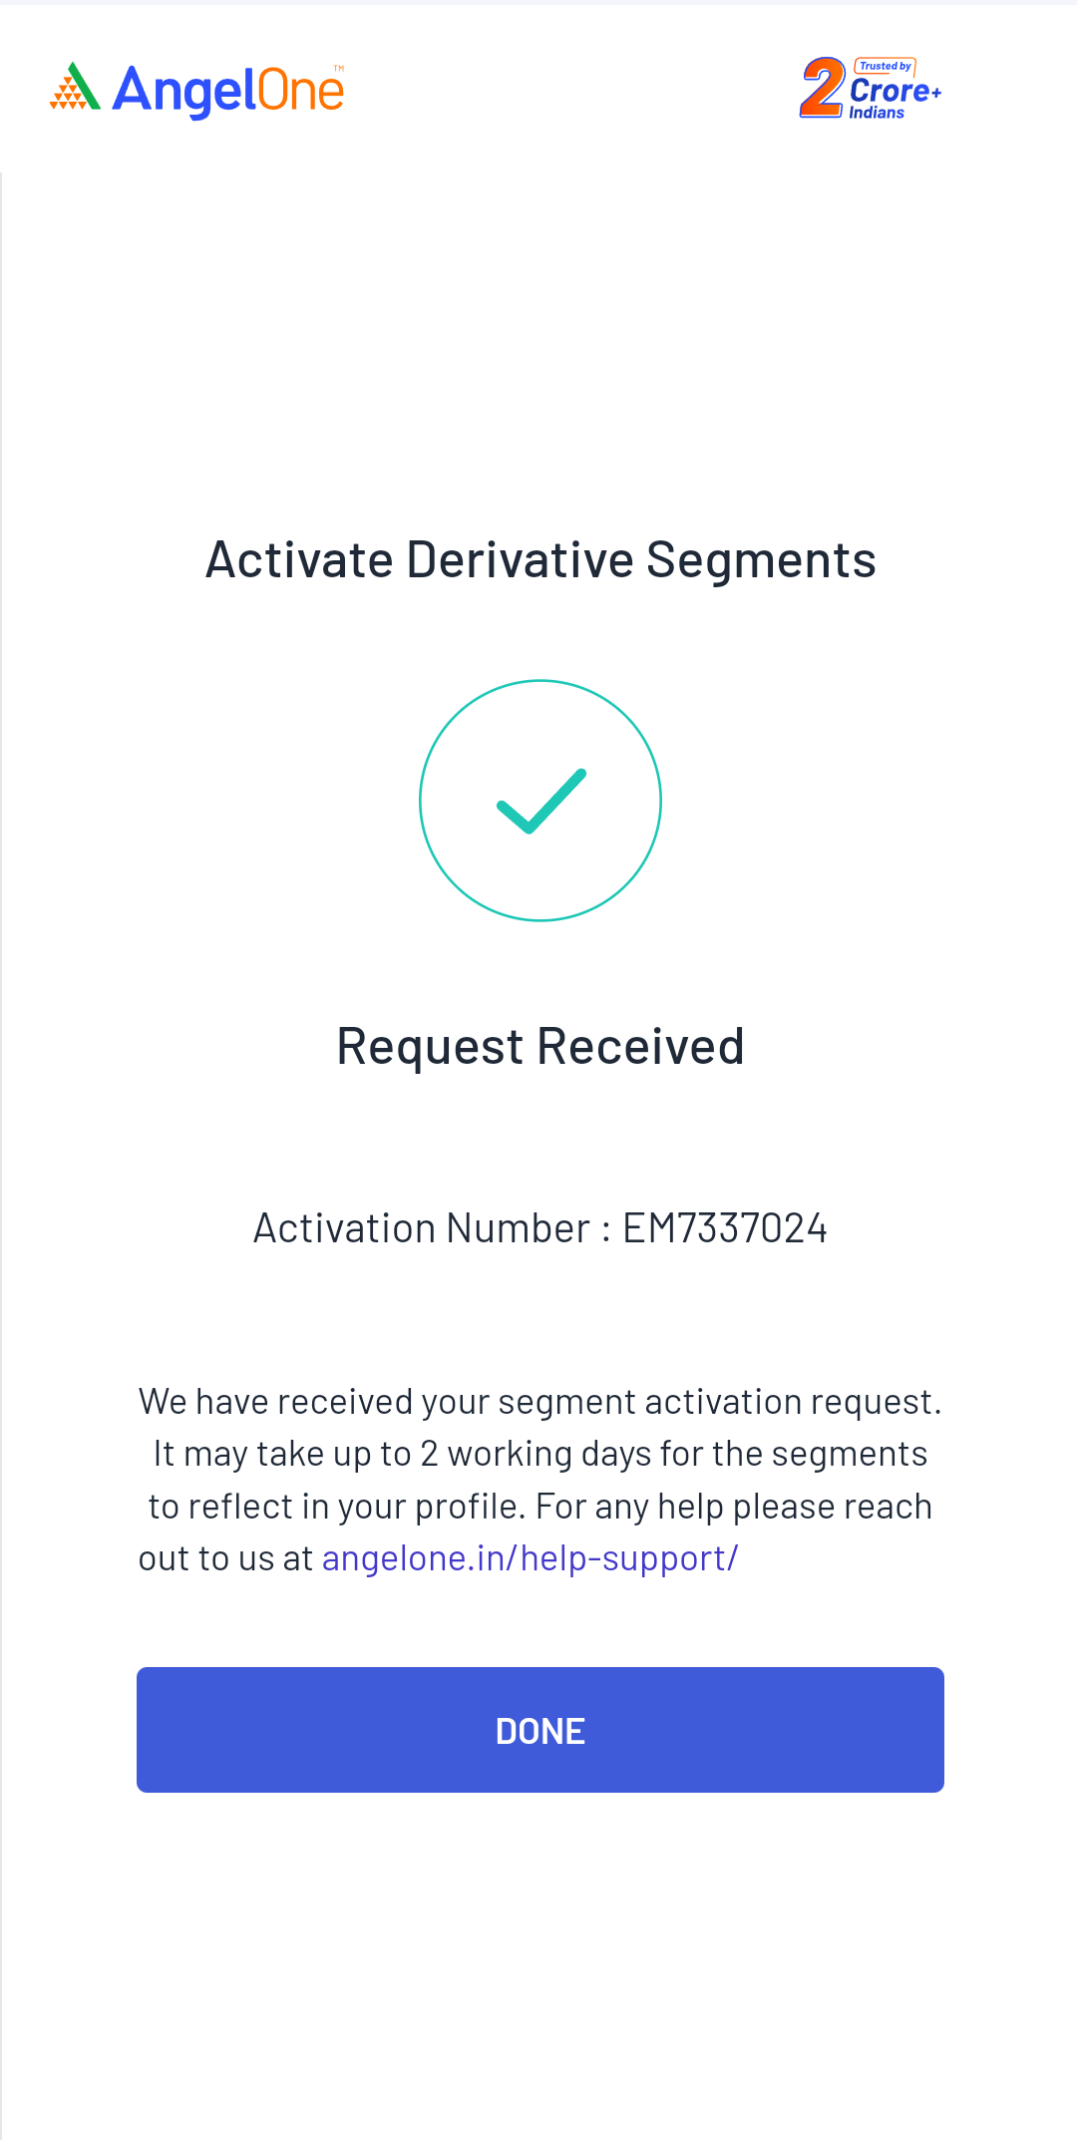
Step 6: The request will be processed in 2-3 working days.
Points to Note
- The following segments at the mentioned exchanges are available for trading -
-
- Futures & Options - NSE, BSE
- Currency - NSE, BSEThe following segments at the mentioned exchanges are available for trading -
- Commodity - NSE, MCX, NCDEX
- Equity and Mutual Funds are the default trading segments activated for all the users with a demat account
- Segment activation process will take 2-3 working days
- Online segment activation is available for the individual account holders. Individual can activate segment online by directly using this link
- Please have your Aadhaar card ready when placing an online segment activation request to e-sign the application.
- Ensure that your Aadhaar card is linked to your mobile number to complete the process.
Conditions for Segment Activation
1. Individual Accounts -
- Providing financial proof is mandatory for activating derivative segments
- Any proof provided should be in the name of the angel account holder
- The proof must contain the logo and seal of the concerned authority
- If there are any holdings in the angel one account, segments will be activated without any additional proof in online segment activation process
- If there are no holdings,financial proof needs to be provided. Any of the documents from the below mentioned list are accepted as valid income proof:
- Last 6 months bank account statement
- It should have at least one transaction from every month
- Passbook
- It should have first page and last 6 months of transaction details
- Salary Slip
- Last month’s salary slip needs to be provided
- ITR acknowledgement form
- It should be from latest/previous financial year
- Form 16
- It should be from latest/previous financial year
- Demat Account Statement
- Latest Holdings statement
- Last 6 months bank account statement
2. Non-individual accounts (Joint, HUF, Corporate) -
- Currently there is no online process of segment activation for non-individual accounts.
- For activating derivative segments, you can raise a ticket here (Create Ticket —> Select Account Details under Category —> Select Segment Activation under Sub-Category) and attach the filled in segment modification form along with any income proof.
- Any of the documents from the below mentioned lists are valid income proof:
- Last 6 months bank account statement
- It should have at least one transaction from every month
- ITR acknowledgement form
- It should be from latest/previous financial year
- Form 16
- It should be from latest/previous financial year
- Demat Account Statement
- Latest Holdings statement
- Mutual Funds Statement
- Latest Holdings statement
- Net worth certificate
- Last 6 months bank account statement
- If you are an HUF account holder, then Karta’s signature and HUF stamp is required on the form.
- If you are a corporate account holder then a corporate stamp is accepted in place of a signature.
- If you are a joint account holder then all holder’s signature will be required on the form.
- For Minor and NRI account holders, segment activation is not allowed.
Password Policy
In the case of your Angel One trading account, the MPIN acts as a password.
How to change MPIN?
The process of changing your MPIN is easy. Just go to your Settings (on the Account section) and click on the “Change PIN” section. Thereafter, you will be required to verify an OTP sent to your registered mobile number. After this, you just have to enter your new 4-digit MPIN and confirm it. Remember, when creating a new MPIN, you cannot use any of the last 5 MPINs used for your Angel One account.
What to do if you have forgotten your MPIN?
If you have forgotten your MPIN you can simply:
- Click the “Forgot MPIN?” text on the screen.
- Next, you will have to enter your registered mobile phone number, your PAN number, and your Date of Birth.
- Finally, you will have to enter an OTP sent on your registered phone number.
- After the OTP is entered, you can now enter the new MPIN and confirm it. You do not have to enter the old MPIN.
- Remember, when creating a new MPIN, you cannot use any of the last 5 MPINs used for your Angel One account.
Logging in
The new app version requires users to undertake a 2FA or 2-factor authentication mechanism. It is a system that requires the depository participant (such as Angel one) to offer any two of the following three types of authentication mechanism to users for logging in to their online account-
- Knowledge factor (i.e. something that only the user knows) e.g. PIN, password etc.
- Possession factor (i.e. something that only the user has) e.g. OTP, security token, authenticator apps on smartphones etc.
- Biometrics (i.e. biological identity markers of the person) e.g. fingerprint, face id, pattern etc.
Note:The combination of OTP and an authentication app or a combination of fingerprint and face ID cannot be considered a valid 2FA as authentication from two different classes of mechanisms is necessary to comply with the 2FA requirement. Under the new 2-factor authentication system, they will have to follow the below steps in order to login:
- Enter their Client ID
- Following this, an OTP (One Time Password) will be sent to the mobile number and email address corresponding to the Client ID.
- Once the OTP is entered (either directly or through auto-fill from the messages), the user will be asked to set up an MPIN.
- After the MPIN is entered, the login will be successful (once the MPIN is set up, all future logins will be done using that MPIN).
- If the user wants, he/she can also use their biometric data (such as Face ID) for enhanced security.
Note: In order to reduce the hassle of the users while entering the OTP every time they try to login, Angel One has made the OTP valid for 7 days. Therefore, once an OTP is used, the user will not have to enter any OTP while logging in for the next 7 days. 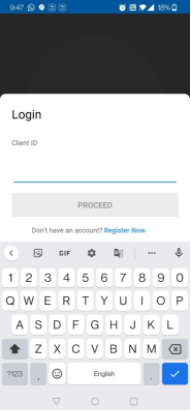
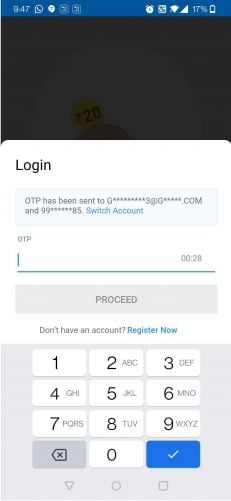
 Figure: Here are the pages for entering Client ID, OTP and setting up PIN (from left to right)Now that you know how to set up your Angel One account, let us check the various advanced features available inside the Angel One Super App!
