Purpose
The Account section strives to show users the details of each and every transaction performed by them in such an organised manner, that it becomes easier for the user to understand exactly what financial situation and cash outflow/inflow position his/her account is currently experiencing. Trade and non-trade charges, profit and loss, statement summaries and various other data are examined so that users can understand the source and destination of every cash flow, taking into account the variation with time and assets involved. SECTION WISE DESCRIPTION
Profile
You can access and edit your profile by clicking on the profile icon showing your initials on the top right corner.
- You can change your profile picture by clicking the camera icon beside the top circle.
- You can change your phone number, email address and location from this section.
- You can also add a bank account if your want to your trading account
- Finally you can subscribe to Derivatives trading (F&O, Currency, Commodity) in addition to Equity Cash trading.
Here you can also see important details such as your Client ID, PAN number and the ID of your DP (Depository Participant). For a more detailed guide on how to modify your profile, click here.
Trading Balance Summary
This section shows the overall balance available from all the transactions made using that account. The details shown include the following -
- Trading balance
- Available cash
- Margins from Pledge Holdings
- Amount Utilised today (i.e. total amount used in transactions today)
- Trading Balance Breakup -
- Amount added today (A)
- Amount utilised (B)
- Trading balance (i.e. A-B)
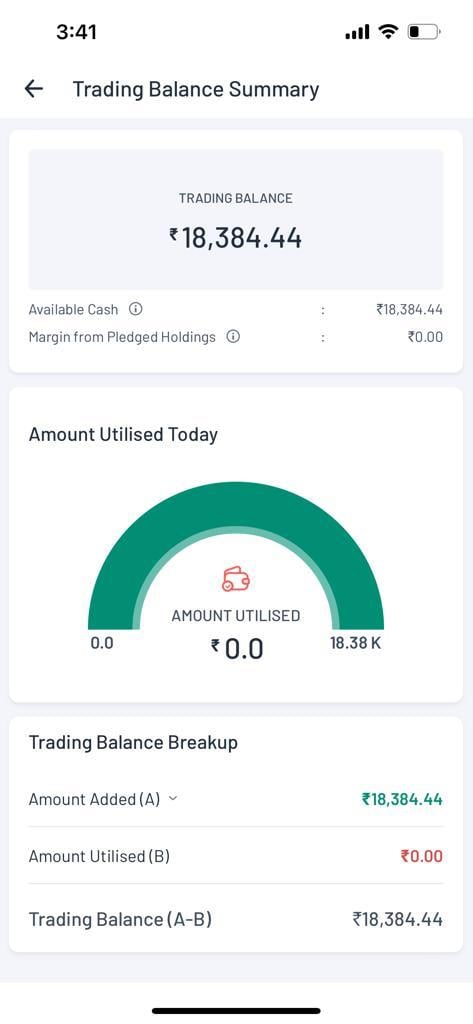 Figure: Trading Balance Summary
Payments Gateways
Angel One offers you two digital payment modes to transfer funds via our app/platform:
- UPI transfer
- Net banking.
The below table gives detailed information about these two payment modes for you to make an informed decision.
| Particulars | UPI Transfer | Net Banking |
| Details Required | Valid UPI ID approved by NPCI | Login credentials |
| Limit Updation in Angel One Account | Instant | Instant |
| Transfer Limit | Up to ₹2 lakh (₹5000 for 1st transaction) | Depends on TPT (Third Party Transfer) limit in your bank account Lower limit of ₹50 |
| Charges | Angel One doesn’t charge any fees to add funds to your account | |
UPI transactions can be conducted through any digital payment apps such as Google Pay, Paytm, BHIM and PhonePe. Note: As per SEBI regulations, the account from which funds can be added must be registered with the depository participant (Angel One in this case). If you are using net banking for your transactions, then you can use bank accounts from a limited number of banks. The list of banks whose accounts may be used for netbanking can be found below - List of Banks through which user can perform Net Banking transactions -
| Sr. No. | Bank Name |
| 1 | Allahabad Bank |
| 2 | Andhra Bank |
| 3 | AU Small Finance Bank |
| 4 | Axis Bank |
| 5 | Bandhan Bank |
| 6 | Bank Of Baroda |
| 7 | Bank of India |
| 8 | Bank of Maharashtra |
| 9 | Canara Bank |
| 10 | Capital Bank |
| 11 | catholic syrian bank |
| 12 | Central Bank of India |
| 13 | City Union Bank |
| 14 | Corporation Bank |
| 15 | DCB |
| 16 | Deutsche Bank |
| 17 | Dhanalaxmi Bank |
| 18 | Equitas Small Finance Bank |
| 19 | Federal Bank |
| 20 | Gujarat State Cooperative Bank |
| 21 | HDFC Bank |
| 22 | HSBC |
| 23 | ICICI Bank |
| 24 | IDBI Bank |
| 25 | IDFC Bank |
| 26 | Indian Bank |
| 27 | Indian Overseas Bank |
| 28 | Indusind Bank |
| 29 | Jammu & Kashmir Bank |
| 30 | Karnataka Bank |
| 31 | Karur Vysya Bank |
| 32 | Kotak Mahindra Bank |
| 33 | Lakshmi Vilas Bank |
| 34 | Punjab National Bank |
| 35 | Saraswat Bank |
| 36 | South Indian Bank |
| 37 | Standard Chartered |
| 38 | State Bank of India |
| 39 | Surat Bank |
| 40 | Sutex Bank |
| 41 | SVC Co-operative Bank |
| 42 | Tamilnad Mercantile Bank |
| 43 | The Ratnakar Bank Limited (RBL) |
| 44 | UCO Bank |
| 45 | Union Bank of India |
| 46 | Utkarsh Bank |
| 47 | Yes Bank |
However, if you are using UPI (including via Google Pay or PhonePe) then you may transact using accounts from any bank (as long as it is registered with your Angel one account). If your device already has the GPay or PhonePe app downloaded, then Angel one will directly show them as payment options to the user. Payment limits For UPI, there is no minimum transaction limit, while the maximum amount that you can pay through UPI is ₹ 2 lakh (this also depends on the bank with which you have the account). For Net banking, the minimum amount that you can transfer in a single transaction is ₹50.
Add funds
In order to add funds to your Angel One account, kindly follow these steps -
- Go to the ‘Account’ section after logging in
- Click the ‘Add funds’ button
- Enter the amount that you want to add
- Choose the bank account that you want to add the funds from - please note that only the bank accounts registered with Angel One (which you select here on the Add Funds page) should be used further as well in the transaction completion
- Choose the mode of transfer - i.e. Net Banking or UPI (if you have the Google Pay or PhonePe app on your device then you can add funds directly through those apps themselves by clicking on the options seen in the figure titled “How to add funds”)
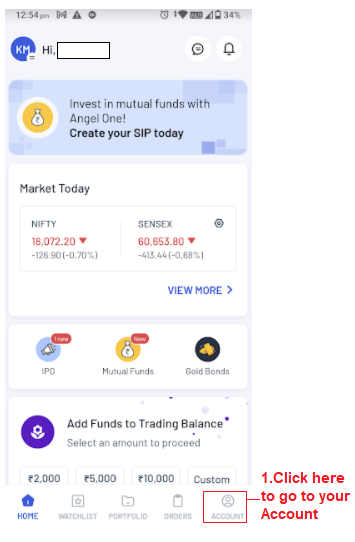
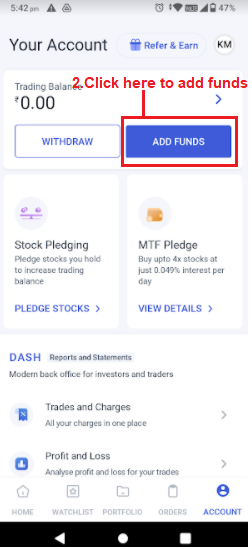 Figure: Reaching the Add Funds page
  Figure : How to add funds Further steps to be taken as per the mode of transaction have been explained in the following section -
Net Banking Transfer Process -
1. After selecting the mode of transfer as Net banking on the Add funds page, the user will be redirected to the page of the bank whose account he has selected on the Add Funds page. 2. On this page, enter the required details e.g. customer ID and password.  3. Once the transaction is completed, the user will be redirected to the Account page with respective status of transaction (i.e. either success, failed or pending).
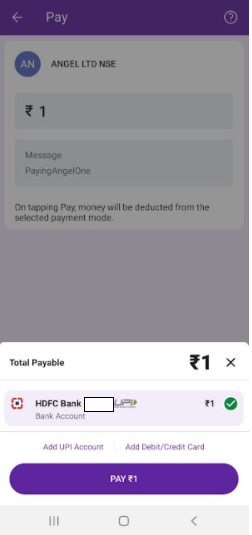
UPI Transfer Process -
1. After selecting the mode of transfer as UPI on the Add Funds page, the user will be asked to enter the UPI ID/ VPA. 2. Enter the UPI ID/ VPA of any UPI application. 3. Click on Proceed. 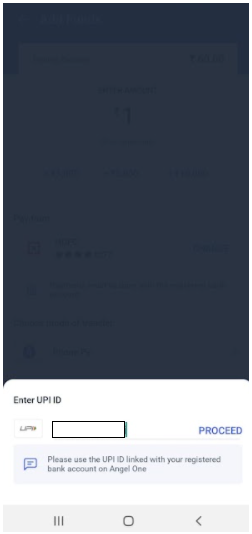 4. Go to the respective UPI application, the UPI ID/VPA of which you had entered. 5. You will find a payment request from Angel One in the UPI application. 6. Click on Approve to complete the transaction.
 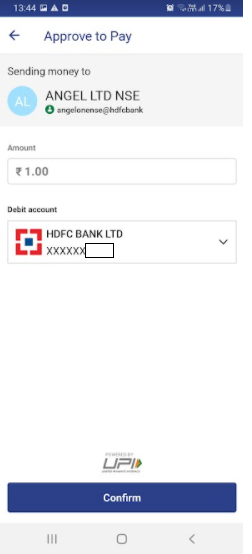 7. Enter the UPI PIN to authorise the transaction. 8. Once the transaction is completed, the user will be redirected to the accounts page with respective status of transaction (i.e. either success, failed or pending).
GPay or PhonePe Transfer Process -
- After selecting the mode of transfer as Gpay/Phonepe on the Add Funds page, the user will be redirected to the respective UPI Application directly.
- In case of multiple accounts registered in Gpay/Phonepe, please select the account which you have registered in Angel One, to complete the transaction correctly.
- Enter the UPI PIN to authorise the transaction.
- Once you complete the transaction, you will be redirected to the Account page where you check the status of transaction (i.e. either success, failed or pending).
 You can check the status of your transaction under the “View Funds Transaction Details'' in the Account section of the app. There are two sections under this - funds added and funds withdrawn, both of which can be tracked separately through this subsection. We will learn more of this from the later section on View Funds Transaction Details. How to check if the transaction is reflected on the funds in your account? Once a transaction is executed, you may check whether the transaction is reflected in your balance. For that, you must go to your Account and check your Trading Balance or click “View Funds Transaction Details”. If you find that the balance is not updated, then try switching to another section (such as Home or Watchlist) and then come back again to Account. The balance should be updated by then.
Withdraw funds
Follow these steps in order to withdraw funds -
- Go to the ‘Account’ section after logging in
- Click the ‘Withdraw’ button
- Check the withdrawable amount.
- Enter the amount that you want to withdraw from the withdrawable balance amount
- Click the bank you want the money to be withdrawn to.
- Click proceed to submit the request
Overall, the remainder of the withdrawal process and checking of withdrawal status is quite similar to the process of adding funds, especially with respect to “View Funds Transaction Details”. 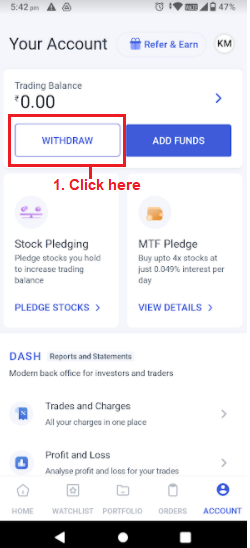
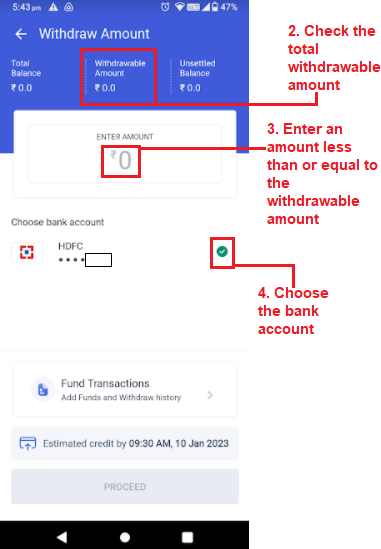 Figure: Funds withdrawal process
Quick questions
What are the different types of balances that you should look at?
- Withdrawable balance - The total available balance in your account that can be withdrawn to your bank account is the withdrawable balance. The withdrawable amount can differ from the total trading balance shown in your trading account.
- Unsettled balance - If a user earns a profit today and tries to withdraw the amount today itself, even though the amount from all the transactions has not been settled yet, then this amount is counted as unsettled balance.
- Total balance - The total balance can be found by adding the withdrawable balance and the unsettled balance - it is the total amount that the user is entitled to at that point of time.
When can funds withdrawal requests be placed?
As per the settlement cycle, you can place funds withdrawal requests on the following days. For delivery sell transactions, funds payout requests can be placed on T+2 day. For F&O transactions, funds payout requests can be placed on T+1 day.
I have received money through a sell transaction but my withdrawable balance still shows zero money. Why is this so?
It takes time for the transaction to be settled. Therefore, until the settlement of the money involved in the sell transaction has happened, the withdrawable balance will not change. Once the settlement has happened you will see the change in your withdrawal balance. Payout cycles In Angel One, funds payout requests are processed three times a day for the convenience of traders. We will process your funds payout request as per the timeline given below:  Note: Payout marking after cut-off time for the day will be processed on the next working day as per the payout cycle. Explanation For example - You have ₹1000 in your withdrawable balance on Monday.
- • You place a withdrawal request of ₹500 on Monday 11 am. Your request will be processed at 5:30 pm and you will receive credit by 9:30 pm.
- • You place a withdrawal request on Monday 6 pm. Your request will be processed at 7:00 am on Tuesday and you will receive credit by 9:30 am on Tuesday.
Until the payout cycle starts, you can still trade assets using the entire available balance, even if you have placed a withdrawal request. For example you have ₹1000 in your account and have placed a withdrawal request for the entire amount. But the amount has not been withdrawn yet, while the stock market has already opened. At this point, say you buy a stock worth ₹200 - so ₹200 is used up while ₹800 remains. Therefore, when the withdrawal happens, only ₹800 will be withdrawn. The remaining ₹200 withdrawal will be executed once the account again has ₹200 or more. Other reasons for partial withdrawals Partial withdrawals can also occur because of any of the following reasons:
- Margin requirements
- Initiated new trade
- Accrual charges
For example: Assume you have Rs. 1000 as a withdrawable balance at the beginning of the day i.e. 9:00 am. And you have placed a funds payout request of Rs. 1000. After placing the request, you entered into an intraday trade and suffered a loss of Rs. 100 (including Brokerage, Taxes, and other statutory charges), leaving your clear ledger balance to be Rs. 900. Hence, when your withdrawal request is processed, you will receive Rs. 900 in your account and not Rs. 1000. In this case, the loss of Rs. 100 due to the intraday transaction modified the amount you received. Similarly, if there is any change in the margin requirements or any accrual charges that need payment, you will receive only a partial amount.
Why is my withdrawable balance zero or not matching my trading account balance?
It may happen because you have unsettled balances in your account. This can happen because of the following reasons:
- • In case of delivery sell transactions,
- • You can use only 80% of the amount to trade on T day (i.e. the day the transaction was executed), and you can withdraw the same on T+2 day.
- • You can use the remaining 20% for trading or withdraw it only on T+2 day.
- • For example - You have a ₹1000 delivery sell transaction on Monday. You can withdraw these on Wednesday. So on Monday and Tuesday, you will see withdrawable balance as zero and unsettled balance as ₹1000.
- • Funds received from exiting F&O position can be withdrawn on the next working day
- • For example, suppose you have a ₹1000 F&O sell transaction on Monday. You can withdraw these on Tuesday. So on Monday, you will see withdrawable balance as zero and unsettled balance as ₹1000.
- • Funds that you have added during the day can be withdrawn on the following day
- • For example, suppose you have added ₹1000 on Monday, still you will be able to see withdrawable balance as Zero on Monday. Say, you add ₹500 on next day i.e. Tuesday. Your withdrawable balance will be ₹1000 (which you had added earlier day. The ₹500 of today will not be visible in withdrawable balance).
I have added funds in my account but I am not able to withdraw them today itself?
Funds added cannot be withdrawn on the same day itself. They can be withdrawn only on the next day (t+1) onwards. For example, if you have added ₹10,000 on Nov 22, 2022, then you can withdraw it only on Nov 23, 2022.
Why is my funds payout request rejected?
Your withdrawal request can get rejected for the following reasons:
- You have entered a new trade
- Margin requirement has changed
- Inadequate balance in your account
Can I withdraw funds to a secondary bank account that I have?
While withdrawing, Angel One gives you the option to select a bank account in which you want to receive the funds. The amount will get credited to the bank account you have chosen.
Can I cancel my withdrawal request?
Yes, if the payout cycle has not started yet, you can cancel your withdrawal request. For example, if you have made a withdrawal request at 6:30 am on a monday morning you can easily cancel the withdrawal request at 6:50 am, because the payout cycle does not start until 7:00 am on Mondays. You can check from the above table when the payout cycles of Angel One are effective. For non-traded users, the processing of the request for funds withdrawal starts within a few minutes of the placement of the request. However, you can still cancel the request if you can send your request for cancellation within that time window.
How to update your bank account details?
IFSC codes and account numbers have been changed for several banks due to the recent mergers. For example, Oriental Bank of Commerce & United Bank of India merged with the Punjab National Bank and more. So, if your bank has recently merged or amalgamated then please make sure that your account number and IFSC code is updated on our app. As the old IFSC code will not be valid for any of the online transactions. For some of the users account numbers might have been changed too. So, to continue enjoying hassle-free pay-ins/payouts with Angel One, you need to ensure that your bank details like IFSC code, account number, etc. are correct. You can do so online by visiting the profile section of our app. Check the below table to know if your bank is in the list of merged banks. 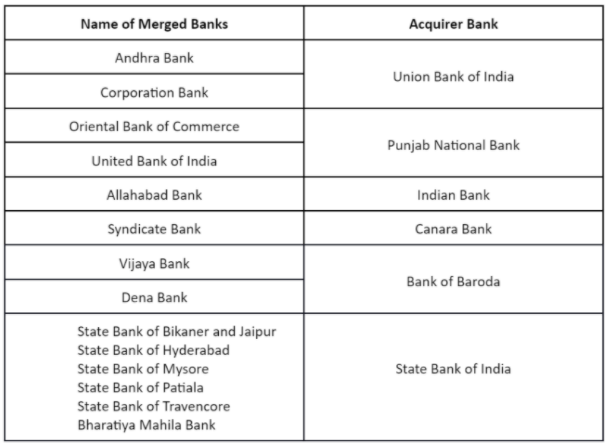
View Funds Transaction Details
Under this section you can view two sections - funds added and funds withdrawn.
Funds Added
Under this section you can check all the fund additions made by you along with the following information -
- Date and time of the transaction
- The bank a/c from which the transaction was made
- The amount involved
- The status of the transaction - e.g. Pending
If you are concerned about transactions related to a particular bank or even a particular amount, then you can directly search for the transaction by entering the bank name or the amount in the search bar.
Funds Withdrawn
To the right of Funds Added, you will find the section of Funds Withdrawn. It will show the exact same details, just for the list of funds withdrawn.  Figure: Process of checking funds withdrawal status - funds withdrawn section from view funds transaction details (left) and individual transaction details (right).
Statement Summary
You can also view a Statement Summary of all your transactions done in a particular time period - it is basically a ledger. In this section you will find the opening and closing balances in that period as well as the credit and debit amounts. You can change the period for which you are viewing the summary by clicking the dates mentioned above - from there you can choose any of the standard periods i.e. last 7, 15 or 30 days or 3 or 6 months or even the year till date or the financial year. You can also choose a custom period by clicking “custom” and choosing the dates ( from *date* to *date*) for the period you want to view. If you want, you can also download the statement summary by clicking on the download icon on the top right corner.
Stock Pledging
In intraday and F&O trades, the buyer does not always have to pay the entire amount - he/she can pay a fraction (or margin) of the asset price to the seller and the rest can be paid off by the stockbroker (in this case, Angel One). Angel One pays off the remaining portion of the transaction value in the form of a loan given out to the buyer. Now in order to avail this loan facility, the buyers would have to pledge delivery stocks in their possession. The process of adding stocks to be pledged is the following - 1. Go to Account and click on “Pledge stocks” 2. Check the “Margin Pledge” - if it is too low, click increase 3. The list of stocks that can be pledged appears 4. You may increase the quantity of stocks pledged 5. Once you have adequate margin allocated, click “Increase Margin” 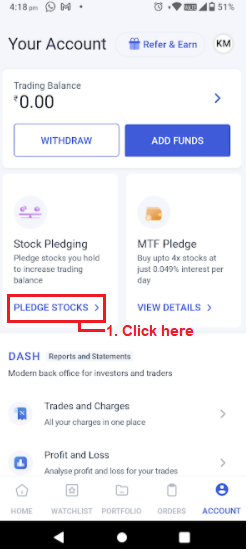
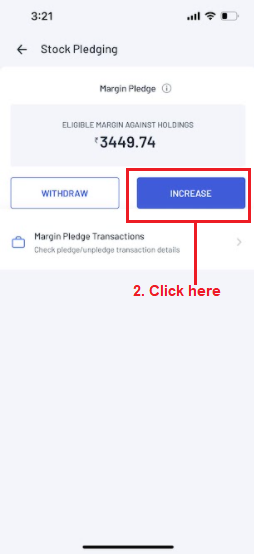
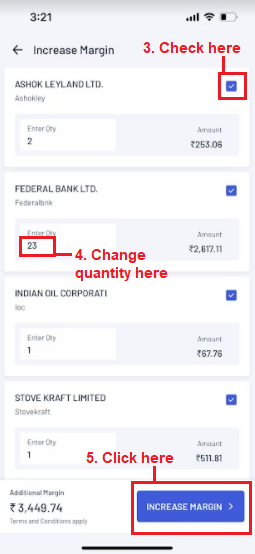 Figure: The process of adding stocks pledged - Part 1 6. Thereafter you will receive a request for OTP verification 7. Once the OTP is verified, you will reach the CDSL page where you will be able to verify the Margin Pledge transaction. Once the process is completed, it takes roughly 15-20 minutes for the increase in margin to be reflected in the trading balance summary. The process of withdrawing stocks pledged is also the same.
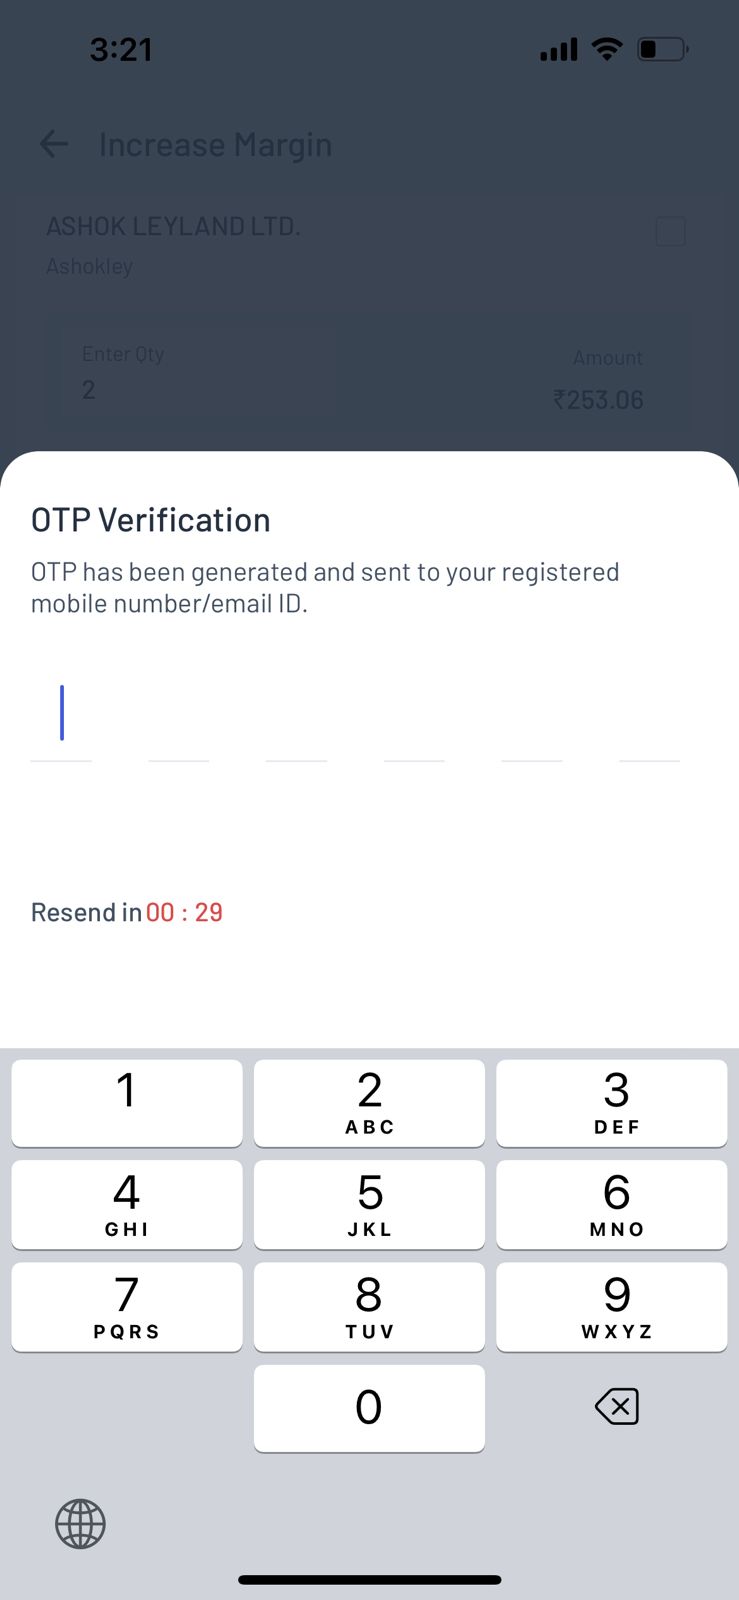
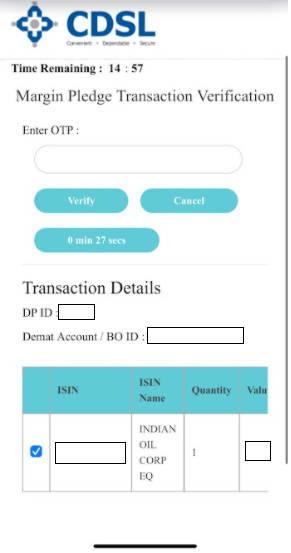 Figure: The process of adding stocks pledged - Part 2
MTF
MTF or Margin trading facility allows users to trade in assets without paying the full amount that the asset is worth in the market - the user has to pay only a fraction of the amount while the rest is paid by the broker (in this case, Angel One). In order to avail this service, the user must pledge some assets (e.g. stocks). The process is as follows -
- You will receive a request from the CDSL to pledge assets for the Margin Trading Facility provided by your broker.
- Once the request is placed, a link will be sent to the registered email/sms at 5:30 pm on the same day.
- Open the link and authenticate it by entering PAN and OTP before 9:00 pm on the same day.
- On successful validation, the pledge will be created and an intimation will be sent.
Dash
The Angel One Dash is the most open, easy-to-use trading transactions management tool available to Indian traders today. It is made of the following 3 components -
- Trades and Charges
- Profit and Loss
- Statement
Trades and Charges
In the fintech industry, trust is the biggest asset. Hence, a transparent system that reveals all profits and charges clearly and efficiently is the bedrock of a successful investment journey. With this in mind, we have made the Trades and Charges section as detailed and transparent as possible. Search You can search for a particular asset to see the charges specifically associated with it. Moreover, with the sort and filter option (3 rods/hamburger button to the right of the search bar), you can check how much charges you are paying for a particular group of assets. Sorts and filters include -
- Sort alphabetically
- Filter by segment - e.g. Equity-Cash, F&O, Commodity and Currency
- Filter by product - i.e. intraday or delivery/carry forward
With this feature you can pinpoint the charges paid for a single trade or a single asset on a single day (including separate trade charges and total charges). Total charges In this dark box, you can see the total charges made on your account along with specifically the trade charges and non-trade charges. If you click on this dark box to know further details, you will see -
- The percentage of charges that are trade and non-trade charges
- The exact and specific categories of charges made overall - e.g. brokerage, exchange turnover charges (ETC), taxes (STT, GST, SEBI taxes), Stamp duties etc.
You can further probe into the reason why those charges were made by clicking on the “Charges Explained” button below. You can also specifically check what were the charges made on your account by Angel One specifically (the rest being ‘External charges’) by turning on the switch icon for the same. 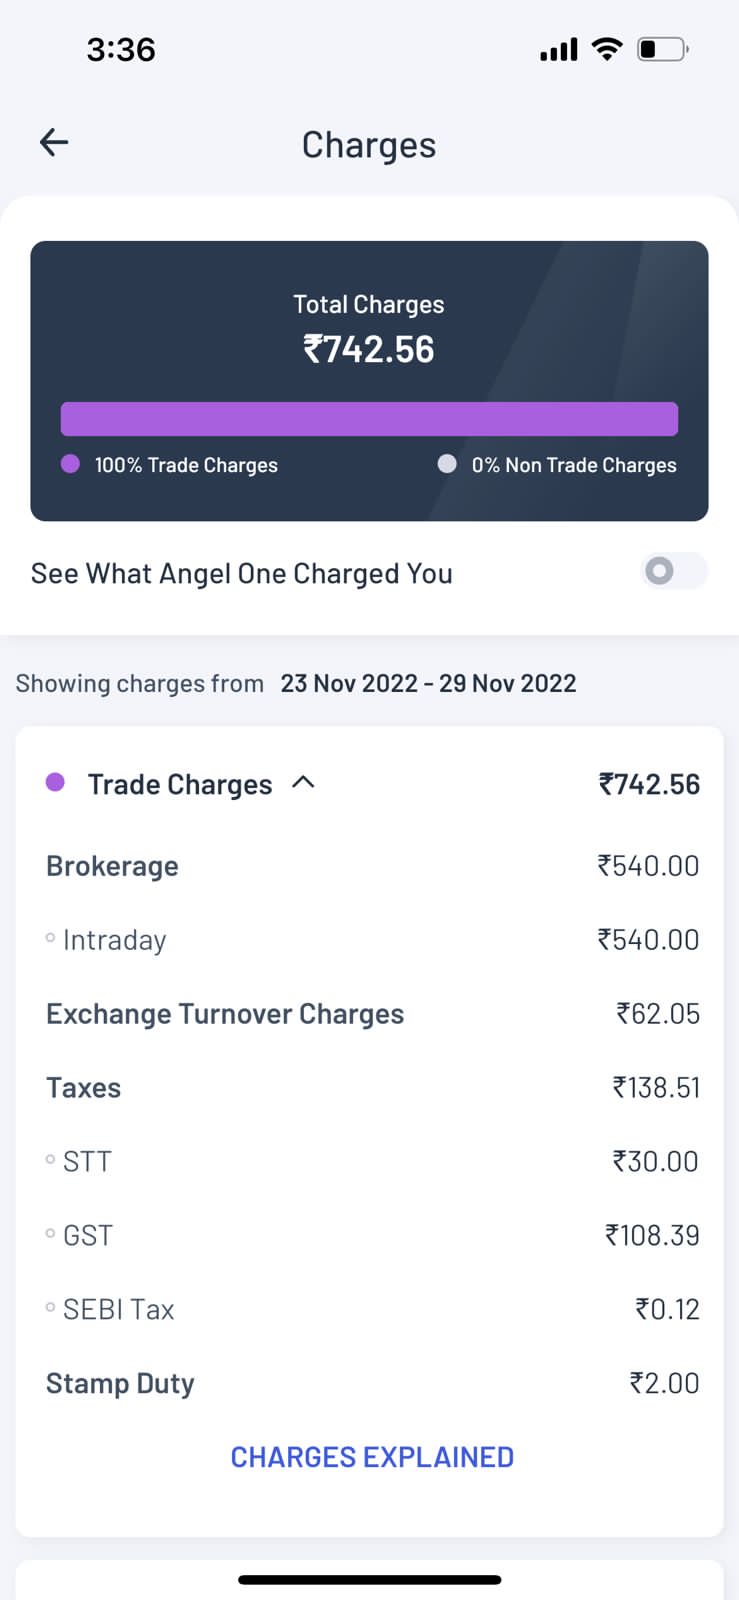
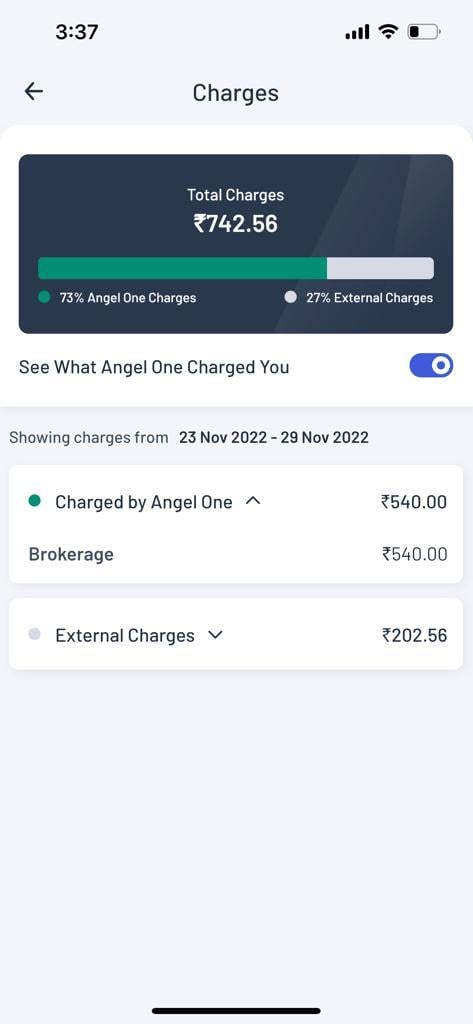 Figure: Trade charges vs Non-trade charges (left), Angel One charges vs External charges (right) List of trades In this subsection you can see a list of all the trades that you have made in the chosen time period along with their basic details -
- Name of the asset e.g. BankNifty Dec 1 2022 43,100 CE
- Quantity of the asset in the transaction - in number of units
- Type of transaction e.g. Sell, Intraday
- Price (e.g. Sell Price in case of sell transaction)
- Charges
You can also click on each of the trades and check the trade details which will include (apart from the above details) the following -
- Trade Value (i.e. Quantity Price)
- Charges - Brokerage, ETC, STT, GST, SEBI tax.
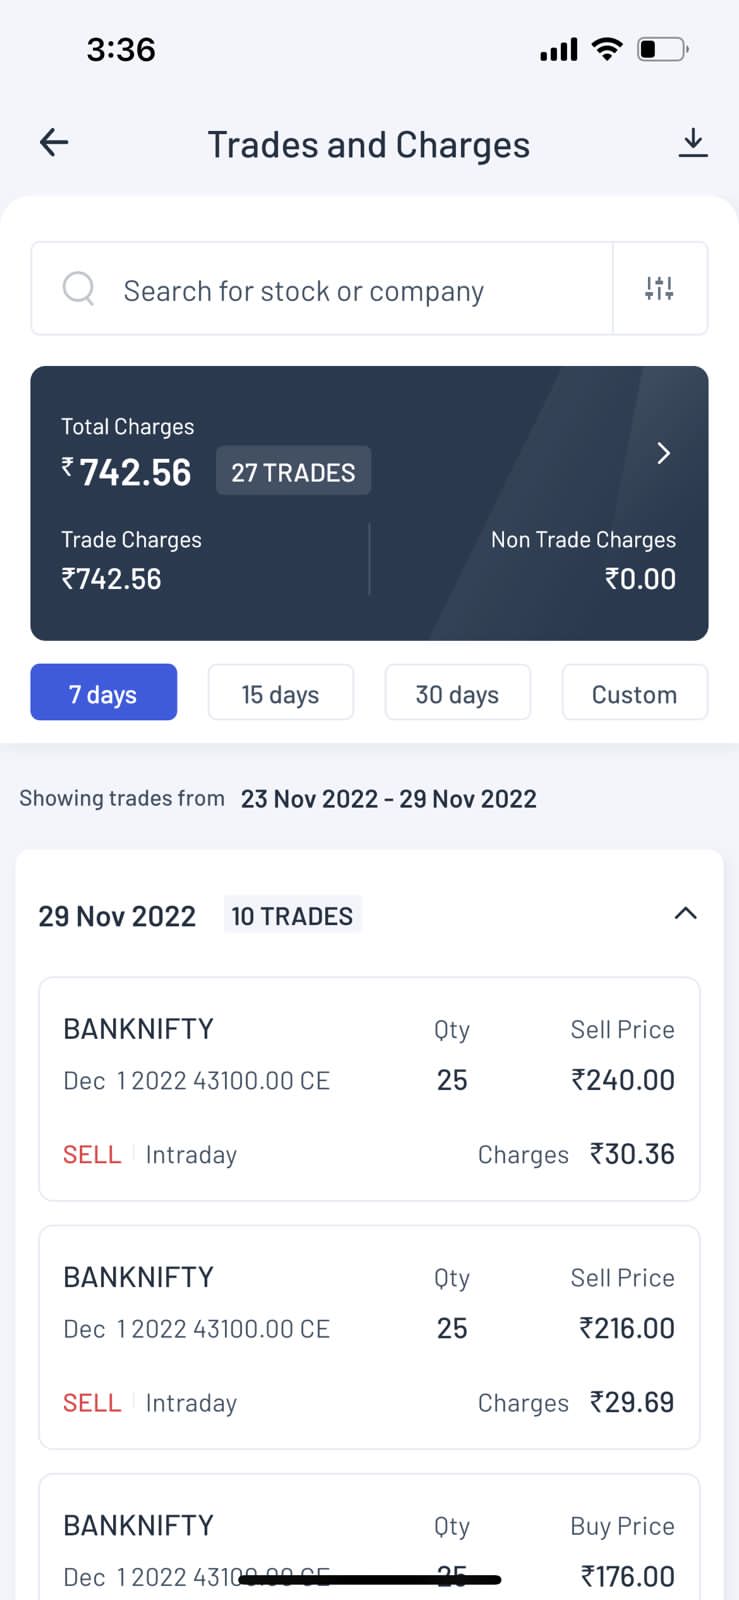
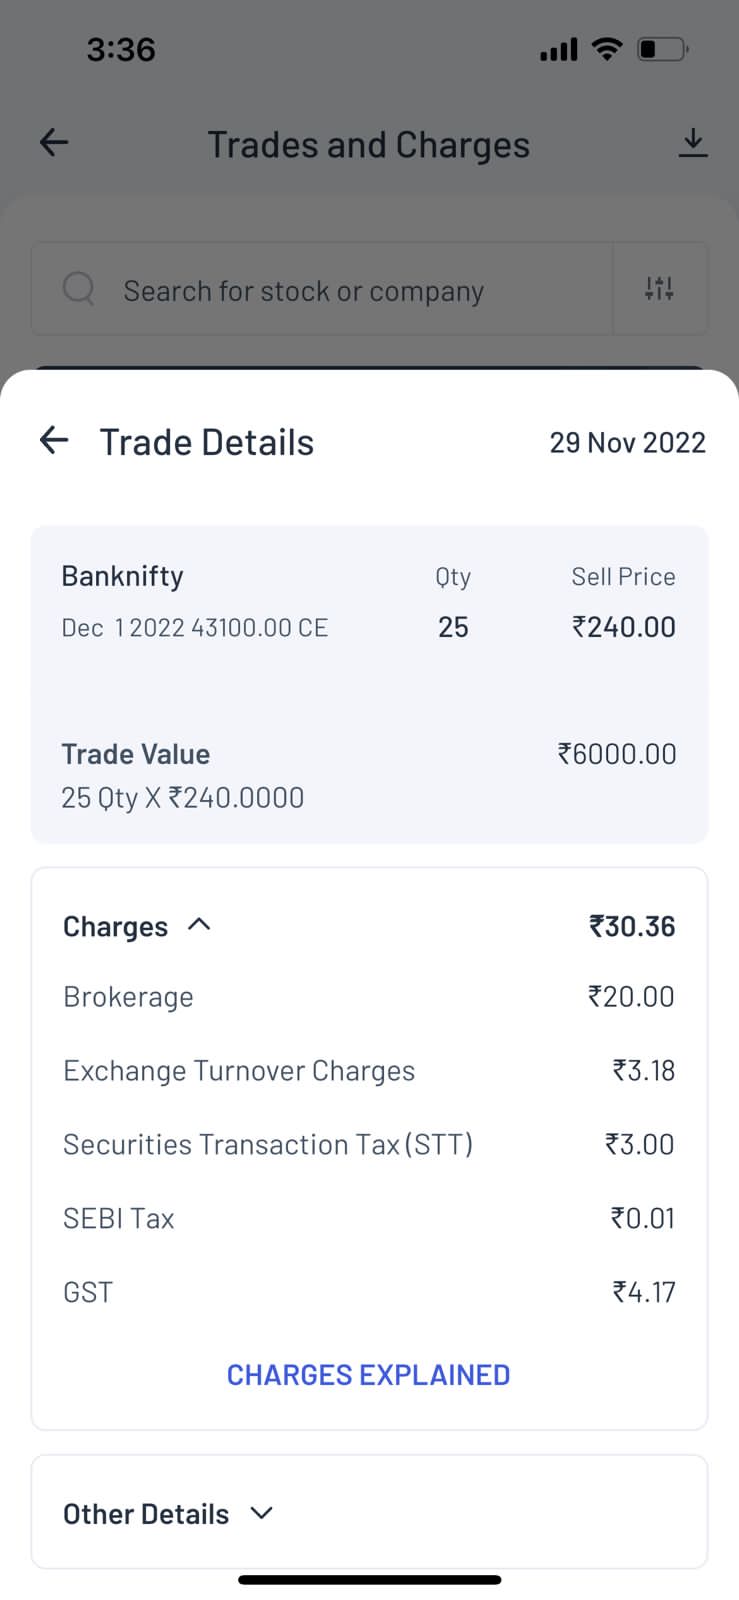 Figure : List of trades and their charges (left) and break up of charges for an individual trade (right) You can get a full list of possible charges on your trades on this page.
Profit & Loss
The first thing that you will notice when you open the Profit and Loss (P&L) section are circular gauge indicators that show you the level of profit or loss made on the respective date. Each level of red or green circle represents a particular level of profit or loss (green meaning profit and red meaning loss) - the exact corresponding meaning can be found by clicking on the “Know more” button right below. Using this, you can have a fair idea which periods (say months or weeks) you have had the most losses - you can easily adjust the timeframe that you want to work with by adjusting the “Date Range” on top. The date range can be the previous 7 days, 15 days, 30 days, the period since the beginning of the financial year, a previous financial year or any other custom period. Once you choose a date range, you will then see the P&L for that period along with the -
- Realised P&L - The total P&L that your trades in the market made
- Charges - The charges that you had to pay to brokers, SEBI etc.
- Net Realised P&L - It is equal to the Realised P&L minus the charges paid i.e. the actual cash that the trader is entitled to receive from the entire trading process
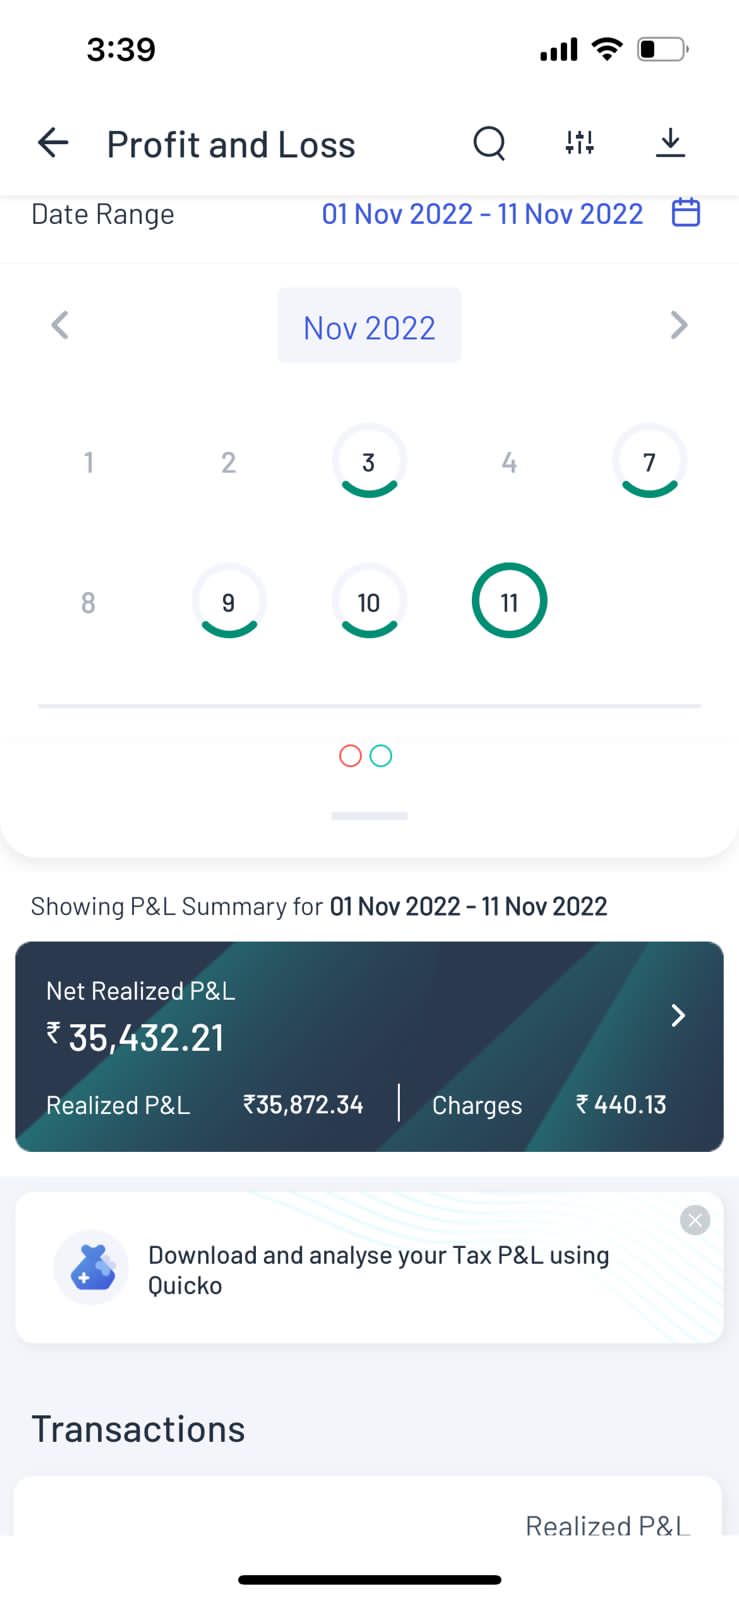
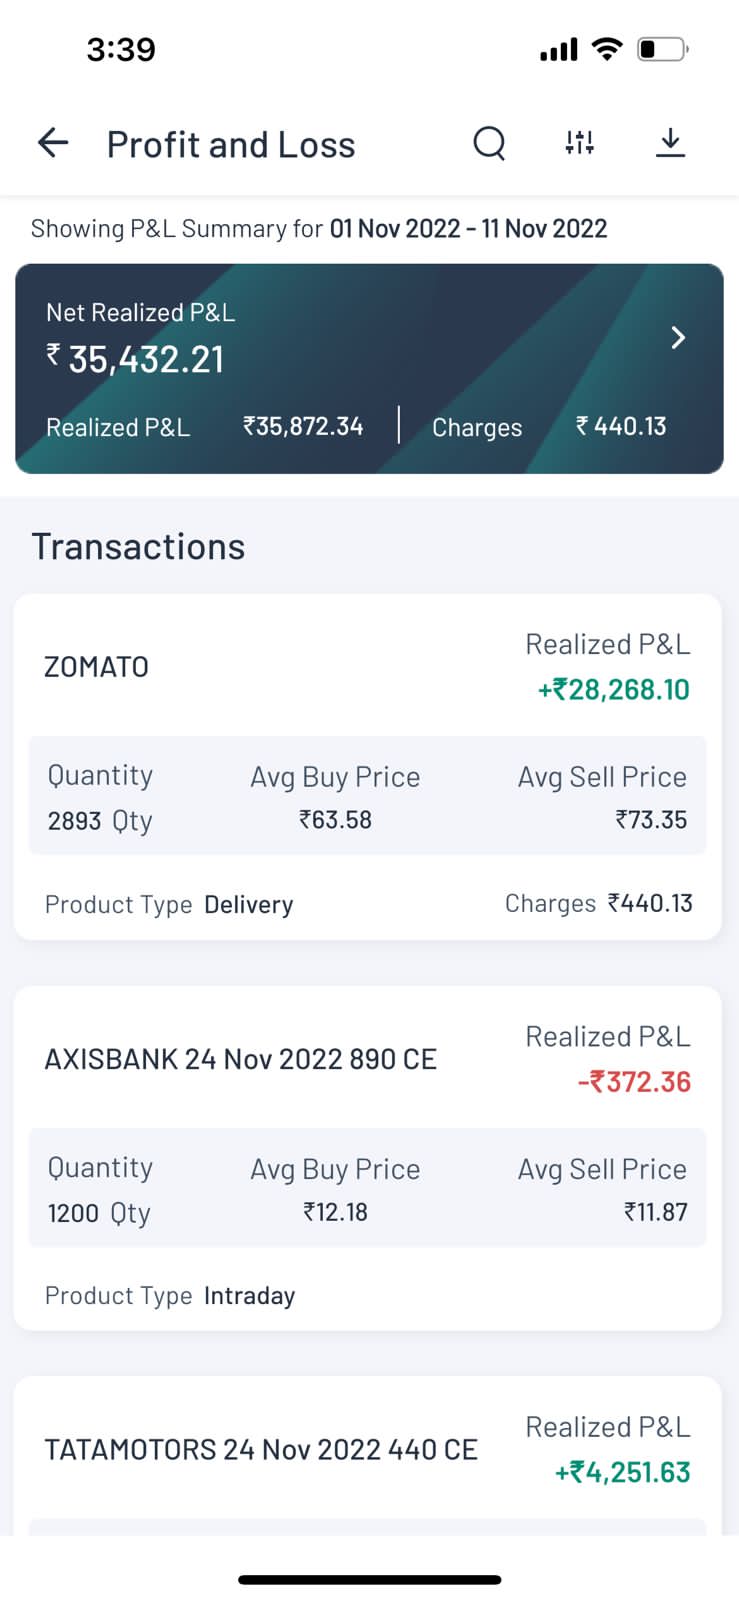 Figure: P&L as per dates (left) and list of P&L for each trade (right) Clicking on the dark box to view further analysis of your profit and loss such as your most profitable and most loss-making assets, top traded scrips etc. You can see the profits or losses made by each individual asset along with the following details -
- Name of the asset
- Realised P&L
- Product type e.g. delivery or intraday
- Quantity traded
- Average buy price
- Average sell price
- Charges
Clicking an individual asset will show you the above details along with a section of “Trade Overview” which includes the details of daily transactions made for that asset such as quantity traded and daily profit or loss made. You can click the filter button (3 vertical rods/hamburger menu) in order to filter the list of scrips based on segment and product types.  Figure: P&L for an individual stock You can also download a detailed Tax P&L Statement, alongside the regular P&L statement in the Account section. To do so, simply:
- Click on ‘Profit and Loss’ in the Account page.
- Click the download icon on the top right.
- Choose the option to ‘Download Tax P&L Statement’.
Statement
This section gives an overview of the total financial information of your account for the chosen time frame. The time period that you can view spans from days, months, years to 3 financial years or a custom date. The data can be viewed in chart form over the course of time, making it more granular or aggregated as per your preference. The Trade Overview shows the different classes of assets traded along with -
- Their quantities
- Their settlement values
- The charges paid.
- The Net Settlement Value
The trades executed have been simplified where we provide subtitles (journalising statement). You have the option to download the contract note that helps the user to have an in-depth analysis. The transaction entries are categorised to cite quarterly payouts, showcase fund credits, trades, pledges, charges etc. You can also select a particular trade and get a condensed version of the contract note citing overview of no of traders, segment type, transaction charges, NSV etc.
Help & Support
This section gives the links to -
- Contact Us/
The Angel One User Manual is your complete guide to navigating our trading and investment platform with ease. Whether you are opening your first Demat account, placing an equity order, setting up an SIP, or applying for an IPO, our step-by-step guides help you understand every feature in detail. From login and dashboard navigation to advanced order types and reports, the user manual ensures you get the most out of Angel One. Designed for both beginners and experienced traders, it brings clarity to every action you take on our platform.
